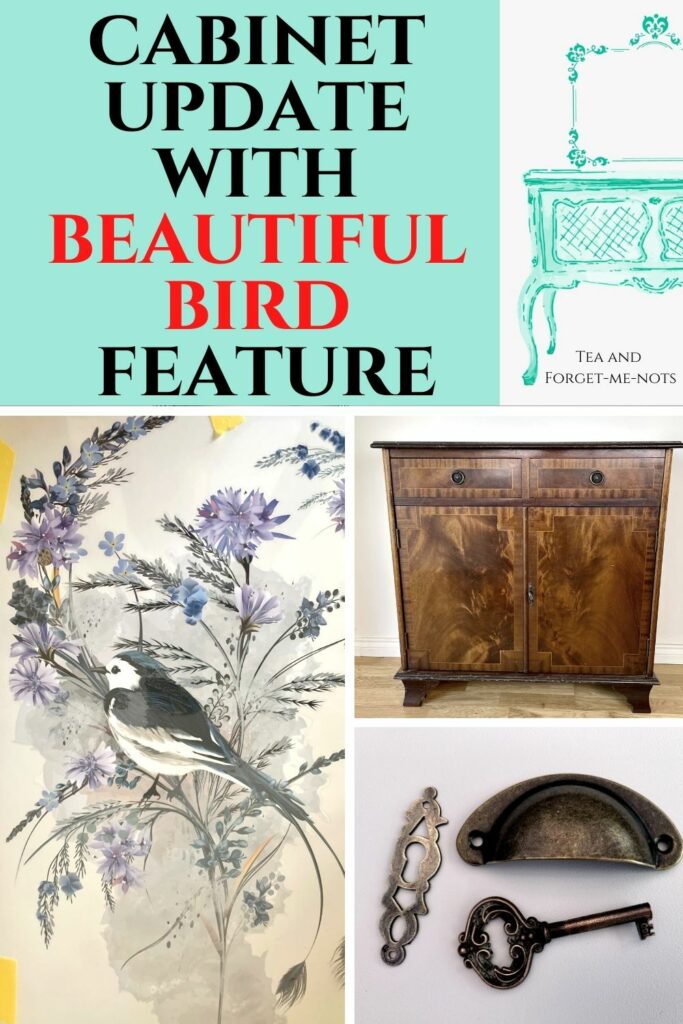
How to update old furniture using a beautiful bird feature
Don’t ignore old furniture because it’s brown and boring. This is a guide on how you can update old furniture using a beautiful bird feature.
Reduce, reuse, recycle.
I want to start by acknowledging that not all old wood furniture needs painting. Plenty of people are in the ‘it’s terrible to paint that beautiful piece’ camp. Yes, sometimes.
But if that old furniture is no longer beautiful and most importantly if no one wants it, then giving it a new lease of life is important. It’s about making our furniture relevant to now and something someone would want in their home.
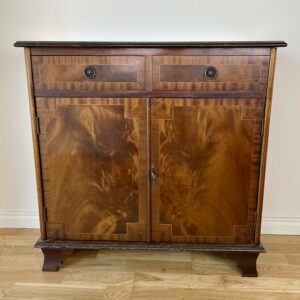
Would I like this cabinet in my house in its original state? No. Would I keep the updated version? Absolutely.
I bought this cabinet from a charity shop for £10, reduced from £35. It has dovetail joints and a few dings to show its history.
Interested in how to find furniture for free? Check out these tips.
How to update old furniture using a beautiful bird feature
The prep
I started by washing the piece down with sugar soap and then doing a rough hand sand over everything. It’s good to wash it first before sanding as you take away the oil and grime rather than pushing them further into the wood with sanding.
As I wanted to paint the piece white, I primed it first to help block the dark wood and tannins from coming back through later on. I used my favourite primer, BIN Zinsser.
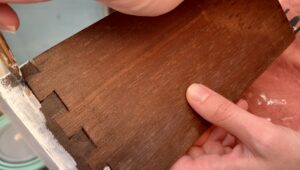
Additionally, I primed the dovetail joints also to make them more of a feature. I like the contrast with the original dark wood so didn’t paint the sides or the insides of the drawers.
The floral makeover on this chest of drawers also had dovetail joints but I painted the whole drawer in that case.
This post may include affiliate links so you can easily find the products I love and use myself. If you purchase these products, I may earn a small commission at no extra cost to you.
Update old furniture with white paint
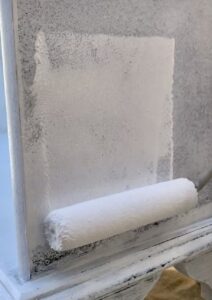
After a coat of primer, I started with my first coat of Fusion Mineral Paint’s, Picket Fence. I love Fusion and use it regularly but had heard that Picket Fence requires lots of coats for good coverage. But even so, it was a boring process going over and over the cabinet with more coats.
I just about eked out the final piece by using one 500ml/17oz pot. I didn’t want to have to buy more unless I had to because I knew I wouldn’t want to do a whole piece in it again.
Then, I bought some new Staalmeester rollers from my local paint shop as they are regularly raved about. They were absolutely beautiful to use. A little less so after washing but still very nice quality.
White and black are both tricky colours to finish well. Here’s how I got a black cabinet looking beautiful with different products.
Chips – not the good kind
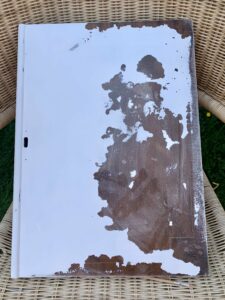
Probably due to the heat in the room I was painting it in, the paint kept getting chipped. Filling and painting over the small chips wouldn’t give the smooth finish I was aiming for. So I decided to sand the whole side off and start again.
Something about the primer or paint reacted with my sander though and it clumped on the sandpaper and didn’t do a good job of removing it. So I used Autentico’s Bio-Strip which you brush on over the surface, let sit for 20 minutes and then scrub or scrape off.
Not 100% perfect but a lot better than filling in little chips in the paint. Fortunately, this was the door I was putting my bird transfer on so it had something to cover it anyway.
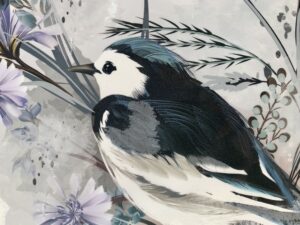
Adding a transfer
This beautiful transfer is called Oiseau Blue from Hokus Pokus. I’ve used Hokus Pokus before on this chest of drawers and really like how easy they are to apply.
I used Frog tape which doesn’t peel off the paint to keep the transfer in place while I used the provided stick to rub the transfer onto the door. If you peel up the plastic you can see where it hasn’t applied enough and you can go over it again until it’s done.
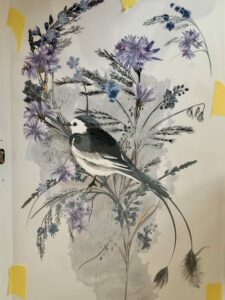
The colour gets lighter when it has applied to the surface as you can see with the bird’s wing.
Want to know 23 great DIY tools? Get the list!
The challenges
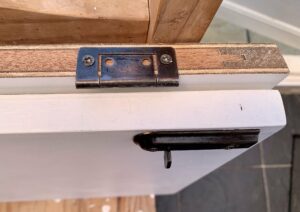
Whilst there were some struggles with this piece, the biggest one was at the end. As I had painted all the sides of the doors for a crisp look, the doors were now slightly too big and caught on each other.
After sanding various parts of the doors and where they attach to the cabinet, they still didn’t fit perfectly. The last thing I want is to sell a piece and for the paint to chip off at a later date.
My solution was to completely sand the edges of the doors and turn them into a feature. This way there’s no risk to the finish and the doors close smoothly. This look may appeal to fewer people but that was the sacrifice for a piece I’m comfortable selling and knowing the quality of the finish.
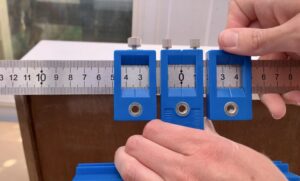
This was my first time using this handy hardware hole drilling tool.
It allows you to measure the size of your drawer and work out the middle point and where your holes will go. Then you drill straight through with the guide for accurate holes.
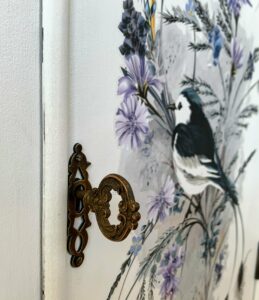
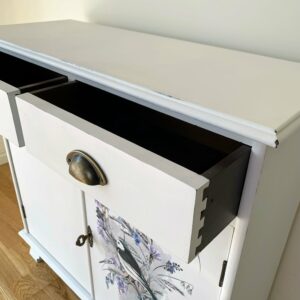
I changed the original handles to cup pulls and the colour really complements the existing keyhole.
To finish off, I lightly distressed the edges of the drawers and carcass to bring back some of the dark wood as a contrast.
The finished piece
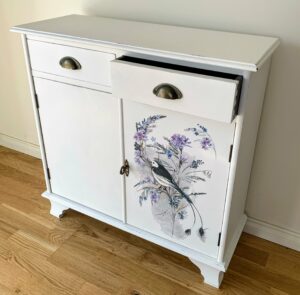
And here it is, the finished piece. Between the lighter colour, bird transfer and new handles, I think it’s a world apart from the original piece.

A close up of the key and transfer. Aren’t they pretty together?
The painted dovetail joints really pop against the dark wood.
What do you think? Are you in the paint or don’t paint camp to update old furniture? Let me know in the comments!
If you liked this post, you might also enjoy these other projects using transfers…
Pin it for later – update old furniture

Hi there! I'm Rachel Bowyer, a passionate DIY enthusiast with a knack for transforming the old into something beautifully new. With a deep love for furniture painting, refinishing, and the art of crafting. I've been documenting my DIY projects and restoration journey since 2018. I specialise in techniques like decoupage, stencilling, and decor transfers. Join me as we explore the world of creativity and home improvement, one project at a time.
Absolutely beautiful. Would definitely have this in my home. Thank you for sharing.PS: love your YouTube channel, which is how I found your blog and I pin and share as much as possible.
Thanks Barb, that’s so kind.