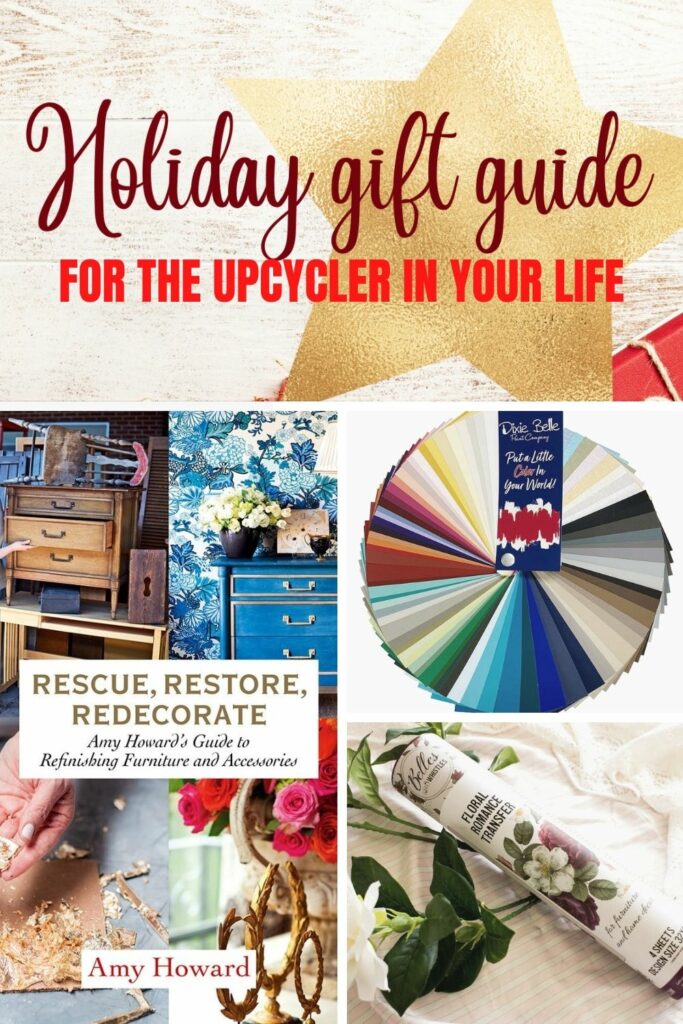
5 Easy DIY Handmade Earrings Ideas To Make For Gifts
Looking for handmade earrings ideas to give as gifts for Mother’s Day or a birthday? Here are 5 easy and beautiful earrings projects to try.
The best gifts are handmade. Made with love so someone knows that you thought of them. So, I’ve created 5 unique handmade earrings designs.
Most of these designs are for wooden earrings. Wood pieces have a beautiful, natural look and exude a down-to-earth vibe.
This post includes gifted products and affiliate links so you can easily find the products I use myself and recommend to friends. If you purchase these products, I may earn a small commission at no extra cost to you.
5 Of The Best Handmade Earrings Ideas
Each of these 5 designs uses a different technique. So, here you’ll learn how to do each method so you’ll be able to recreate it for yourself.
A great place to start is with decoupage.
The great thing about decoupage is that it’s so versatile. You can use napkins, wrapping paper, posters, or whatever you have.
Paper that will be meaningful to the person you gift these to. Or for yourself, of course.
Design 1 – Decoupage Earrings
I started with unfinished trapezia (or trapezoid) wooden pieces.
The first thing I did was create holes for the earring hook to attach to the jewellery. I used my smallest drill bit to make a small hole at the top of the wood.
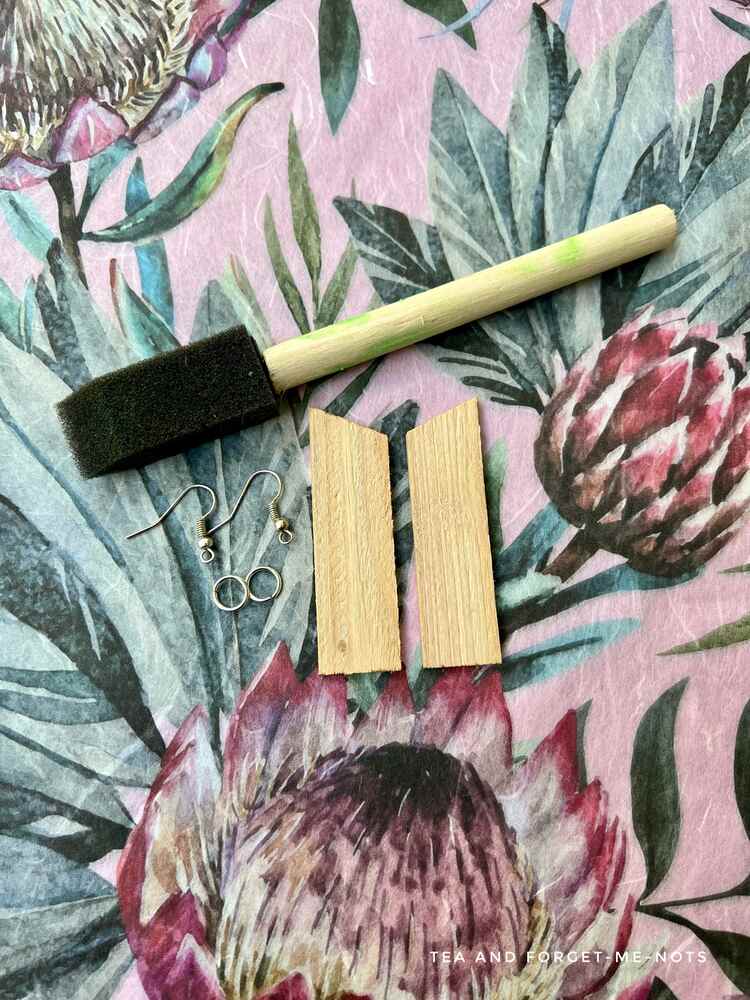
I sanded the wood shapes smooth for the paper to apply evenly. Using 180 grit sandpaper.
With decoupage, you have the choice to paint underneath the paper or not.
Painting white under the decoupage paper will create a more vibrant look. Leaving the natural wood reduces the vibrancy of the paper but gives a more subtle look.
I chose the decoupage paper, Tropical on Pink for this kind of earring. It’s a pale pink with protea flowers on them.
Here’s how to decoupage!
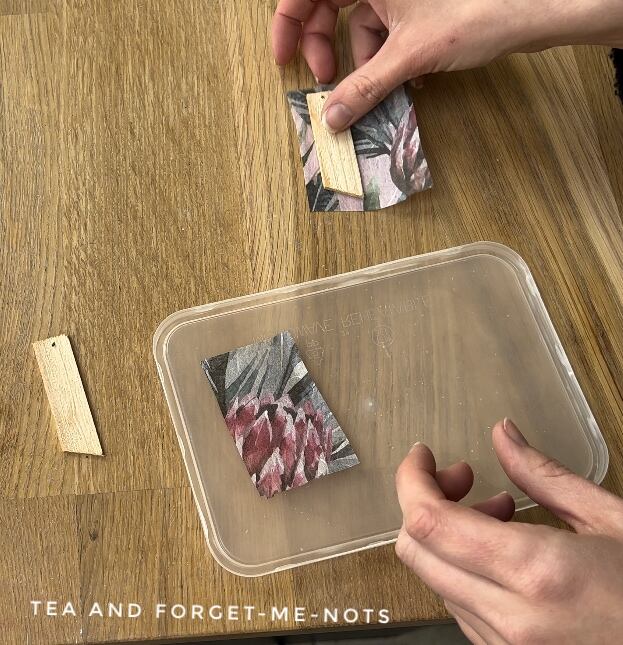
I cut out two areas of the image with a nice variety of colours on them. Firstly cutting out the front and then the back to apply them separately.
How to Apply Decoupage Paper
PVA glue or mod podge is a great option to apply decoupage paper. It’s affordable and a great tool to have in any craft kit.
For the best results, you want to apply an even coat of glue. Any build-up in one area will create wrinkles on the paper. You can smooth out the paper easily with cling film without tearing it.
The more delicate the paper you have, such as napkins or tissue paper, the more careful you need to be.
I applied the first side and let it dry. As I had the small hole already in place, I poked the hole through the decoupage paper to hang it carefully while drying. Then repeated with the second side.
Once it was dry, it needed sealing. I sprayed two coats of Rust-Oleum Crystal Clear which is a protective lacquer spray paint. This is both UV-resistant and protects from water.
Water-resistant earrings are necessary to protect from everyday wear.
To finish, I attached the dangly earrings with jump rings to the earring hooks.
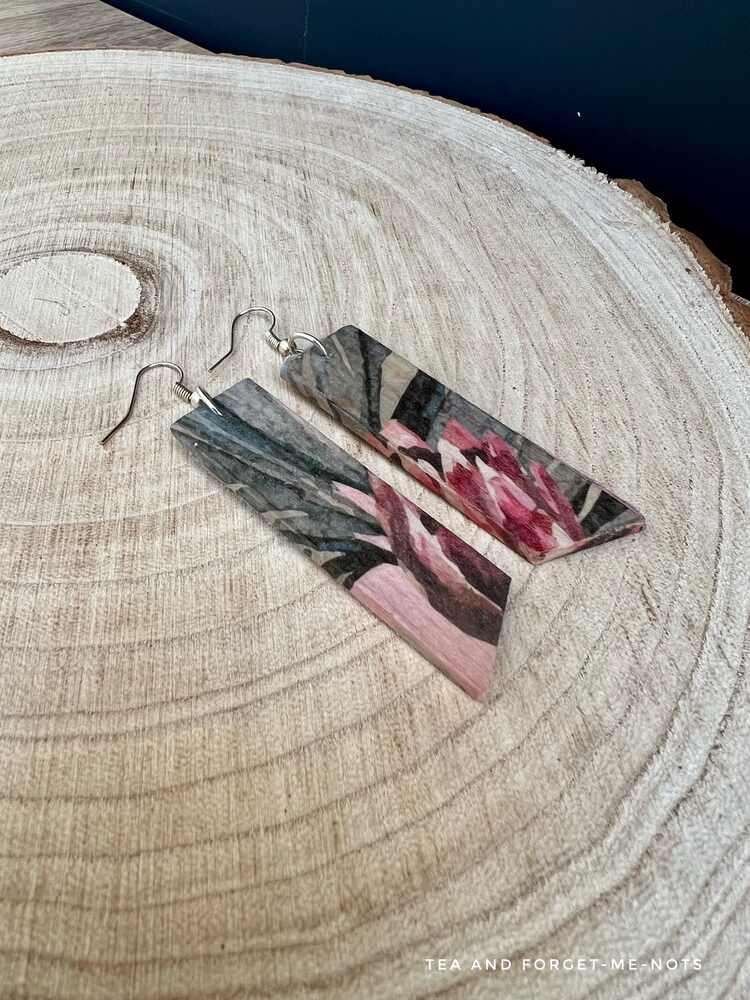
The bold print and pretty colours of this design are both cute and quirky.
The best things about unique earrings are that they can be tailored to your own personal style, so make great gifts. Decoupage is one of the easiest ways to create one-of-a-kind pieces for someone you love.
Handmade Earrings with Decor Stamp
For the second DIY project, I used an Iron Orchid Designs Decor stamp.
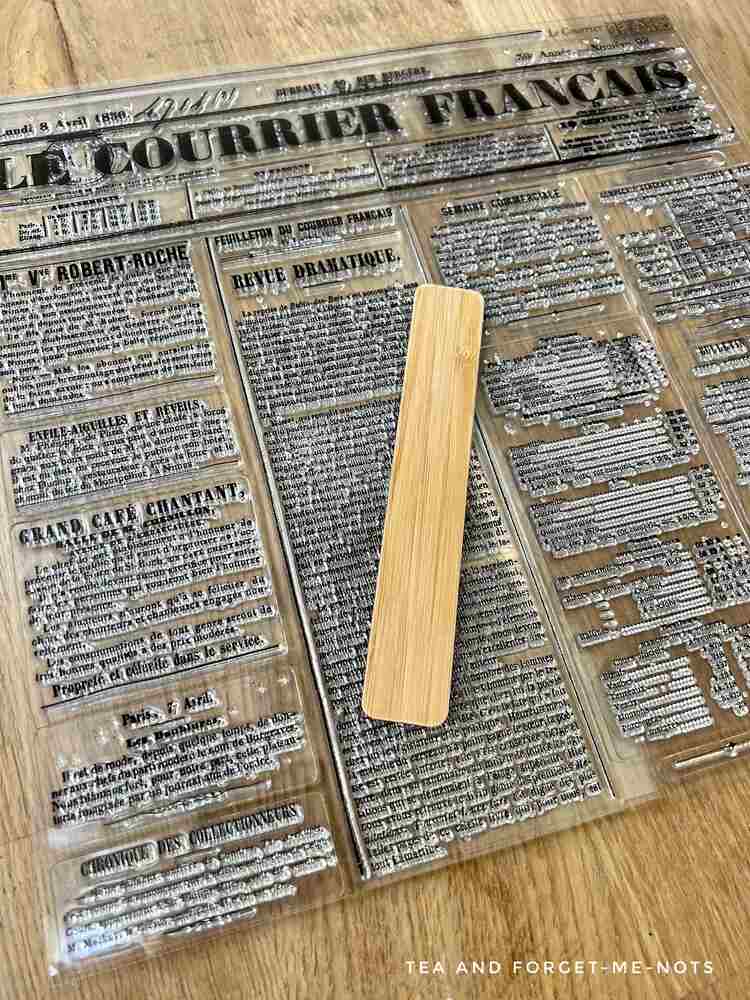
For the wooden base, I used a rectangular stick. One that comes with furniture transfers.
To start, I cut the stick in half. Then used sandpaper to round the edges to create an even look.
Then to take this blank slate to the next level, I used the Le Courrier stamp. Which is designed to look like a French newspaper.
You can use either ink or paint with stamps. I used a black paint called Caviar.
Here’s how to paint with black successfully.
I chose a small portion of the stamp. A part that incorporated both a title and paragraph text.
I used a brayer to add a thin layer of paint to the stamp. Ink is likely to create a more subtle, translucent look. Whereas a medium like acrylic paint gives a bolder finish.
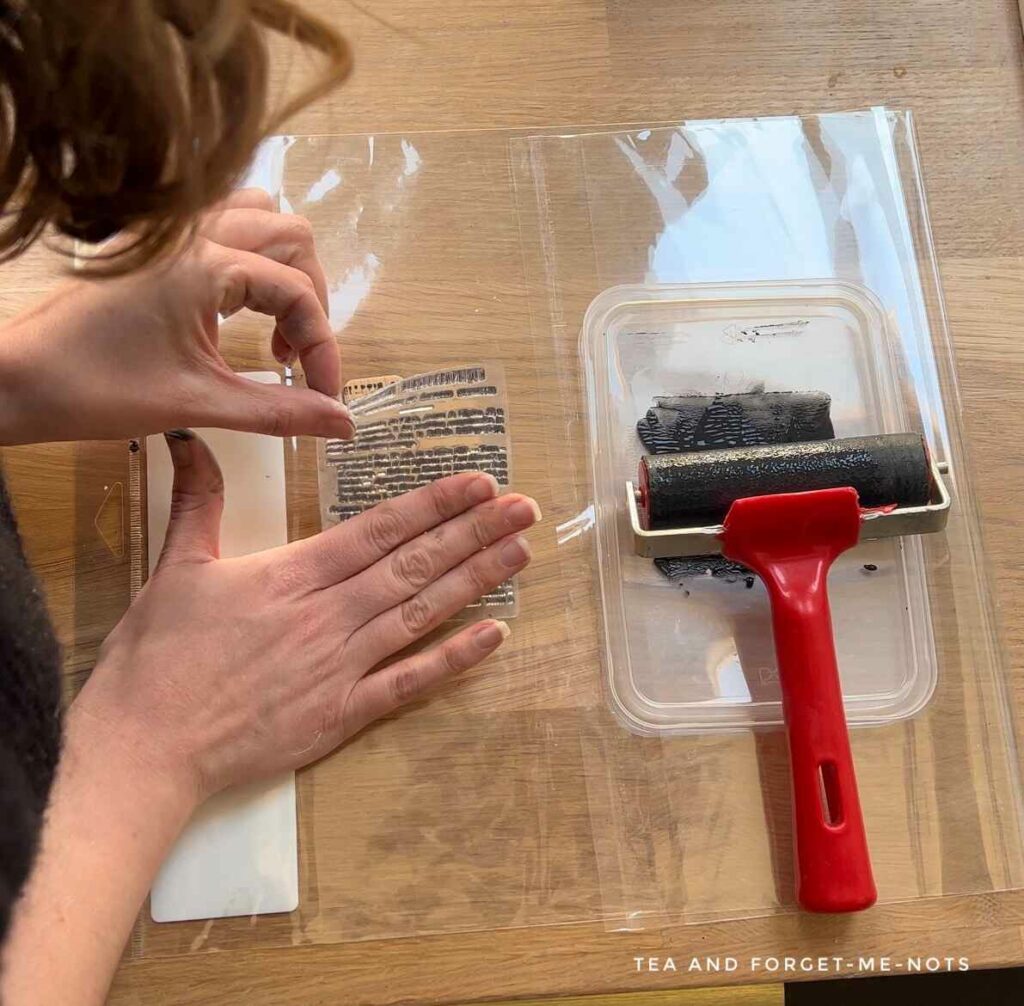
It’s important to place the stamp down and not move it. Moving it will smudge the image. To help it apply evenly you can use your fingers to gently press the design into the surface.
Then to clean the stamp, simply wash it with soap and warm water.
Finally, I coated this earring project with Clear Coat in Flat. I used a matte finish to give the dull sheen of paper. If I had painted the wood white initially, then they would have more closely resembled the newspaper.

This is a great project for a book lover. It gives a literary feel. You could easily recreate this with a page of a dictionary. Or use a baby name book with special names on it.
It was so much fun creating this look. And a good choice for a statement pair of earrings.
For a full tutorial on Decor Stamps, check out Iron Orchid Designs.
DIY Earrings Using Clay
The third design was so simple! And made with paper clay.
Paper clay is basically air dry clay that has cellulose added to it. The result is that the clay is both strong and lightweight when dry. A good material for handmade earrings.
I rolled out some clay to about half a centimetre thick.
What’s another versatile tool that you probably have around the house? Vaseline! I used the lid to create the perfect-sized circular shapes.
Then for the design. I imprinted the shape of an ornate key into three parts of the circle. This created 3D intricate designs in each earring.
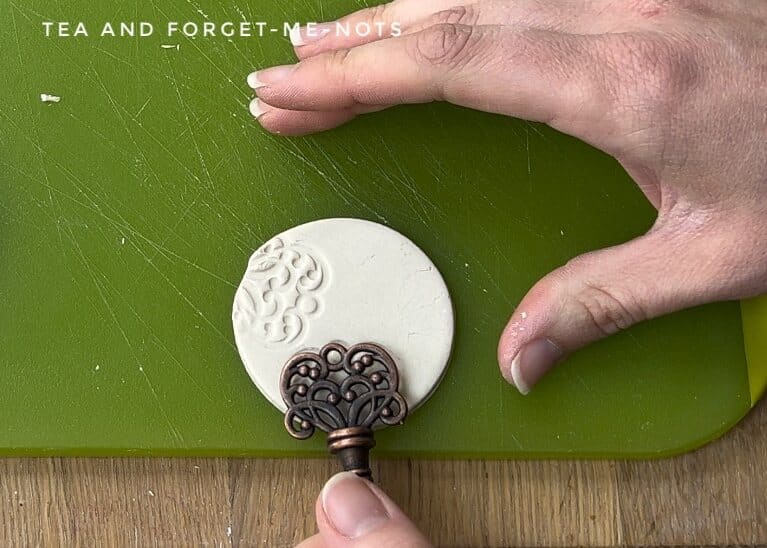
Then I left them to dry. The thicker the clay, the longer it takes to dry. These took one day.
You can see when they have dried because the colour changes. If they feel cool to the touch then they are still drying.
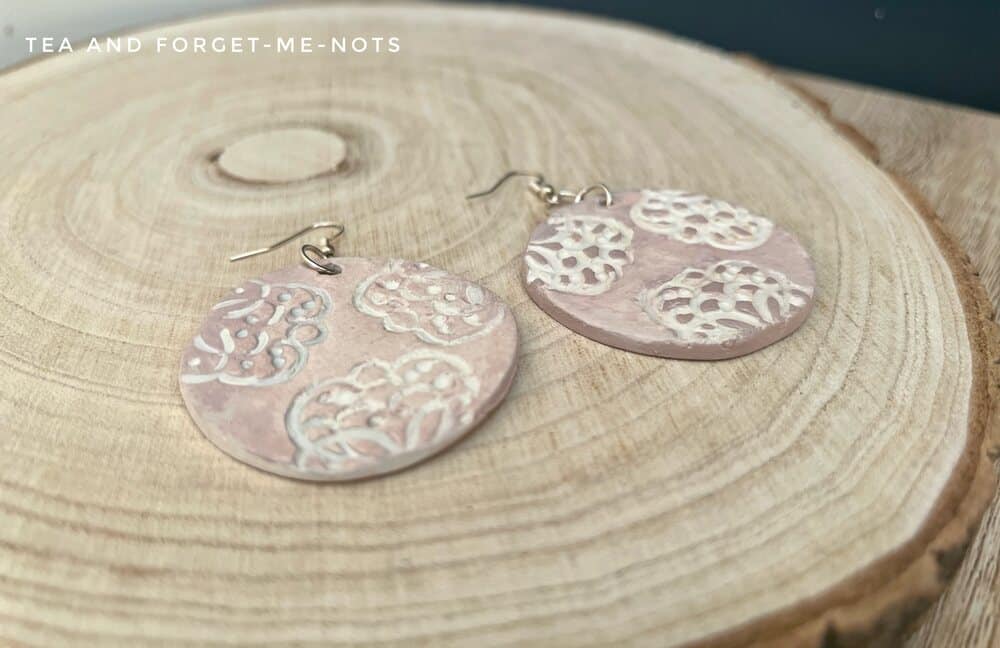
Once dry, I painted them. I used a pretty pink called Tea Rose. I rolled it on with a brayer to avoid getting paint into the debossed details.
Here’s what Tea Rose looks like on a beautiful bookshelf.
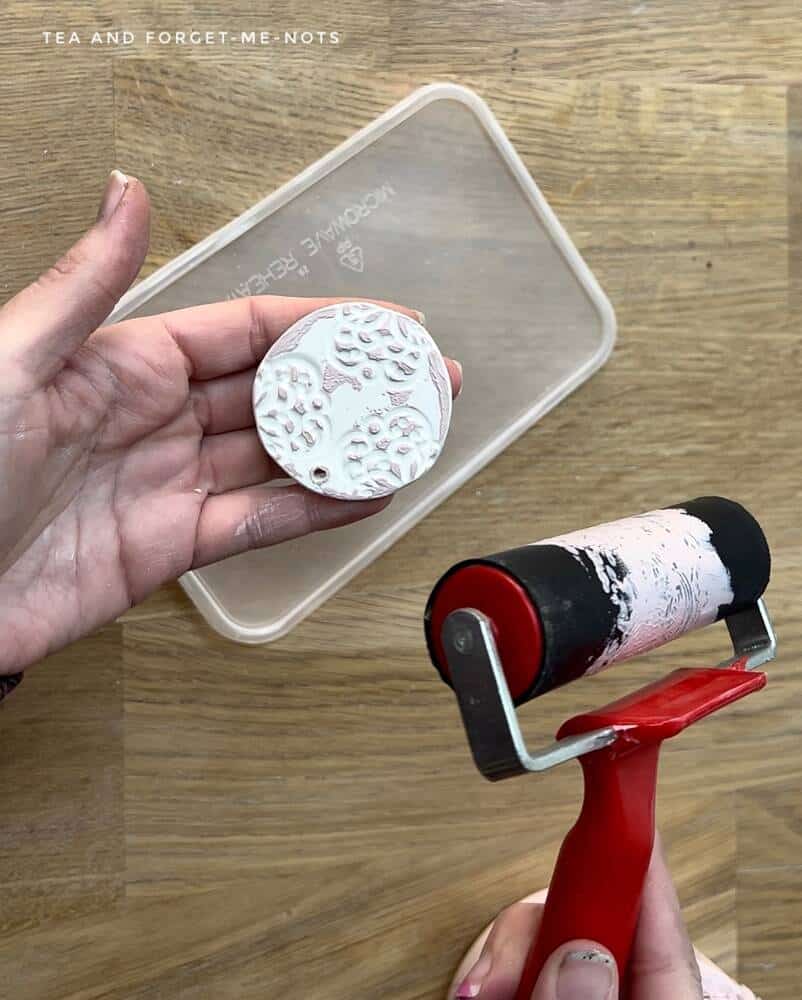
Then used a creamy colour called Buttercream, as a wash to add more dimension.
Finally, I added a Pearlescent Glaze. This is to create a shimmer when the earrings move when walking.
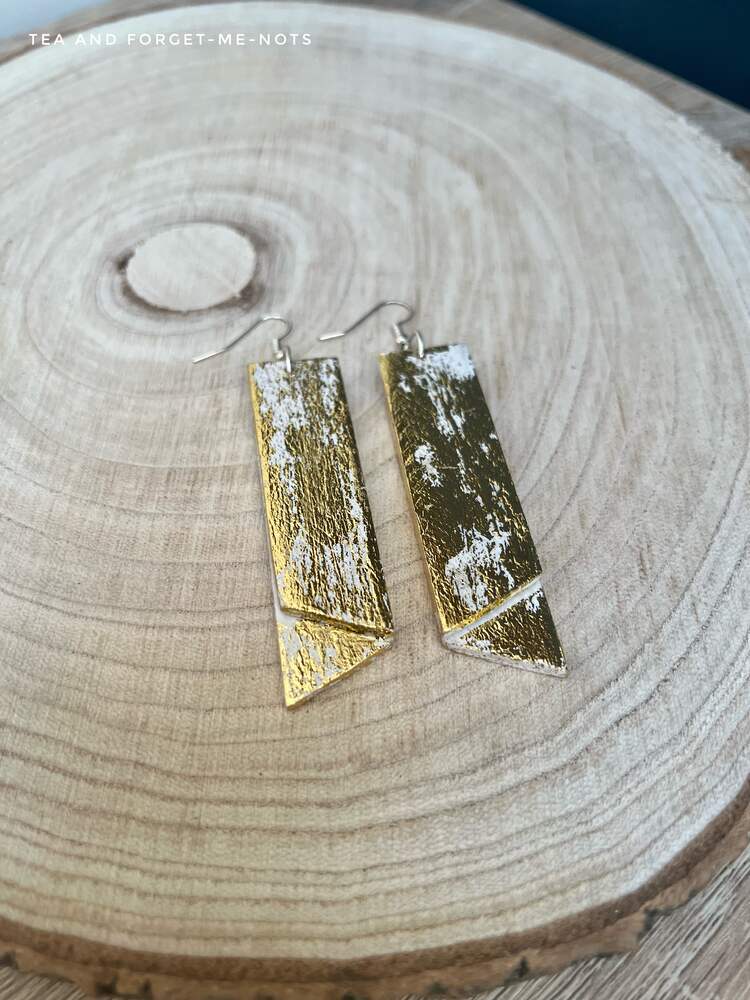
No. 4 – Handmade Earrings Ideas with Dixie Shine
Design number 4 uses a just-released product called Dixie Shine.
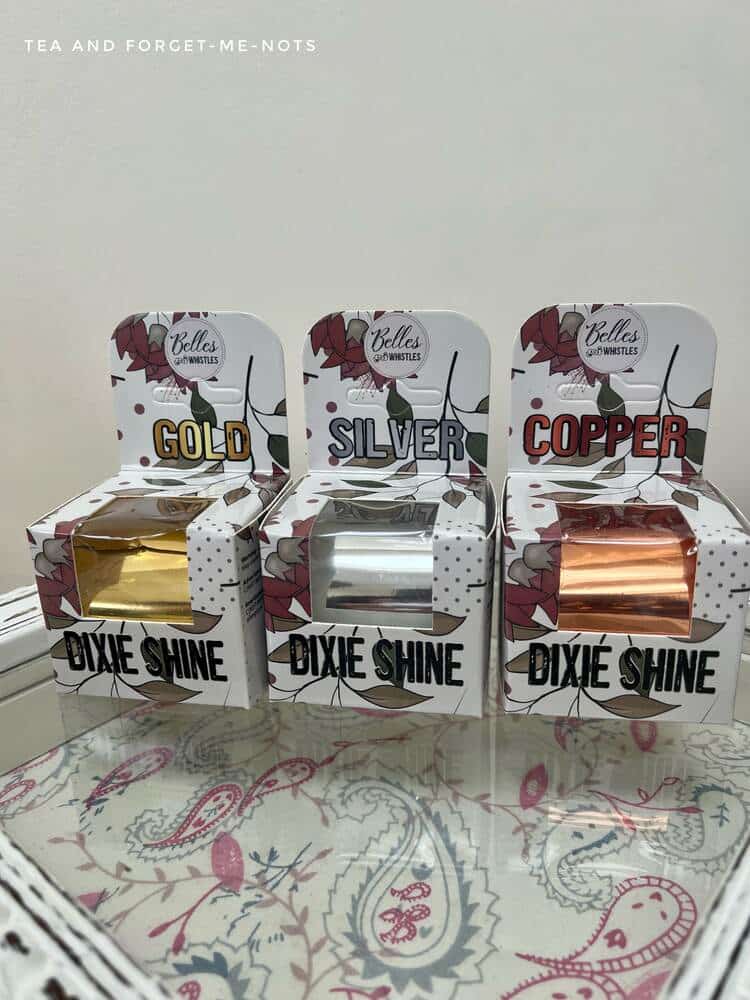
Dixie Shine is a roll of metallic material. A great way to add some shimmer. Like if baking foil and gold leaf were combined.
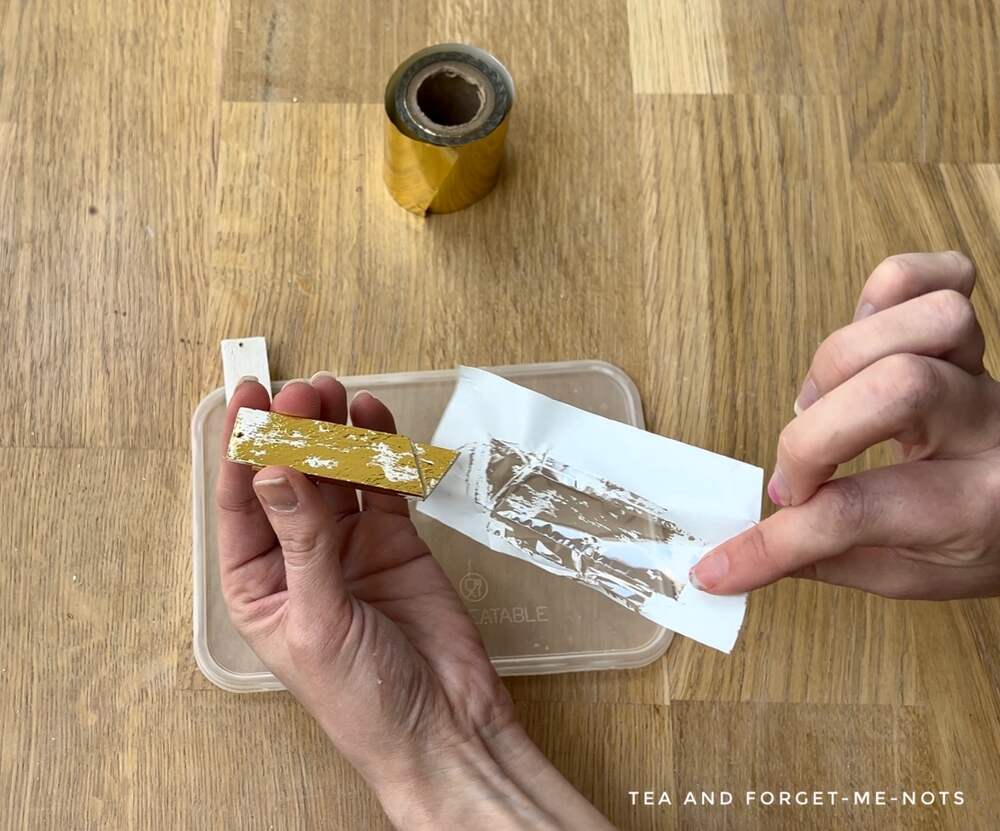
Firstly, I started by doubling up the trapezoid wood pieces. I painted them white as a base and used wood glue to attach them together. I staggered them so that the bottom left a folded, ribbon-like look.
Here’s a step-by-step guide to Dixie Shine
To apply Dixie Shine, you need the adhesive, Stick With Me. Just like with metal leaf size, I applied this evenly and left it to dry. It takes about 15 minutes and turns translucent.
Then I cut the metallic paper to size. I used the gold version but it also comes in silver and copper.
Then I applied the paper on top of the glued area. With the shiny, coloured side facing up. Then using a finger or (burnishing stick), I rubbed over it to make sure that it attached.
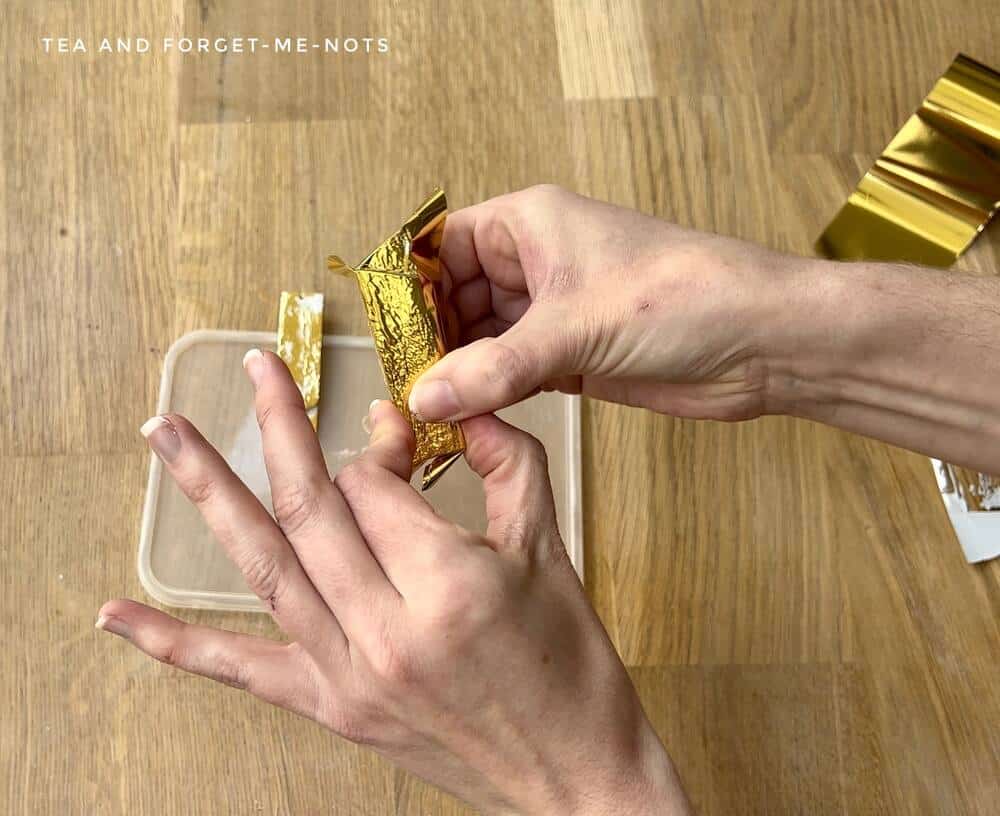
As my wood was textured, so was the result of attaching the Dixie Shine. If I had wanted a more even application, smooth wood or plastic would work better.
One earring had more gold transferred to it than the other. So to even it out, I pressed the Dixie Shine down again and it transferred more of the colour.
What a fun way to create a glam pair of earrings. With a base coat of navy blue, these could also be for an evening look.
For more rustic glam, here’s how to use gold leaf on concrete!
Then the final set of earrings.
Hydro-Dipped DIY Earrings
Probably you’ve already seen a version of this in a TikTok video.
And the good news is that you could create these at home so easily. The best part? It uses nail polish. Something most of us have already.
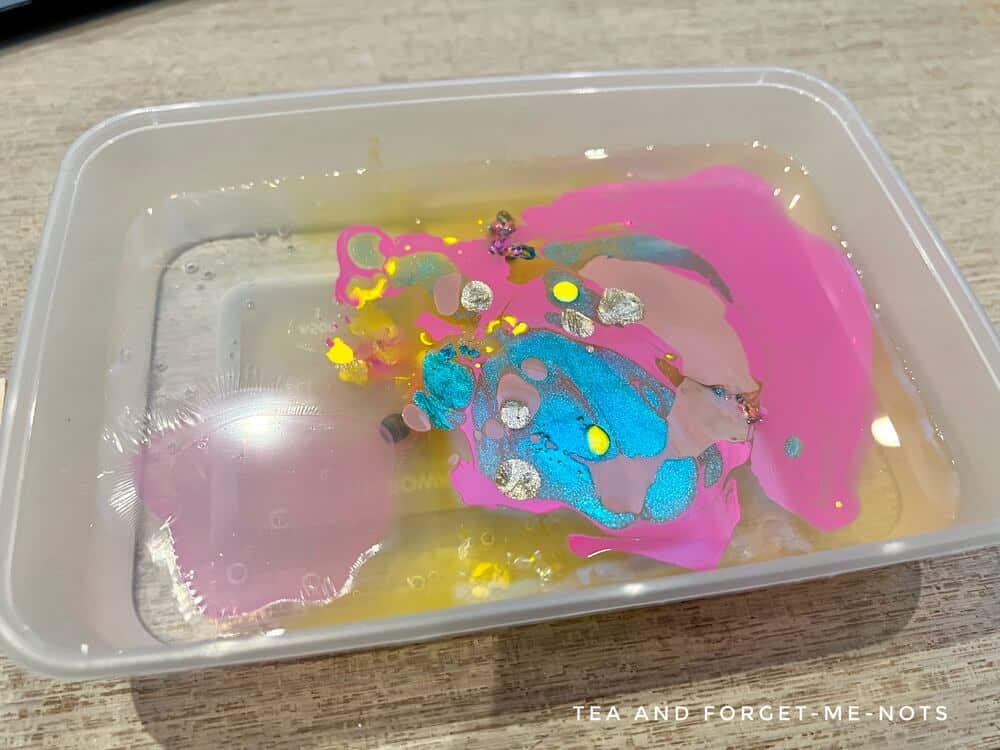
This is hydro-dipping with nail polish. Simply dipping an object in a bowl of water and paint.
The first step is to use a disposable tub and fill it with water. I then added drops of a variety of different colours of nail polish. Then using a pin, I swirled the colours together.
Then it’s time to dip.
I used a pin to hold the wooden piece through the earring hole so that I wouldn’t touch the area which was getting painted. Then slowly swooshed it through the mixture and the paint attached.
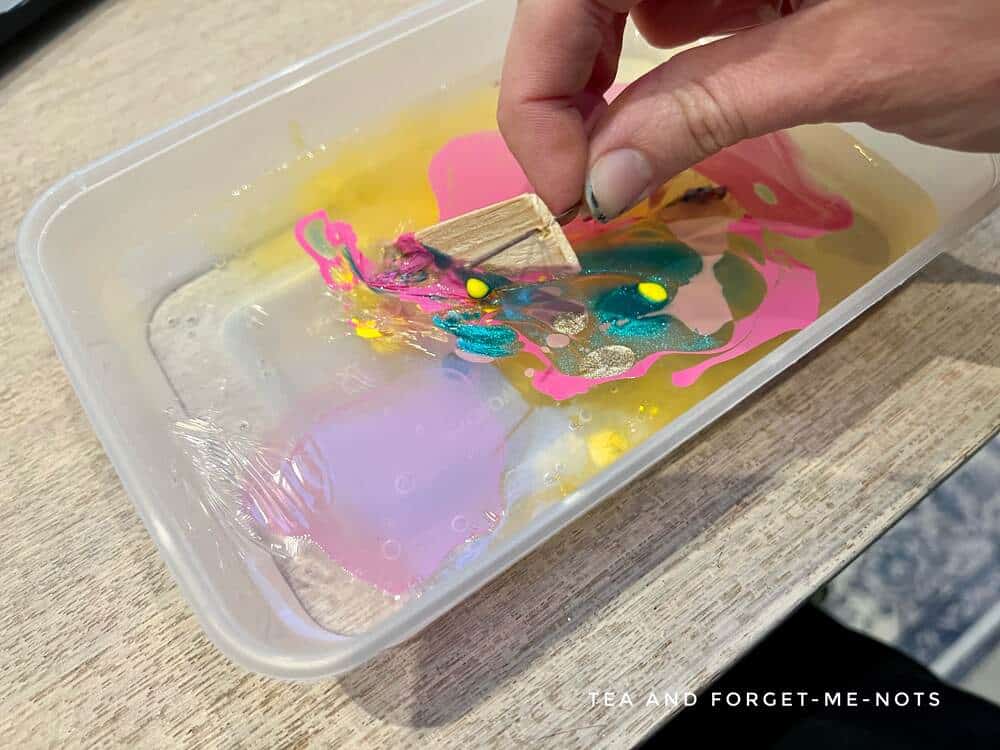
I left it so that part of the wood was left uncovered. To contrast the bright colours against the natural wood look.
If you want full coverage, you can do a second pass with a new pool of paint.
I then sealed them with Rust-Oleum Crystal Clear. Primarily to protect them from fading in the sun.
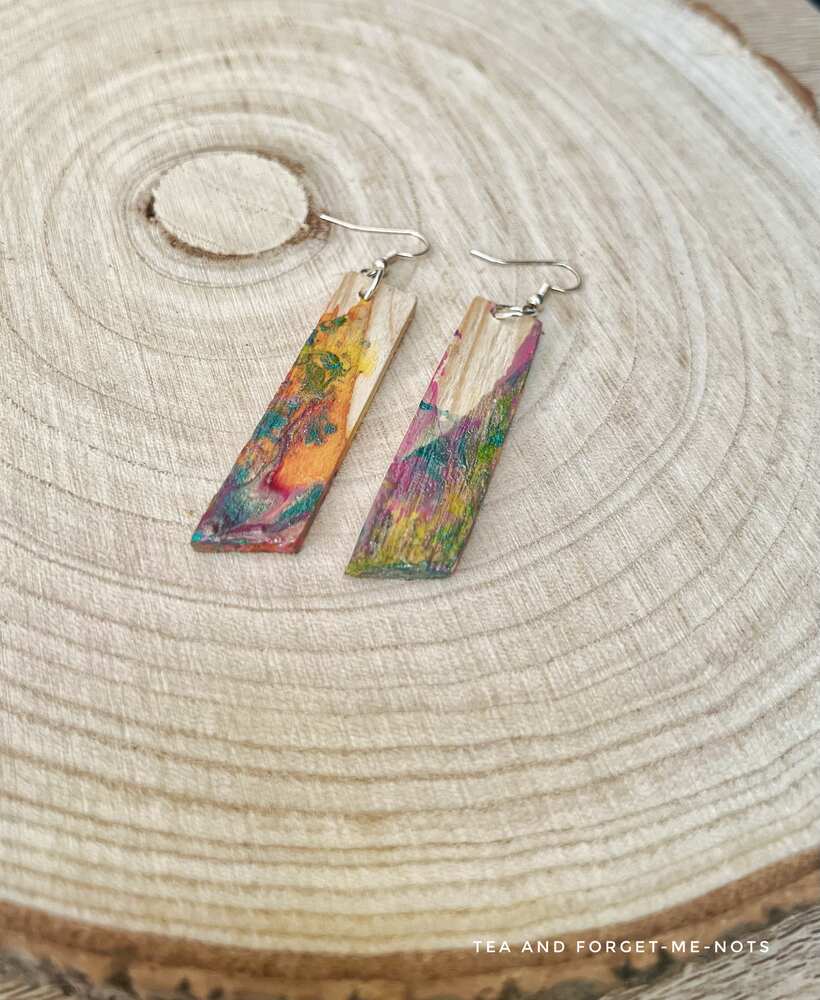
The beauty is that you can change the colours depending on your mood. Want an everyday look suitable for work? Maybe keep them neutral.
Personalised, Unique Earrings
Beautiful earrings and handmade products in general are the perfect accessory. They always mean so much more. And can be an easy way to show someone that you’re thinking of them.
The great thing about all of these easy DIY projects is that they can be adapted. You can use different shapes such as wood circles. Make them into stud earrings. Or even turn them into necklaces instead.
Another easy idea would also be to make Cricut earrings. You wouldn’t even need to design them yourself, just use the Cricut Design Space. Only a good choice though if you don’t need the additional cost of buying a Cricut machine!
Which of these handmade earring designs will you try for a new project?
For more creative inspiration, check out my YouTube channel.
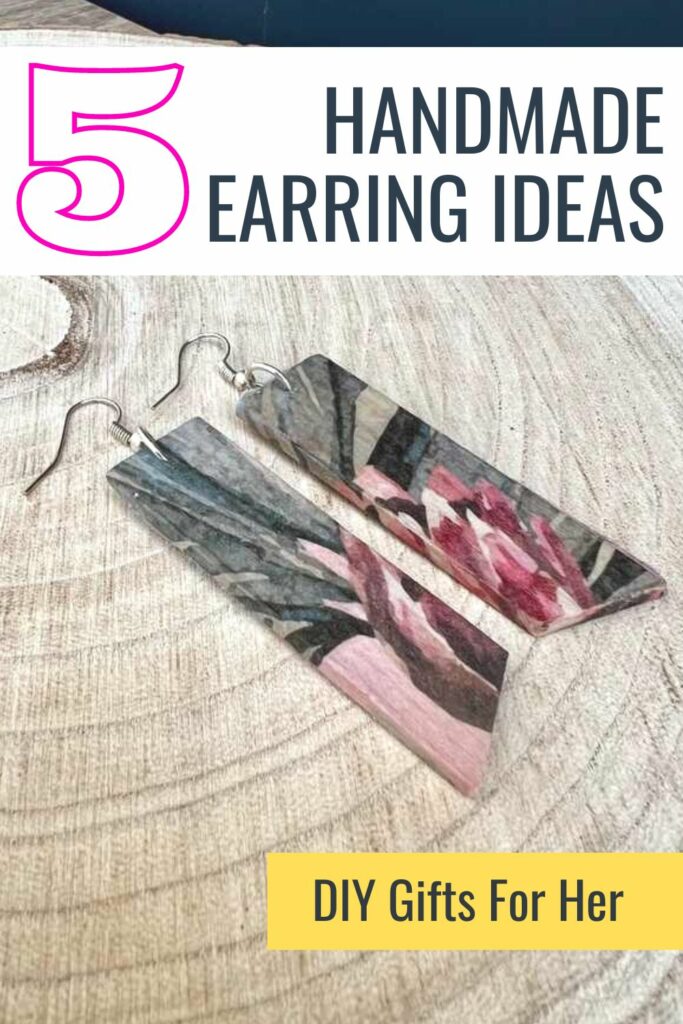
Pin it for later – 5 Handmade Earrings Ideas
If you loved this project, you’ll love these projects too:

Hi there! I'm Rachel Bowyer, a passionate DIY enthusiast with a knack for transforming the old into something beautifully new. With a deep love for furniture painting, refinishing, and the art of crafting. I've been documenting my DIY projects and restoration journey since 2018. I specialise in techniques like decoupage, stencilling, and decor transfers. Join me as we explore the world of creativity and home improvement, one project at a time.
All wonderful projects Rachel! That Dixie shine was one I suggested when they were asking us for new product ideas. Too bad it took so long to release it lol!
Oh wow, that’s a great claim to fame! I’m sure product testing takes ages. Let me know if you’d like some and I’ll send it to you.
You made something for everyone! I can think of people who would love each design.
Thanks, Marie, that’s a lovely thought.
You are so creative, Rachel! Each design is so different and looks so fun to make! Great idea for a Mother’s Day gift! Thanks!
Thanks, Donna, that’s kind!