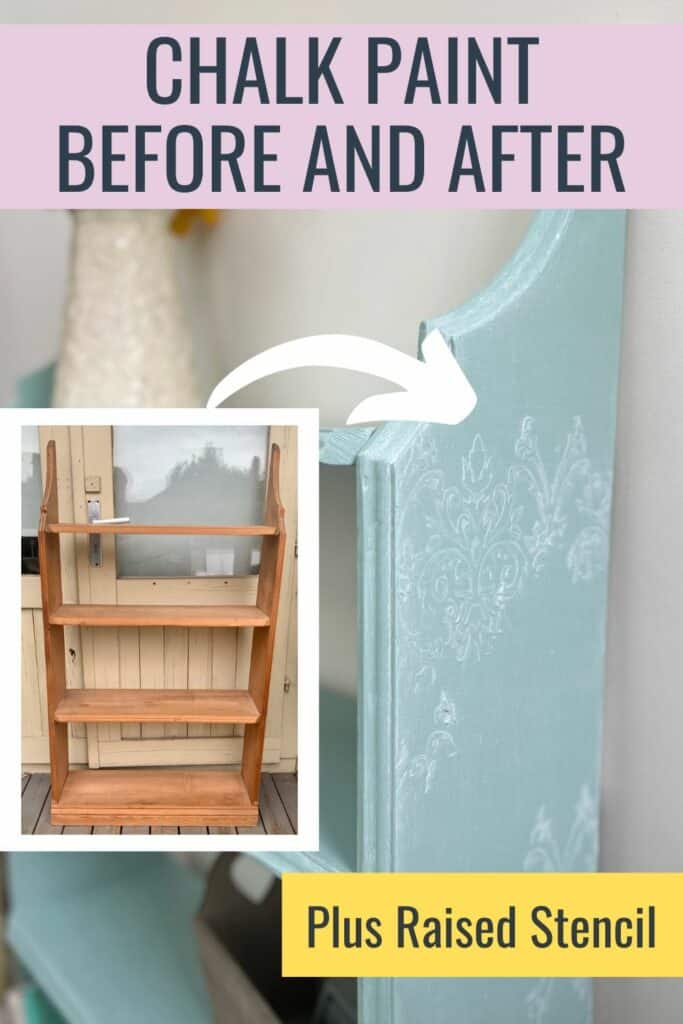
Chalk Paint Furniture Before and After | Wooden Bookshelf
Looking for inspiring furniture makeovers? Here’s a chalk paint furniture before and after. Plus how to achieve this beautiful new look.
Painting furniture pieces doesn’t always go to plan. And sometimes despite my best efforts, I have to reevaluate. This is one of those DIY projects.
This bookshelf makeover actually started a long time ago. 18 months ago in fact! After many hours of prep work and both stain and a new coat of paint. It was time to step away.
So, here’s the story of the ups and downs. The great thing is, it was worth the wait!
Thanks to Dixie Belle Paint for sponsoring this post.
Chalk Paint Furniture Before and After
I got this bookshelf for free on Facebook Marketplace.
I particularly liked the unusual shape. Although it had seen better days. There’s a reason why old furniture is free usually.
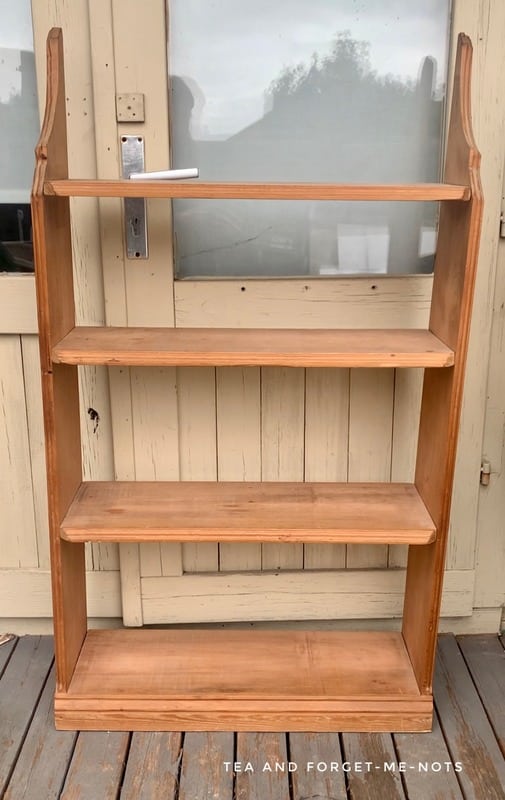
In fact, it was deceptive just how many little repairs it would need to get it back to a good quality state.
Painted Bookshelf with Raised Stencil Video
This post includes gifted products and affiliate links so you can easily find the products I use myself and recommend to friends. If you purchase these products, I may earn a small commission at no extra cost to you.
How to Prep Wooden Furniture Before Painting
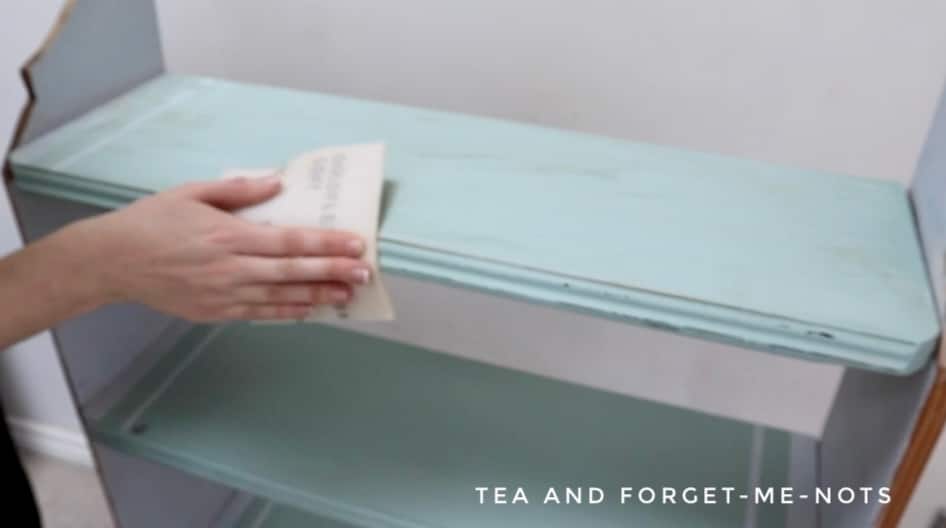
The first thing to do is clean and sand. There was no obvious existing finish on the wood. But sanding it back evened out the look of the wood and made it much cleaner looking.
I sanded the tops of the shelves with an orbital sander. And hand-sanded the edges, which have ridges.
In particular, there was a big crack along one of the shelves. Normally with cracks and things like that, people hide the issues with paint. But my original plan was to stain the shelves.
So this posed a problem.
I mixed some of the stain with wood filler to create a brown paste. Then filled the crack like normal. I filled it to above the surface so that it could be sanded back flat to the surface.
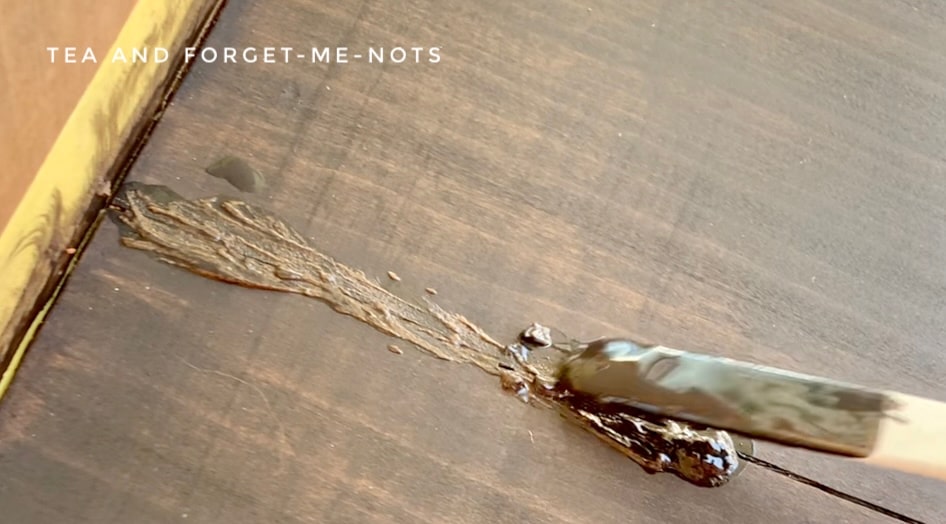
Fortunately, this worked like a charm and left a great result.
But I wasn’t convinced by the route I was taking.
So I switched to a light green regular paint. I liked the fresh, bright colour. Then I played with adding some stripes for some extra patterns.
But it was here that I called it quits. I couldn’t decide on the direction for it.
So, back it went into storage for 18 months. Then I returned with a new plan.
To start, I gave the piece a well-needed clean. I rinsed it with White Lightning TSP cleaner. I removed the leftover residue with clean water.
Then as I had the first coat of paint and stain on the shelves, I scuff-sanded them. I used 180 grit sand paper to rough up the entire surface to help the new paint grip to it and give a smooth finish.
There was still some wood filler from the first time that I hadn’t sanded smooth. So I sanded that and added a little more wood filler. It was never going to be a flawless piece but it helped some of the unevenness.
Then I removed that sanding dust with a damp lint-free cloth.
Painting a Bookshelf With Chalk Paint
I liked the original green that I’d chosen. So was happy to repeat that part of the look.
I found a similar colour called Sea Glass. Which is one of the best chalk paint colours for spring.
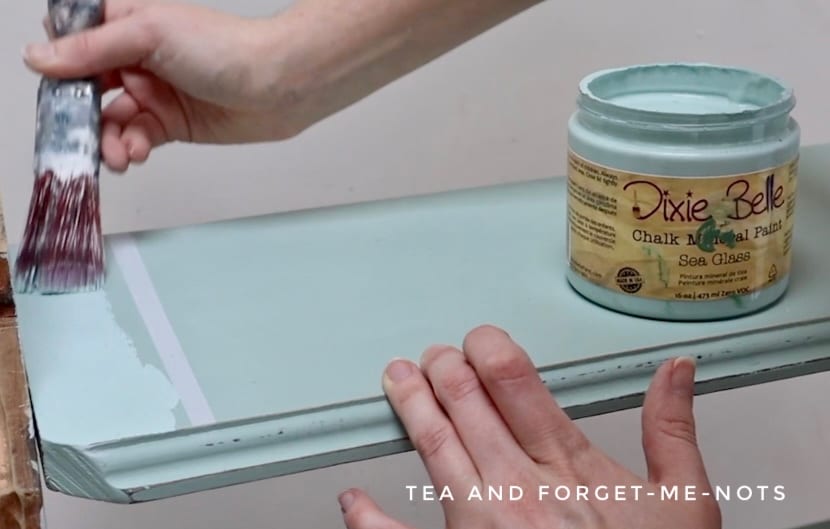
I had to stir it well as the mixture had settled. If you find this then shaking the can (with the lid on!) and stirring with a lollipop stick helps mix it together again.
With chalk painting, a little paint goes a long way. If you still find that the chalk paint is thick to apply. You can use a mister bottle to spray a little water on the brush to help move the paint around.
Here’s how I used white chalk paint on a coffee table.
It’s a good idea to raise the piece off of the floor when painting at the bottom. This helps to keep a clean painted edge. I tend to use Painter’s Pyramids as the best option for this.
Painter’s Pyramids are great as they can be used with freshly painted surfaces. They leave only a tiny mark where the top of the pyramid makes contact with the surface.
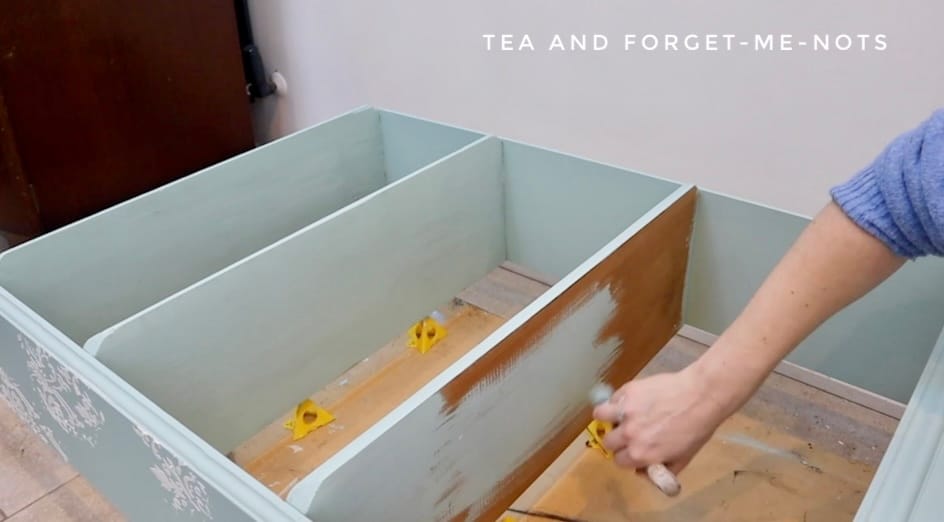
I only needed two coats of paint to get good coverage. The new look felt really fresh and bright.
Liking the colour choice? Here are some beautiful dresser drawers.
Unbeknownst to me, the gap between the top and second shelf was smaller than the other shelves. So for the first coat, I kept hitting the bottom of the shelf above with the paintbrush handle.
So, for ease of use on the second coat I changed to a mini brush with a much shorter handle.
Then for the fun part. Just like with the original stripes made with painter’s tape, I knew that I wanted to add a decorative element. Something to make this plain bookshelf more interesting.
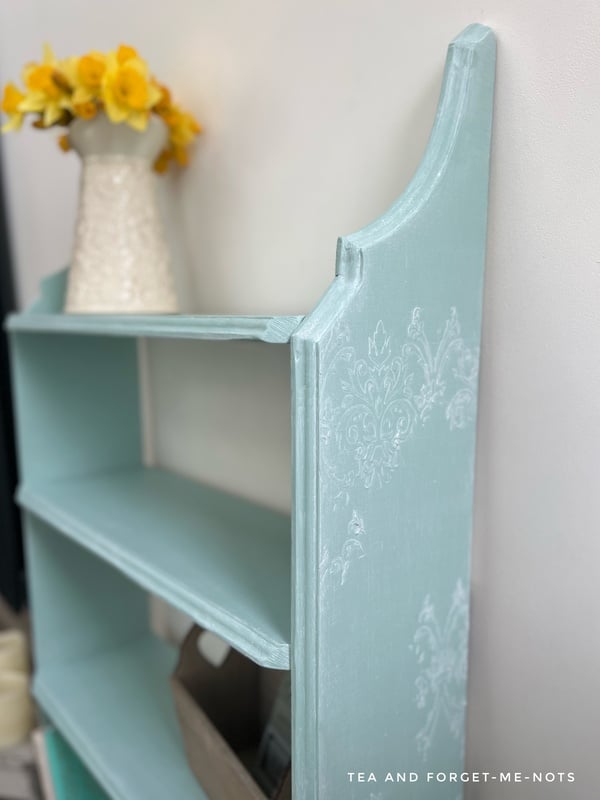
I chose the Royal Damask stencil. And decided to do a raised stencil with it.
How to Create a Raised Stencil
A raised stencil uses a product to create a 3D layer before applying the paint. It adds an additional step in the process but gives the look so much depth.
To go with the slightly shabby bookshelf, I chose to only partially apply the stencil. I used various portions of the design rather than the entire piece to give a distressed appearance. As though it had worn away over time.
I attached the stencil with a little bit of Frog Tape to the side of the bookshelf. Which is a good way to keep the stencil in place as it’s low-adhesive. So it’s less likely to take off fresh paint.
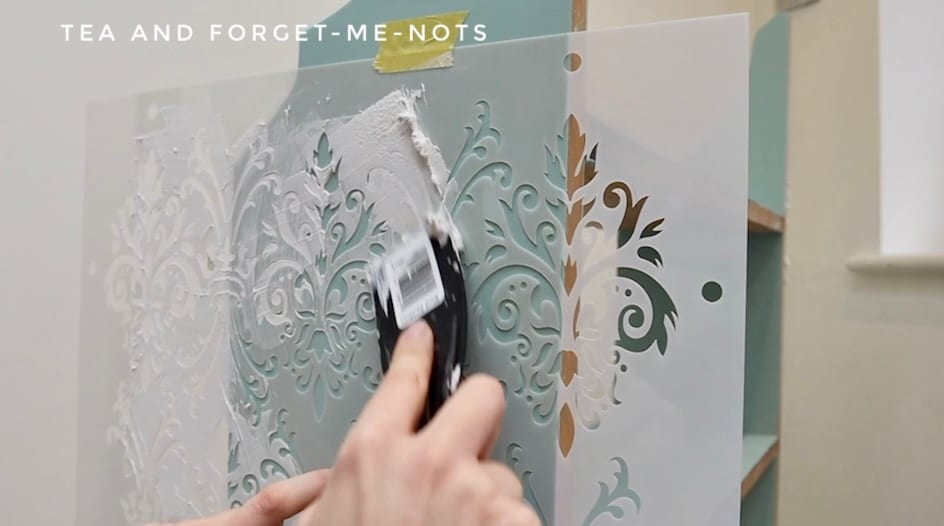
I used Dixie Mud as the stencil compound. I often use Dixie Mud as a wood filler. But the white version is great for creating raised stencils.
I applied it with a plastic spatula and scraped it across the stencil.
As Dixie Mud dries hard, it’s important to not wash the tools in a sink. So, I used a wet wipe to clean the spatula.
I repositioned the stencil several times to apply it to various parts of the side. I positioned it strategically over things like a large nail head. Things that were fine originally but given the choice, may as well be covered.
Where the stencil left any of the Dixie Mud in unwanted places, I wiped that off with a damp cloth.
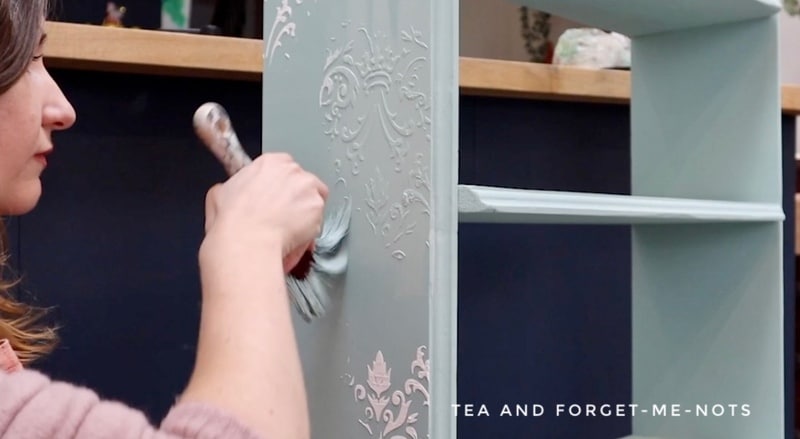
I waited 24 hours for the stencil to dry. And then painted over it in the same original colour of Sea Glass. I like to paint over raised stencils to make them look like a naturally integrated part of the piece of furniture.
How To Seal Chalk Paint
And then it was time to seal it. I did two coats of top coat in a satin finish. Which is durable and has a medium sheen.
Over the raised stencil. I did brush strokes every which way. Vertically, horizontally, diagonally, and all over. This makes sure that every part of the raised stencil is sealed. Then finally for the best results, I smoothed the brushstrokes out for a clean finish.
The final step was to enhance the raised stencil.
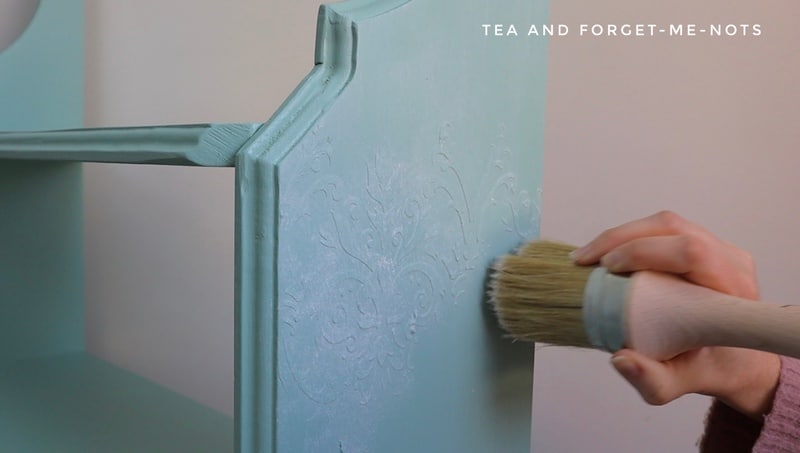
Now that I had blended it into the piece, I wanted it to stand out again.
So, I added white furniture wax. I used a large wax brush and added the wax to all the crevices. I could have made it more subtle by buffing it but I chose to leave it quite thick.
On the shelves, I used wax in horizontal and vertical brushstrokes. This created a cross-hatch and made a cool texture on the flat surface. The wax really nicely highlighted the details.
The wax also acts as a third protective coat. So for a shelf with heavy use, it should hold up well.

Dark wax would have given an entirely feel to the end look. I wanted more fresh and bright. But that would have made it more moody and dramatic. If you try this, you can put clear wax underneath first so you can experiment easily.
Chalk Paint Furniture Before and After
18 months later and I love the final result. The light green and white feels beachy and coastal to me. And the raised stencil adds both interest and does a good job of hiding a few flaws too.
It’s a more modern look.
Want to have a go at chalk-painted furniture yourself? Here’s how to find free furniture. It’s the lowest-risk way to getting started!
Here you can find step-by-step tutorials for all kinds of furniture here.
Pin it for later – Chalk Paint Furniture Before and After
Check out my YouTube channel for more chalk paint furniture before and after projects.

Hi there! I'm Rachel Bowyer, a passionate DIY enthusiast with a knack for transforming the old into something beautifully new. With a deep love for furniture painting, refinishing, and the art of crafting. I've been documenting my DIY projects and restoration journey since 2018. I specialise in techniques like decoupage, stencilling, and decor transfers. Join me as we explore the world of creativity and home improvement, one project at a time.
I love the look of a raised stencil, but have been too afraid to try it! Thanks for the step-by-step tutorial! It looks fabulous! I can’t wait to try this sometime!!
It’s not scary at all, definitely have a go!