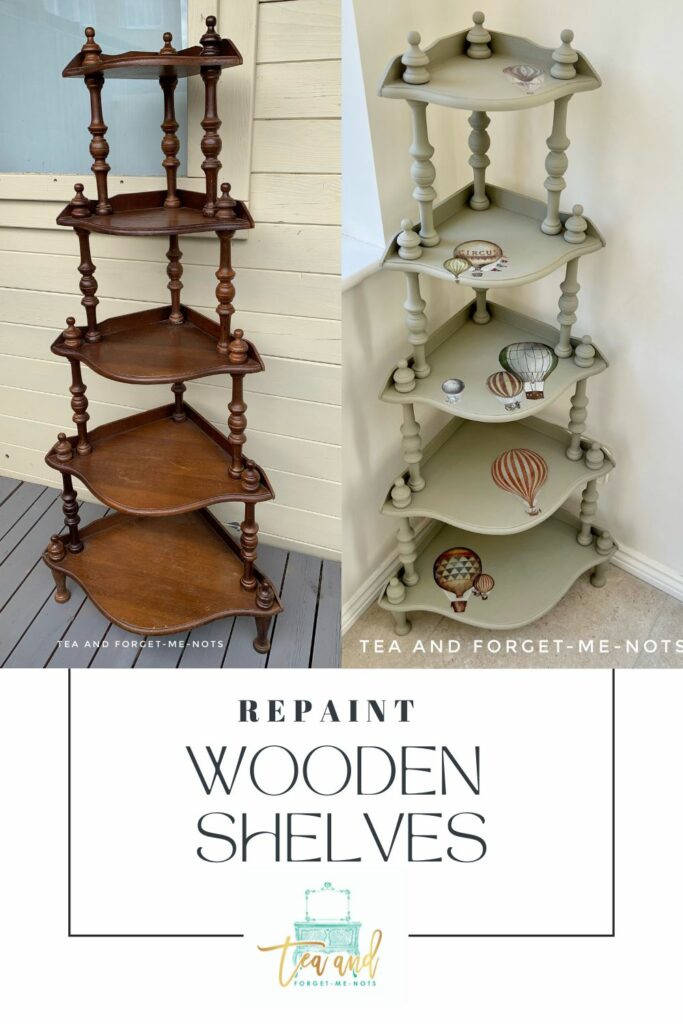
How to give painted shelves a new look
Want to give previously painted shelves a new look? Here’s how I gave a makeover to shelves I painted and decoupaged years ago.
Tastes change. Fashions change. The beauty of paint is that it’s so flexible.
No longer like the colour? Paint it.
Furniture a bit boring? Add a transfer.
The possibilities are endless. Which is why I love what I do!
This post includes gifted products and affiliate links so you can easily find the products I use myself and recommend to friends. If you purchase these products, I may earn a small commission at no extra cost to you.
How to give painted shelves a new look
You may remember these shelves from my post on the easiest ways to decoupage.
Cute, fresh colours combined with leafy paper. I loved how it turned out.
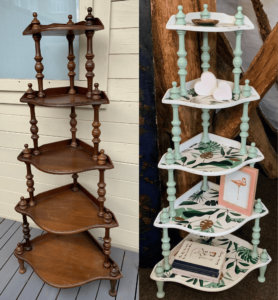
But it was time for a new look. I waited until I felt inspired. Then along came an unusual transfer.
No, it isn’t florals! Shocked?
Give Painted Shelves a New Look Video
This project is part of a DIY blog hop.
Do It Over’ Designers are a group of talented bloggers who love to recycle, upcycle and DIY. It’s about taking something old or unused and ‘doing it over’ into something new.
Check out all the ‘Do It Over Designers’ at the bottom to see their lovely do-overs too!

So back we go to the start, almost.
How to prep painted furniture before repainting
I didn’t strip the paint. The beauty of being the person who did the original painting is that I know what products I used.
I didn’t need to strip the paint, just prep it properly to go over it.
I started by tearing off the decoupage paper. Which was a bit of a pain, it was well stuck on.
Here’s one of my most beautiful decoupage projects ever!
In fact, if you have tips on how to remove decoupage easily, please let me know!
Once the paper was removed, I began cleaning. There was no point cleaning before as I was only going to make a mess again.
I gave the whole piece a once over with White Lightning. It’s so convenient having it ready to go in a spray bottle. It makes the more boring prep stage easier to crack on with.
I then rinsed the whole piece in clean water. It’s important to do this step otherwise ingredients in the cleaner will stop the paint from sticking properly.
Then I gave it all a scuff sand with a RAD Pad. Which is sandpaper with a foam backing.
Finally the last step of prep, I gave the shelves one coat of Slick Stick. Slick Stick is great for mattifying shiny surfaces.
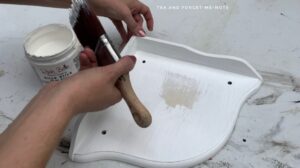
I used it to ensure that any leftover decoupage glue was properly covered. That meant that the paint would adhere nice and smoothly.
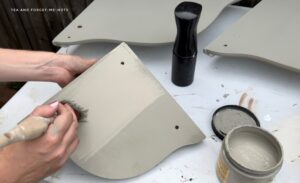
What paint can you use on shelves?
The transfer I planned to use had an olde worldy look to it. So, I knew I wanted a paint colour to complement that.
I did three test swatches of different colours to see which worked the best. My favourite was the grey-green colour of Dried Sage.
I painted this on a really hot day. So it was helpful to have a mister bottle to hand to keep the paint damp and brushing on smoothly.
I only needed two coats of paint as it covered really well. Here was my production line for drying. I was very afraid that someone (most likely a cat) would investigate and knock them all over.
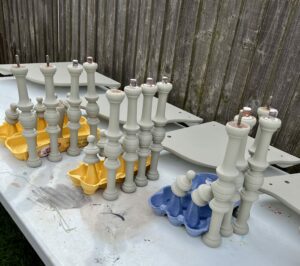
I was lucky this time.
Not so much this time when the legs did fall over!
But there were 31 pieces in total. Considering they were mostly legs, it was a time-consuming process getting them all painted.
How to apply a decor transfer to chalk paint
And on to the transfer that inspired the redesign.
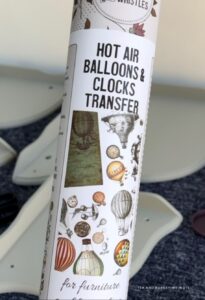
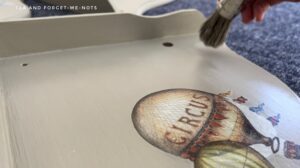
This is the Hot Air Balloons and Clocks transfer by Belles and Whistles. I like transfers that have different elements to them so you can play around until you find the right layout.
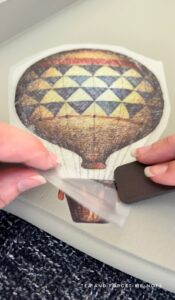
For this piece, I only used the hot air balloons. I cut them all out first to see what combination looked best.
I’ve written many times about how to apply a transfer but it’s the easiest thing ever. Use the ruler tool to rub over the picture. Then when you see the colour get lighter, it has attached to the piece.
A common question is whether you can layer multiple transfers on top of each other. Absolutely. In fact it often enhances the look.
This is one of my best examples of it and was ”even more beautiful than pictured”, when given to the new owner.
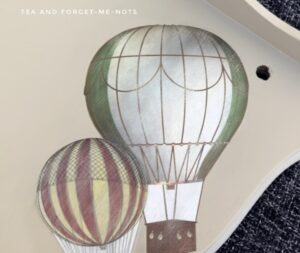
I very lightly sanded the transfers to add to the aged look. The distressing actually highlighted the brushstrokes of the paint beneath it. Which I thought was cool, it was almost like motion lines from the wind.
However, if you don’t like that look and want to distress transfers, you can paint using a roller for a smoother surface.
How to seal a painted shelf
My original plan was to put brown or black wax on the piece, again to create that aged, olde worldy look.
For this, it’s best to start with a coat of clear wax first.
The reason to do this before a darker wax is that it’s hard to remove dark wax when it’s directly applied to the piece. If you do too much or want to lighten it, there’s not much you can do to correct it.
However, with the clear wax barrier first, you can remove excess dark wax by adding more clear wax on top of that.
If you want to try out black wax, here’s how!
I did a test shelf of brown wax and didn’t like the look. I preferred the cleaner, original look. Fortunately, because of the clear wax barrier, I could remove it easily.
So there it was, all finished with a nice coat of wax, which gave it a slight sheen.
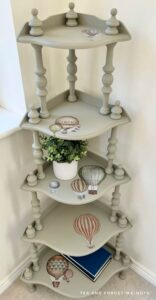
Give painted shelves a new look – the result
As with most of my re-dos, I liked the before. It was a bright set of shelves. I just wanted a different feel with this makeover.
Whatnots are difficult to photograph because they look out of proportion. Rest assured, the shelves are all evenly spaced.
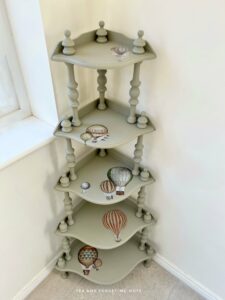
I especially like the placement of the balloons. The staggered placement doesn’t make any area too heavy looking or lopsided.
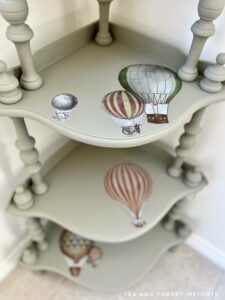
As there’s a lot of detail with the balloons, you wouldn’t want too many things on display.
I think it’s more of a piece to accessorise lightly rather than filled full of books or ornaments.
I hope you enjoyed reading about this re-do. If you did, you might also like the short YouTube video and catch a few more tips along the way.
Also, please check out the other DIYers projects below, there are some smashing ones.
Until next time!

Pin it for later – give painted shelves a new look
And for more inspiration, here’s how I turned shabby bookshelves into something beautiful.
And you won’t believe how I made this cabinet look like metal! It’s genius!

Hi there! I'm Rachel Bowyer, a passionate DIY enthusiast with a knack for transforming the old into something beautifully new. With a deep love for furniture painting, refinishing, and the art of crafting. I've been documenting my DIY projects and restoration journey since 2018. I specialise in techniques like decoupage, stencilling, and decor transfers. Join me as we explore the world of creativity and home improvement, one project at a time.
How pretty! Those transfers really are a magic way to get a whole new look.
Thanks Kim, they are!
Oooh – I love that transfer on this piece Rachel; so inspiring! Funny how I’ve never noticed it before until now lol!
Thanks Sara! Funny!
Oh, the wonders of paint and transfers, Rachel! Your curio shelf looks amazing! You chose quite a pretty color as an update and the air balloons were a fun way to add artistic designs to the piece! I love it!
Thanks, Gail. That’s kind of you to say.
They looks great, thank you for going through all the steps so thoroughly. My mother in law has a similar shelf unit and is thinking of letting it go. If she does I might nab it and give it a modern new look like this instead of advertising it on facebook!
Thanks, Julie. Yes, I think the originals probably do need something to make them more interesting. I’d love to know if you do take it on.
I love it, it would look so sweet in a child’s room too!
Thanks, Tania. If my son wouldn’t climb it, I’d be tempted!
I love this makeover just up my street. Those transfers are very steampunk so it was love at first sight.
Thanks, Anita. Yes, that’s a great way to describe them!
Wow! The transfers are amazing! Thanks for the inspiration!
Thanks Anna, I’m glad you like them!
I’m glad I’m not the only one who gives pieces multiple makeovers when growing tired of the design. I have some pieces that are on their fourth! LOL This pretty sage green incarnation of your shelves is lovely and how fun is those hot air balloon transfers!
Thanks Marie. It certainly brings a new meaning to refinishing!
That’s an interesting piece of furniture! I love the sage color and the balloon transfers are so fun!
Thanks, Donna, that’s kind.
I like the second makeover just as much as the first one. Thanks for sharing all of the products and tips you used. Those are valuable for whenever I tackle a similar project. Pinned!
Thanks, Donna. It’s so nice to be able to recreate something and like it just as much.