The best upcycling project for beginners – the 8 rules
The best upcycling project for beginners may come in different forms but there are eight rules to follow which will lead to success.
Of course, rules are made to be broken. And you can break some of these eight rules too.
But they’re designed to help you. To keep you on the right track and enjoy the process of upcycling. The more complicated a project gets or the more stress it causes, the less fun it will be.
So, keep these rules in mind when planning the best upcycling project for beginners.
This post includes gifted products and affiliate links so you can easily find the products I use myself and recommend to friends. If you purchase these products, I may earn a small commission at no extra cost to you.
The best upcycling project for beginners – the 8 rules
The piece
The piece of furniture you start with will decide exactly what level of challenge you set yourself. For a beginner, there are four things to look out for when choosing your first project.
Rule 1 – Start small
The bigger the piece, the more overwhelming it can be. You need more paint, more time and more space.
By keeping the furniture small, the mistakes you make will also be. Redoing mistakes in a small area is much more manageable and less demotivating than having to repaint a huge surface.
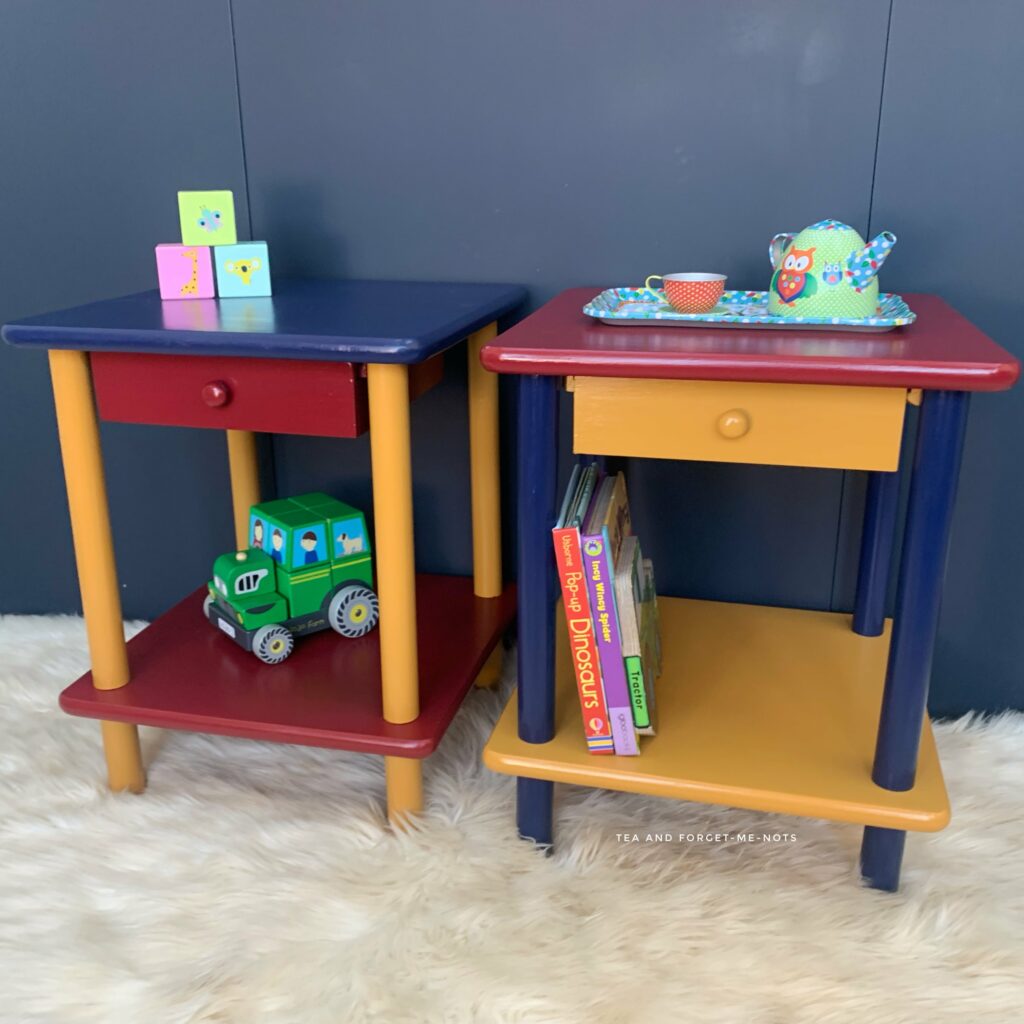
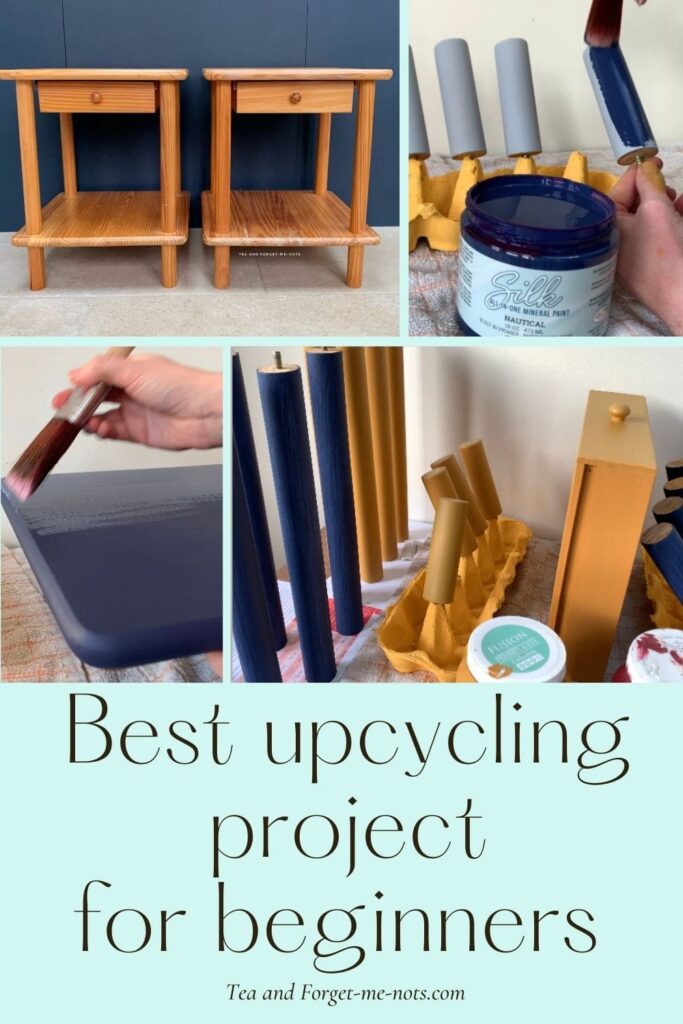
I recently upcycled this pair of side tables, which are only about 50cm high. Due to the size, they’re probably suited to a children’s bedroom or playroom.
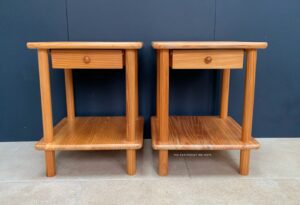
These are an ideal starter project and follow all of the eight golden rules.
Best Upcycling Project for Beginners Video
Rule 2 – Be cheap
If you start painting the family heirloom or a piece that you splurged on, you’re adding risk, and probably stress.
You’re probably upcycling because you at least partially want to enjoy the process. So, reducing stress is important for a beginner’s project.
Cheap doesn’t have to be bad quality. It can be cheap because you already own it, someone gave it to you, or maybe you found a bargain on Facebook.
These side tables were free because a charity shop thought that no one would buy them, so gave them to me. Bargain!
By starting cheap, the only way is up!
Here are my 5 ways to find free furniture.
Rule 3 – Looking good
The piece should be in reasonable condition. Or preferably, great condition.
Start with a piece that needs minimal repairs. I would avoid chipped veneer, broken drawers or huge holes. Fixing those things are great skills to learn. And those skills can come later.
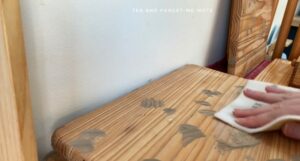
These tables were in reasonable condition. The tops had quite a few scratches on them, so I used wood filler to even out the surface.
But structurally there were no issues, so were 2/10 on the effort scale.
I do usually get carried away with the wood filler though, as shown in this grey makeover!
Rule 4 – Keep it simple (the piece)
The piece might be small, it might be free, but is it simple? You might find a small, free table but if it has hidden drawers and 16 legs, it can get overwhelming.
Find a simple piece. You can branch out into fancier things later when you have a better understanding of how your paint, tools and you like to work.
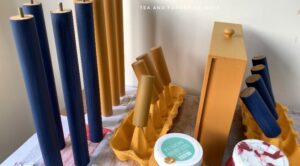
My side tables have straight lines, one basic drawer and can be dismantled. Taking them apart was so helpful because it meant that I could paint each piece individually.
Simpler is easier and that’s very important when starting out.
Want to know 23 great DIY tools? Get the list!
The process
Rule 5 – Keep it simple (the style)
Just as the piece should be simple, so should the style you paint it be.
You might have dreams of blended, textured, gilded creations having watched YouTubers with years of experience. And they are amazing.
But simple is the way to success, for now.
One colour of paint is the easiest to work with. There’s less chance of splashing the wrong paint on the wrong surface. You can also paint in one go rather than have to wait for the colour on an adjacent surface to dry.
Using one colour is also the cheapest initial cost of products. But an affordable way to add more colours is to buy sample pots.
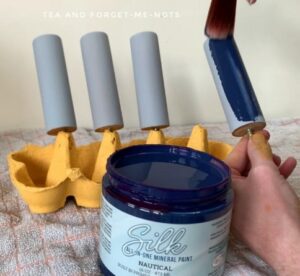
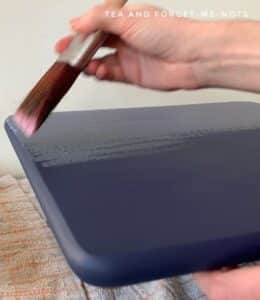
I used three colours, red (Fusion’s Cranberry), yellow (Fusion’s Mustard) and blue (Dixie Belle’s Nautical).
But I used colours that I already had and the fact that the entire piece dismantled, avoided the issue of painting the wrong surface accidentally.
This navy bookshelf was one of my simplest projects in 2021 and was so popular!
Rule 6 – Protect it
After you’ve put all the hard work in and you’re basically at the finish line. Don’t stop there! Add a top coat to seal and protect your hard work.
Some paints say you don’t need a top coat and some people don’t ever use them. Great, if that works for you.
But as a beginner, it’s so disheartening to see your piece not stand the test of time because you didn’t add a sealer.
So, my advice is to use a protective coat such as Polyvine’s Wax Finish Varnish or Dixie Belle’s Clear Coat.
I coated these tables with Clear Coat in gloss. Gloss is considered one of the most durable finishes and as these tables will be used by children, they’ll probably need it!
You can use wax but that does require redoing every 6 months.
If you aren’t keeping the piece for yourself, then you’re asking the buyer to take on that maintenance. Which might be fine but it’s worth both you and them knowing.
Rule 7 – The cure
Now, do nothing.
Curing is different to paint drying. It’s the time it takes for paint to fully harden and be as durable as it will ever be. Which is usually 2-4 weeks.
This is the time to leave your piece alone. Try and put it out of sight, if possible, or you might be tempted to start using it.
The paint may be dry but it’s still delicate.
Putting items on tables or using a desk every day before the curing period is up, are ways to risk the finish not lasting well.
If you’re selling furniture, it’s advisable to not sell it until the curing period is over too. It wouldn’t be much fun to buy a new piece and be told not to use it for a few weeks.
Your approach
Rule 8 – Patience
So, with all the technical best practice tips in mind, one of the key things left is to be patient.
Things will go wrong. They will take longer than you expect. There might be holes you didn’t see before, the sanding might be patchy, or you might not like the paint colour.
These are true whether you’re a beginner upcycler or a professional. Just this week I had to take a hammer and drill to glued-on drawer handles which took far more time than I expected to remove.
And I worked on this chest of drawers for months before they were finished!
But how you handle those setbacks and by trying to be patient, will go a long way as to whether you come back for more.
Upcycling should be fun. A good thing for creativity, relaxing and the environment. But without patience, can come stress. Expect the unexpected and try and enjoy the process.
And after all of that, here are the finished tables. A simple, fun makeover and one anyone could take on.

What do you think is the best upcycling project for beginners? Let me know in the comments!
If you liked this post, you might also enjoy these painting tips…
And please check out the video tutorial on YouTube.
Pin it for later – the best upcycling project for beginners

Hi there! I'm Rachel Bowyer, a passionate DIY enthusiast with a knack for transforming the old into something beautifully new. With a deep love for furniture painting, refinishing, and the art of crafting. I've been documenting my DIY projects and restoration journey since 2018. I specialise in techniques like decoupage, stencilling, and decor transfers. Join me as we explore the world of creativity and home improvement, one project at a time.
These are great tips for beginners Rachel! I started upcycling with items like vases and candlesticks and then moved to small pieces of furniture! Have a great day, Donna
Starting with smalls is great advice!
Great tips for anyone interested in starting to makeover furniture with paint.
I’m glad you think so, thanks Paula.
This is nice to project.
Thanks, Tammy.
Great tips! I have a lot of big furniture pieces that I’d like to paint but I feel overwhelmed. Maybe starting with a small piece would help.
Absolutely, big pieces are daunting. Good luck!
This is a super cute project! Great tips too.
Thank you!
I love transforming furniture too. You did a great job in these!
Thanks very much, Kim
These are great tips! I love to redo furniture. Sometimes! Lol.
Haha, I understand that! Best tackled when you really want to do it otherwise it’s not a lot of fun.
Love these tips! I used to redo furniture years ago using Annie Sloan chalk paint. I might have to try Dixie Bell.
I have some Annie Sloan in my stash but don’t use chalk paint very often, they have some lovely colours.
These are such great tips! Thank you for sharing! Pinned!
Rachel, these are terrific tips! I’ve done a little furniture upcycling myself, and these are super tips for anyone getting started! Thanks for sharing!
Aw, thanks for saying so, Kim.