How To Paint a Table – DIY Black Painted Furniture
DIY black painted furniture can look beautiful. It’s moody, dramatic and clean. But it isn’t an easy colour to paint perfectly. Particularly, top coats often leave streaks.
In this makeover, I share a piece that I’m repainting with classy black paint. Also, I’m adding a beautiful decoupage paper to complement the dark paint.
Then finally, sealing it in a foolproof, streak-free way.
Thank you to Dixie Belle Paint for sponsoring this post.
This post includes gifted products and affiliate links so you can easily find the products I use myself and recommend to friends. If you purchase these products, I may earn a small commission at no extra cost to you.
Materials you’ll need
Step by Step Instructions
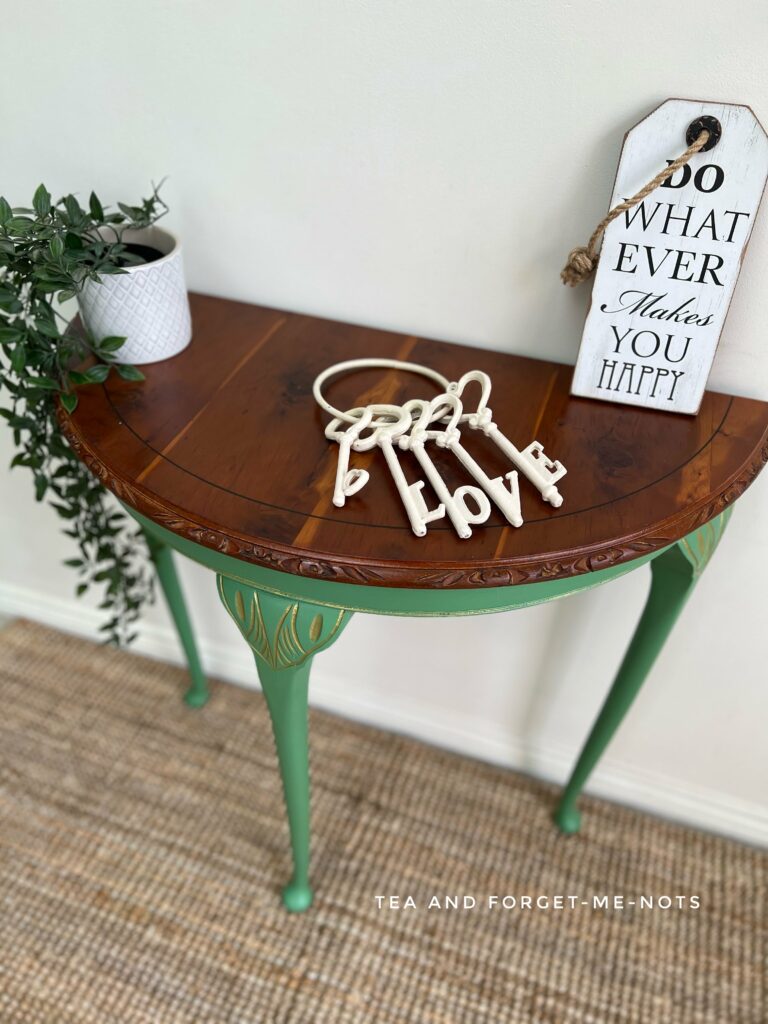
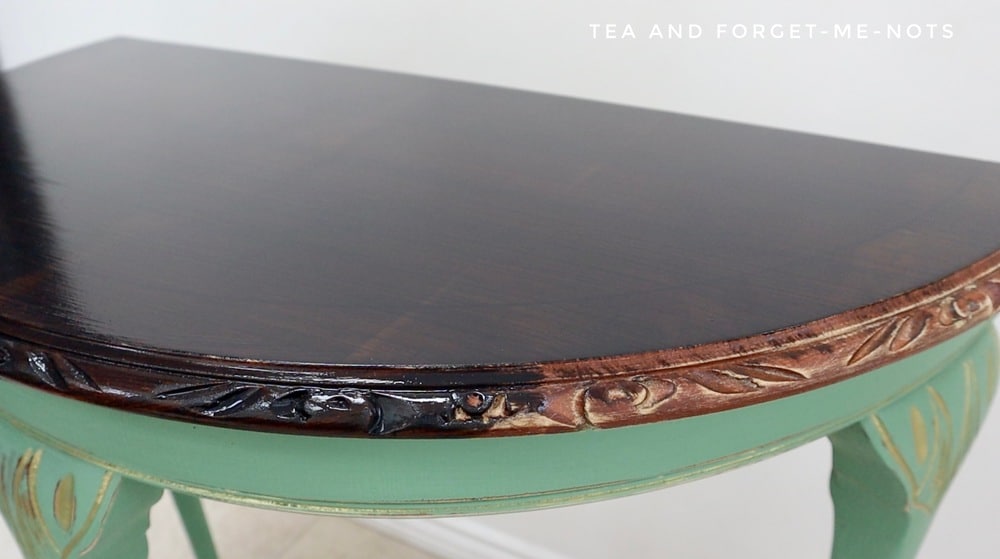
The furniture piece I’m starting with in today’s post is this bright half-moon table.
The original makeover was a half-wood, half-painted combination. I loved how the bright green paint, contrasted with the red-toned wood on the top.
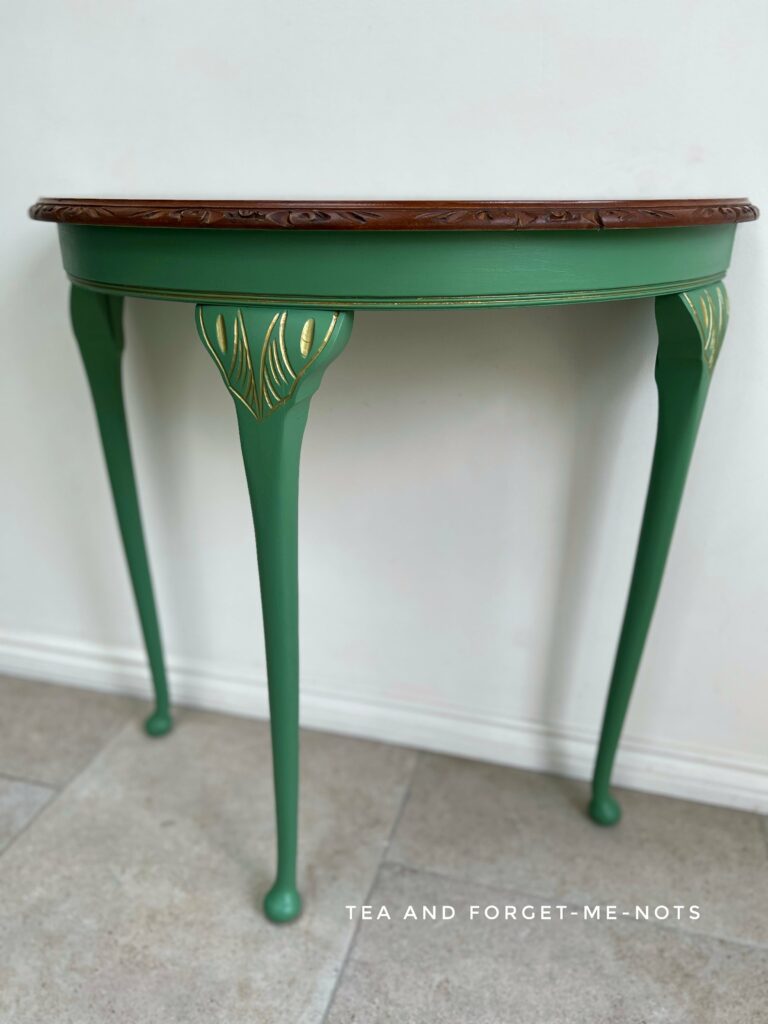
But sometimes things need repainting, so this console table is going dramatic.
Of course, not just painted with simple black paint. I still have to make it a little quirky!
The best thing about repainting something that you’ve already painted is that you know what paint and materials were used. If the quality was good the first time then the next step is a lot easier.
How to prep painted furniture for repainting
The first thing to do when repainting furniture is to prep the surface. Just as you would with an unpainted piece of wood furniture.
But as my side table was both painted and oiled, they needed prepping in different ways.
For the green table base, was the usual process.
You do a light sand over the paint finish with sand paper to rough up the surface. Just enough to give the first coat of paint something to stick to. It’s not necessary to sand back to bare wood or remove the paint entirely.
However, if the old paint is flaky or chipped, you would want to sand it back to a smooth finish.
Only a smooth surface to start with will end with beautifully smooth results. No amount of coats of paint will hide holes left by flaky paint.
Do you need to remove hemp seed oil before painting?
While it’s easier to paint over hemp oil after it has cured, you’ll achieve the best results by removing it to start with.
An easy way to remove hemp seed oil is with mineral spirits. Also known as white spirits or paint thinner.
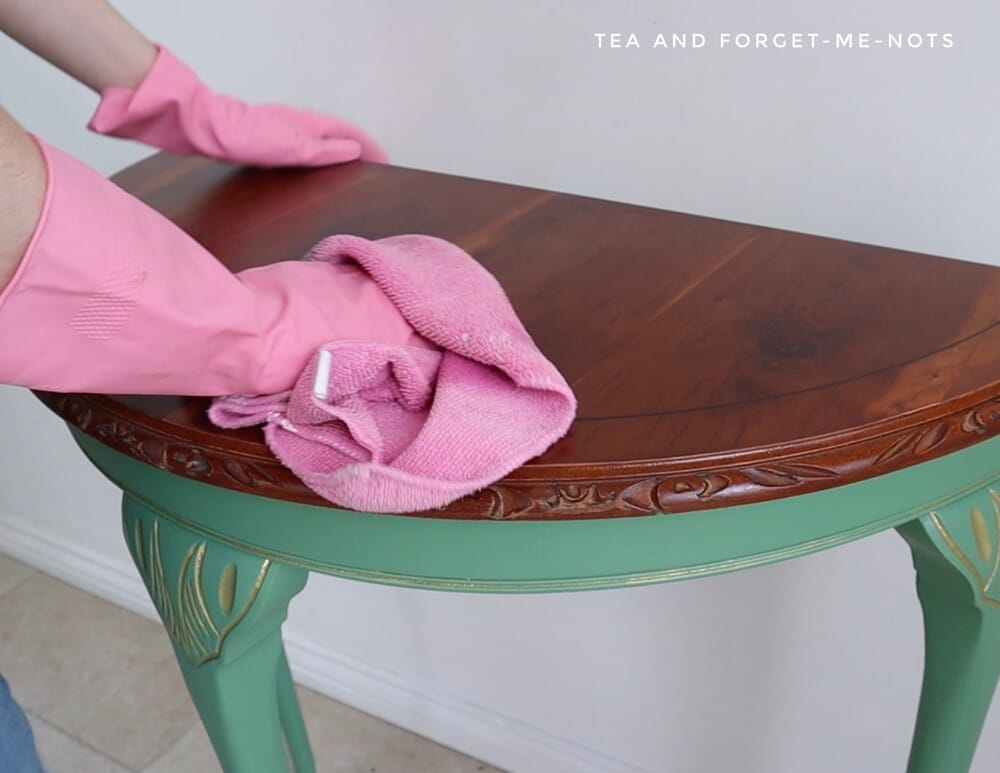
I used an old cloth and rubbed the mineral spirits into the tabletop. You want to use this in a well-ventilated area as it doesn’t smell very nice.
With both the table top and base prepped, it was time to clean.
Firstly, I removed the residue left from the sanding. Then I used a cleaner to get this old piece prepped to nicely accept a fresh coat of paint.
You can remove sanding dust with a tack cloth. They’re great for picking up fine particles. However, if you use one with silicone in, it can cause problems with paint adhering later on.
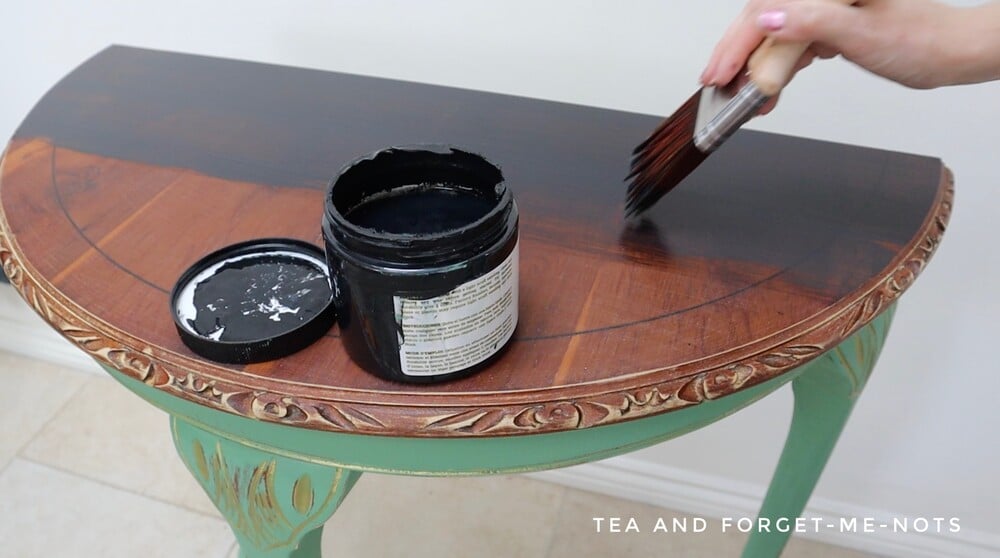
The best black paint for old furniture
The best paint for black furniture makeovers is Anchor, in my opinion. It’s a true, sophisticated black.
You can see how I used it paired with natural wood when painting this dresser black.
If you think that black furniture paint may look overbearing on a fully black piece of furniture. Remember that you can use it on a small project. Or on parts of the furniture only, such as the drawers.
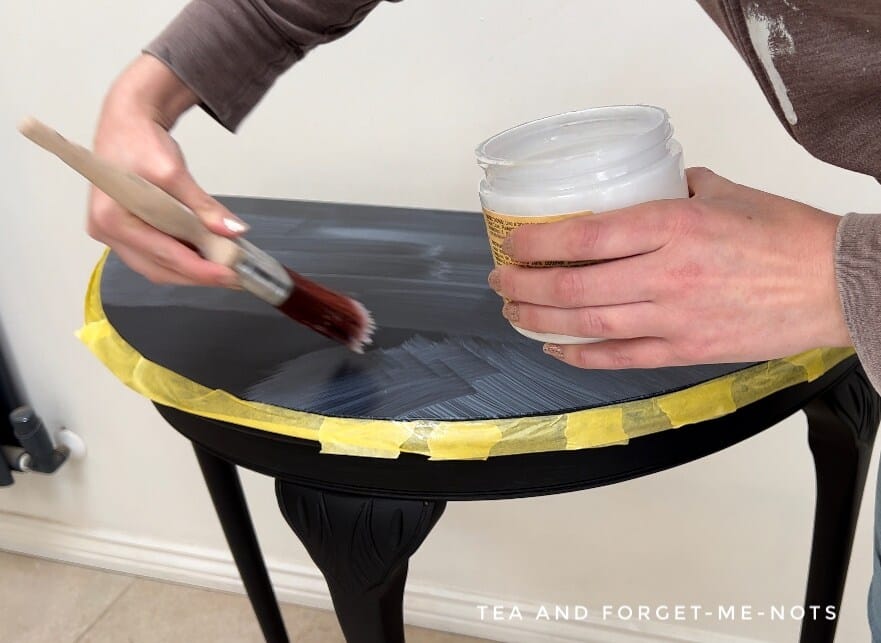
I used a paint brush to apply this Dixie Belle paint. Silk paint is a mineral paint, rather than black chalk paint. The difference is thinner coats of paint and therefore less visible brush strokes.
For the details around the edge of the tabletop, I used a detailed artist’s brush. It’s more accurate and less likely to lead to excess paint built-up around the ornate areas.
A Silk type of paint dries quickly. After one coat of paint, I was still able to see some of the patterns of the veneer underneath. After two light coats of paint, it had perfect coverage.
The best way to make sure that you don’t miss a spot is to paint from a different angle.
I also turned the table upside down to make sure that I had painted everywhere. Flat surfaces such as furniture movers are great for this. As the wheels give you the flexibility to rotate the piece too.
Especially if you aren’t doing a water-based top coat, you don’t want to miss a spot. If you seal with an oil-based top coat and then need to add some paint after, you’ll need to remove the top coat. Or wait for it to cure for several weeks to do so.
Best to check that you’re happy with the new coat of paint first, before moving on.
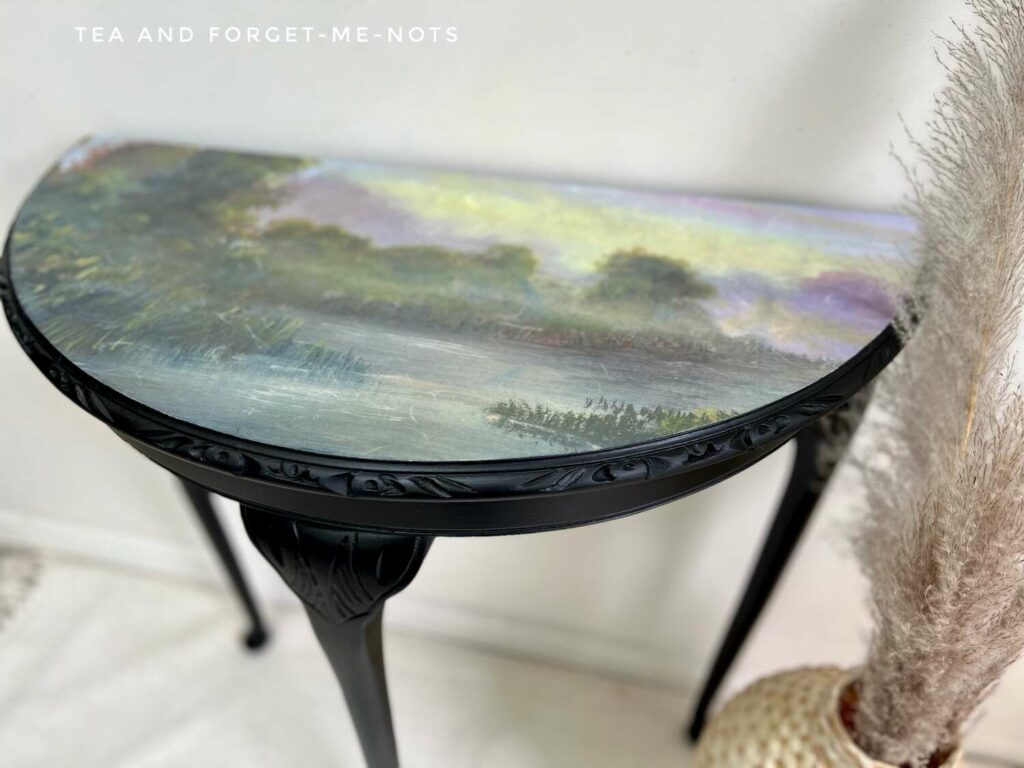
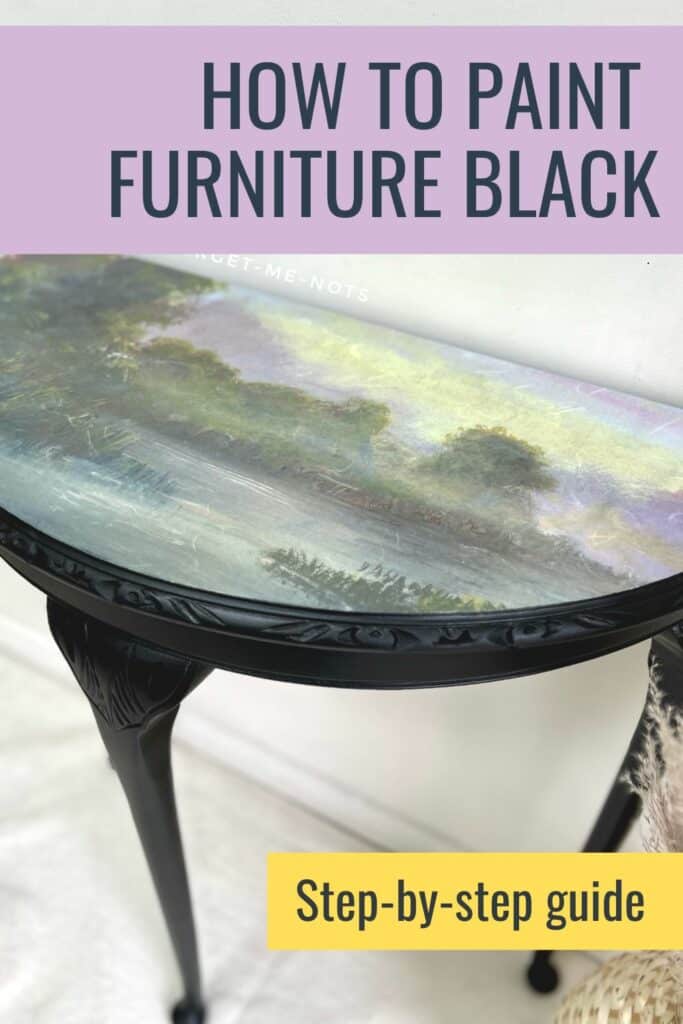
Adding rice decoupage paper to a tabletop
I applied rice decoupage paper to the tabletop to add some drama to the black coat of paint.
I chose a new decoupage paper called Late Aurora for this piece. It’s a stunning landscape of a river, using greens, blues and purples.

While this paper comes in A1 size, I was careful to choose which part of the image I wanted to use. And I saved the rest of the rice decoupage paper, for another smaller project.
Often people advise using white paint under a decoupage paper to help the bright colours of the paper stand out. I did this after the second coat of Anchor, and it still looks vibrant.
How to apply rice decoupage paper
One of my best tips is to prepare the area outside of where you will place the paper in advance.
So, for this side table, I added Frog Tape around the ornate edge. I did this to avoid getting the decoupage medium anywhere other than under the paper. The difference in sheen would be visible with the current matte finish.
The medium I used is Clear Coat in Flat. I chose Flat because again, it would minimise the visibility if any got onto the black paint other than where I wanted it.
Fortunately, Clear Coat is something I also use a sealer, So, it’s a great way to double up on the usefulness of a product and not purchase something extra.
It’s a good idea to start in the middle and spread the top coat out to the edges. Avoid applying it from the outside edge inwards, so as to not get build up outside of the decoupage area.
You can do several coats for this step. The more you do, the fewer gaps and therefore better adhesion you should have.
Then leave the Clear Coat to dry.
Once dry, you can easily position the paper to where you want it. If the paper is smaller than the surface area, you can tear the edges for a more natural look.
But this decoupage paper was larger than the table.
I chose the central part of the image. Focusing on the darker river, with less of the lilac sky. I felt that the dark colours of the dramatic picture paired best with the black paint..
Iron-on method for applying decoupage paper
Once in place, you can use an iron to secure the paper. You need some parchment or baking paper on top of the decoupage paper. This protects it from the iron.
If you place it on a medium heat then you don’t risk scorching the paper. If the paper doesn’t seem to be attaching, then carefully increase the heat until it’s effective.
This method works by reactivating the Clear Coat so the paper firmly attaches.
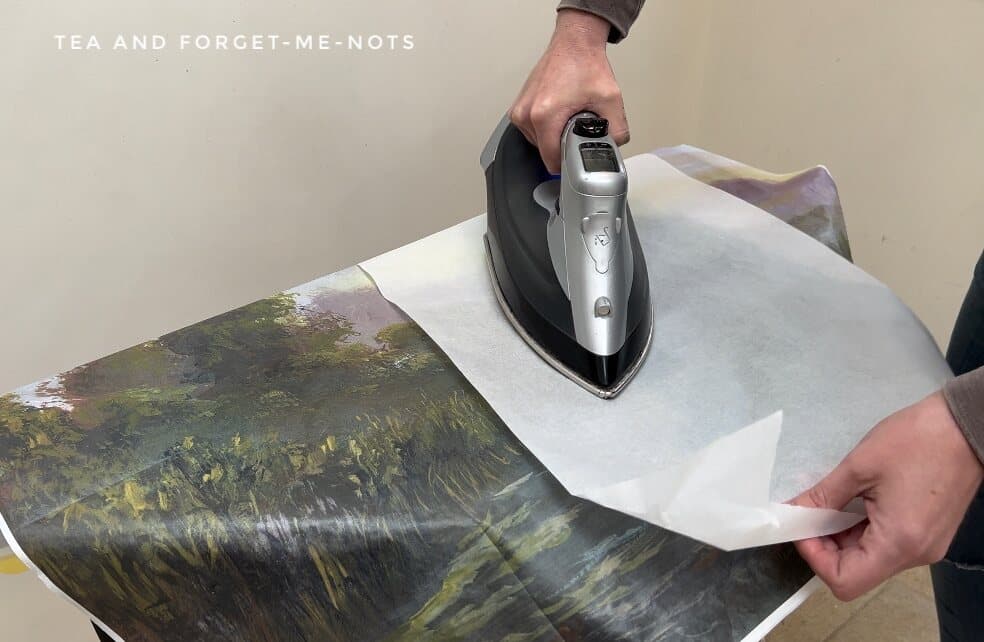
It’s helpful to start ironing from the middle outward. You want to reduce bubbles and this avoids trapping them in the middle of the paper.
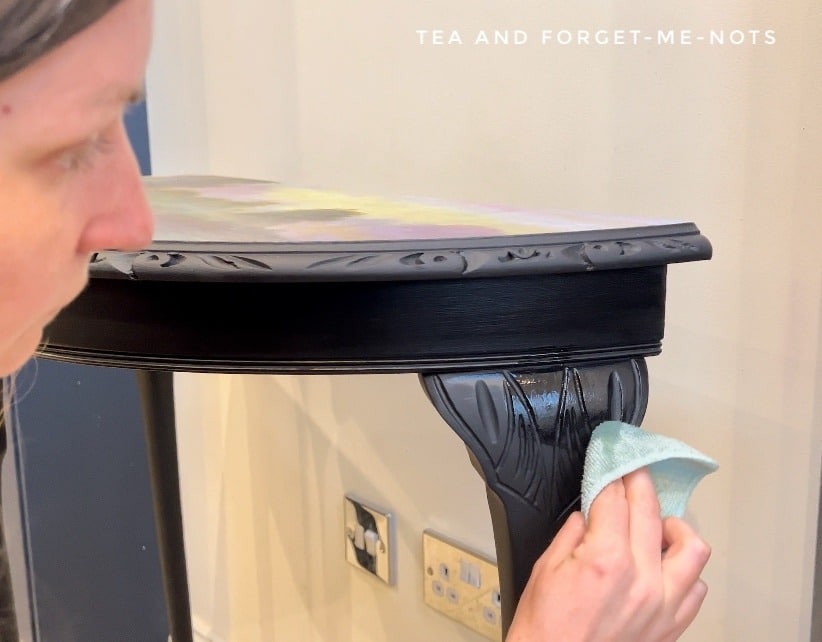
Once the paper is cool from the iron, you can top-coat it with the same sealer.
This may cause bubbles to reappear!
Don’t worry if you do find bubbles, you can minimise them in two ways.
- Firstly, you can pop them with a tiny pin.
- Secondly, you can re-iron them.
Often, however, they disappear by themselves once left overnight.
The last step is to trim the paper to the edges. I do this by using sandpaper and gently sanding at an angle. Be careful not to use rough sandpaper as it may tear the paper. And don’t sand too heavily or it could scratch the paint below.

However, if you like the distressed look, you can gently sand the image with high grit sandpaper for a different feel.
How to seal DIY black painted furniture
The best topcoat to seal black paint is hemp oil. It’s a streak-free sealer and very easily applied.
The first step is to apply it sparingly with a lint-free cloth. Then after letting it sink in for about 12 hours, wipe the excess off. If some hemp oil is still visible, it just means that that area of the furniture absorbed less of it.
It’s a lightweight sealer in terms of durability. But for the purposes of sealing the legs of a side table, the perfect choice.
If you want to use another top coat for a high-traffic area, you can still avoid streaks and brush marks.
It’s a great idea to mix a touch of black paint into your sealer to help reduce streaks. And also do thin coats.
Or if you’re still struggling with streaks, you can do a final top coat of black paint only. As long as the sealer coats underneath are durable enough to protect it.
DIY Black Painted Furniture
I love the look of black paint on furniture. It’s a classic like white but with more edge.
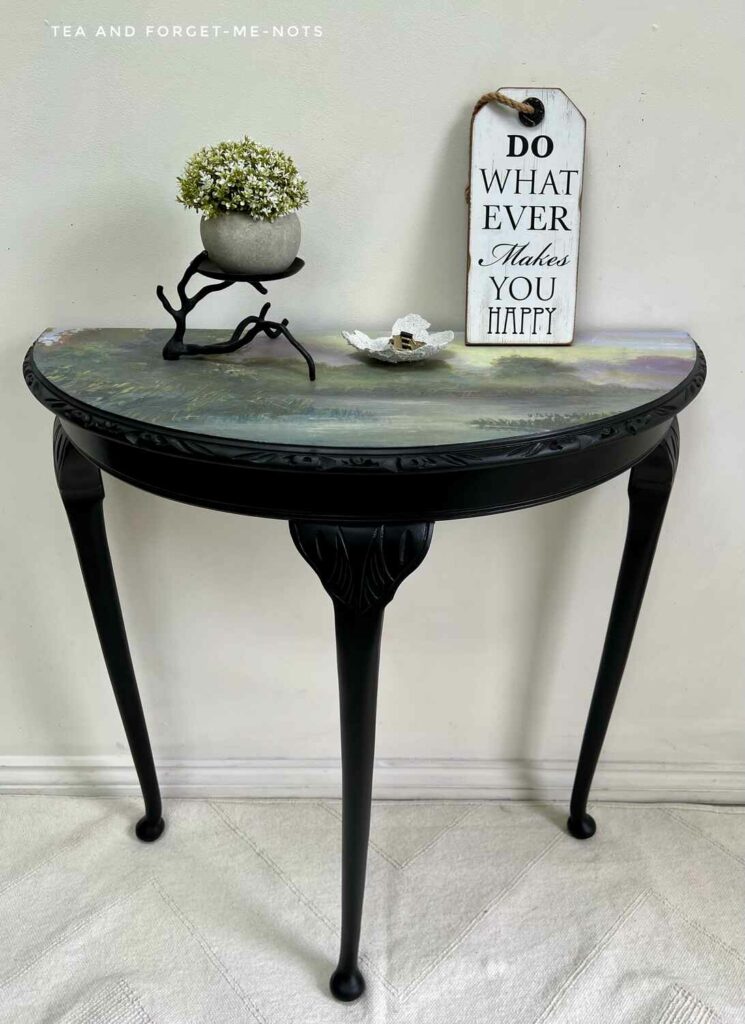
And the decoupage paper is just beautiful. Inviting colours and charming. I’m so pleased with this combination.
You could also create a similar look with a black stain. If it’s a gel stain then you can use it directly on top of an existing finish.
Like DIY black painted furniture but without a very dark look? How about a dark gray black like on this beautiful cabinet?
To be the first to get my latest blog post, subscribe here.
Answers to your questions about painting furniture black
Q: How do you avoid streaks?
A: Hemp Oil leaves no streaks and is so easy to apply.
Q: How many coats of black paint do you need?
A: Anchor covers perfectly with two coats, over both the existing paint and wood.
If you loved this project, you’ll love these projects too:
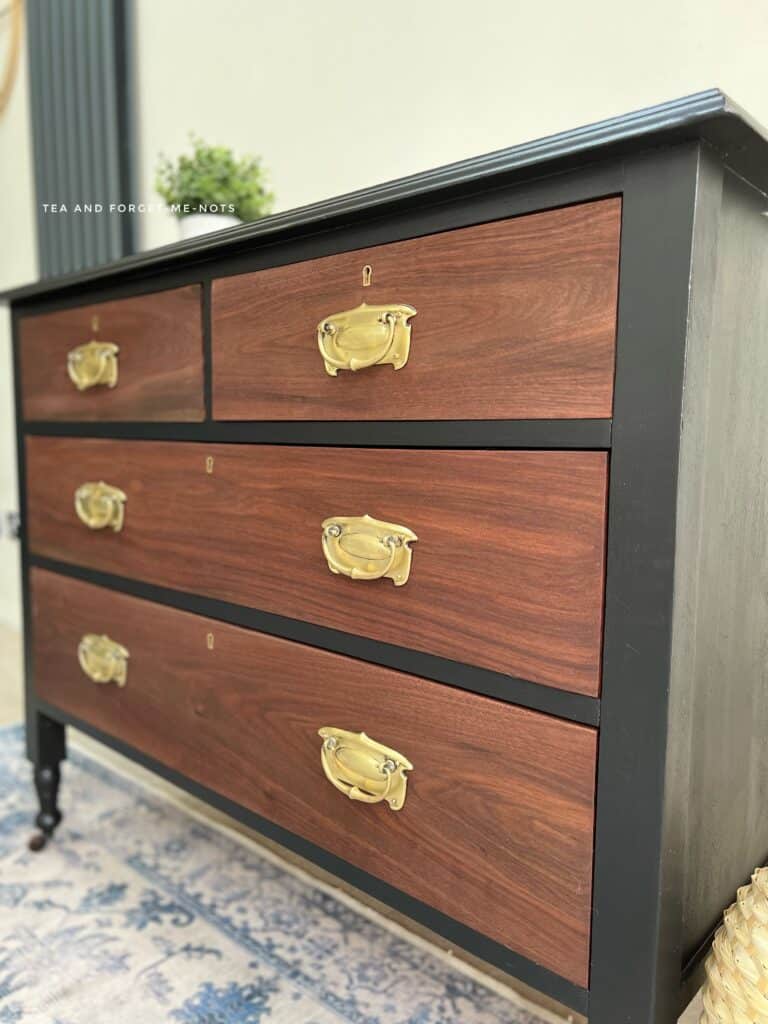
trendy black and wood dresser
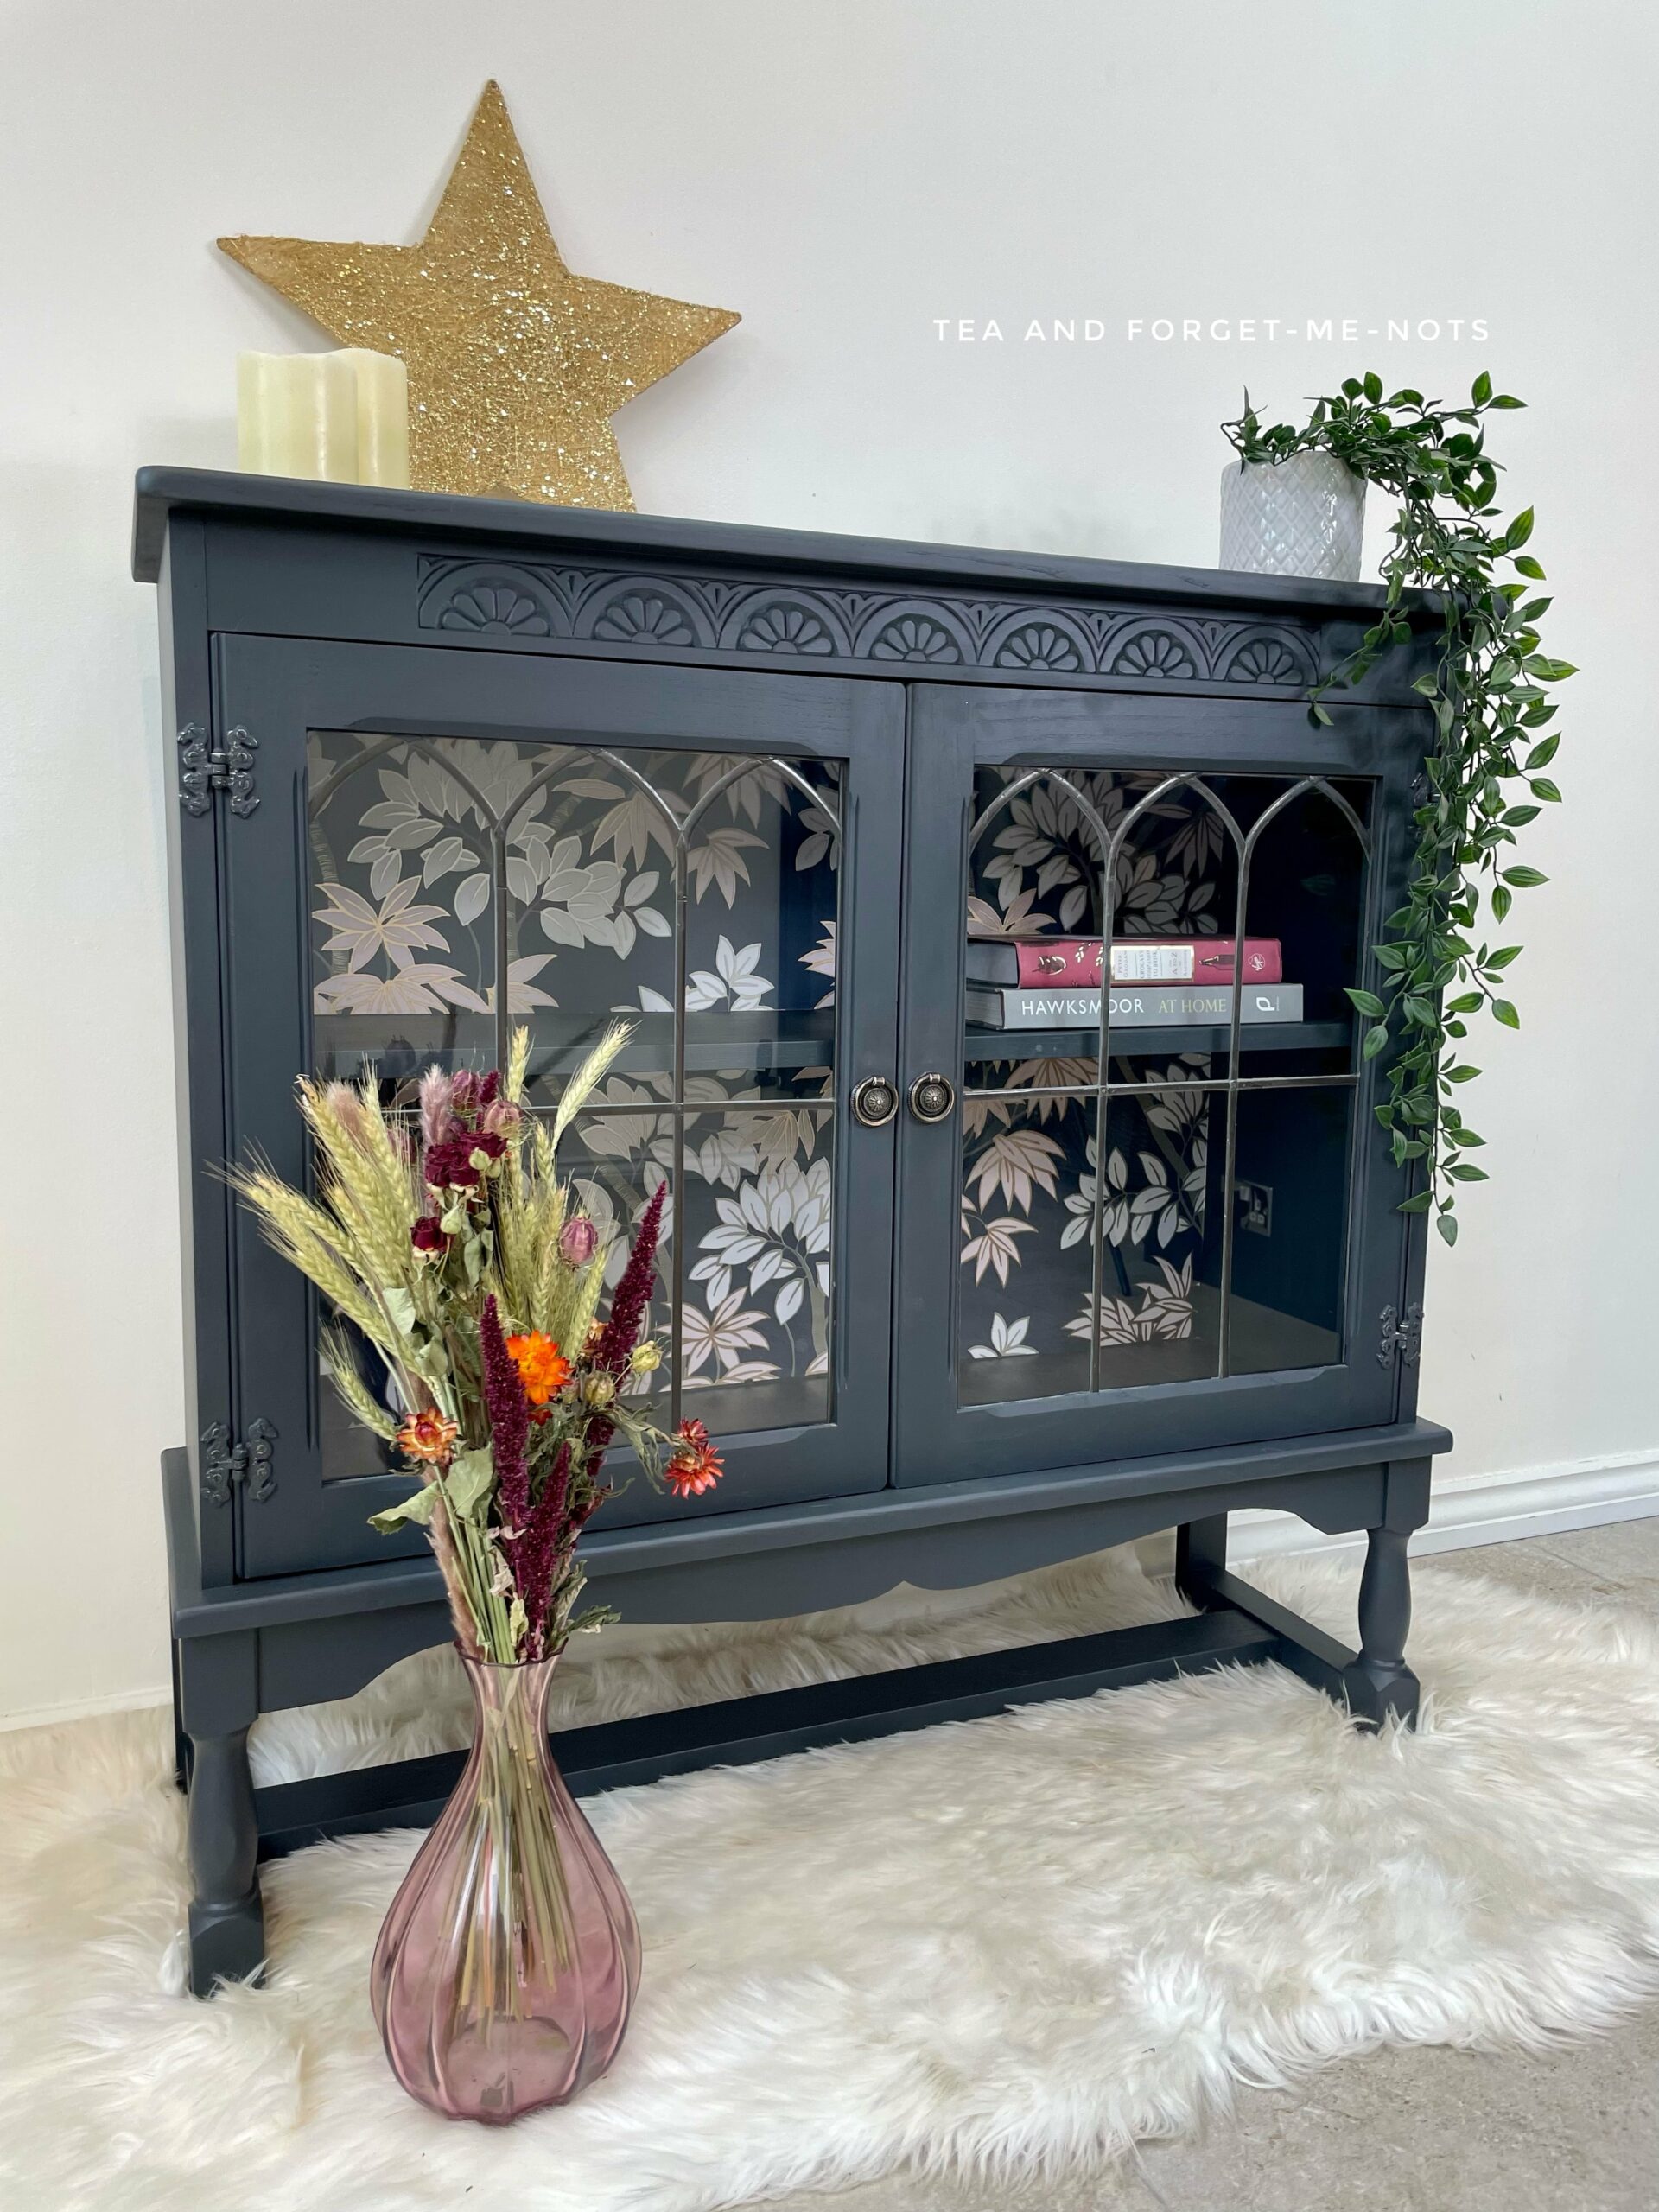
Stunning Grey-black Cabinet
Space-saving table and chairs
Did you Paint Something Black?
I’d love to see what you have created so mention @teaandforgetmenots so I can see your creations!
Pin it for later – DIY Black Painted Furniture

Hi there! I'm Rachel Bowyer, a passionate DIY enthusiast with a knack for transforming the old into something beautifully new. With a deep love for furniture painting, refinishing, and the art of crafting. I've been documenting my DIY projects and restoration journey since 2018. I specialise in techniques like decoupage, stencilling, and decor transfers. Join me as we explore the world of creativity and home improvement, one project at a time.
This is a great project. I love the top of the table!
Turned out beautiful Rachel! Quick question; I’m curious to know why you’d use hemp oil on top of anchor since it already has a sealer? Isn’t hemp oil supposed to soak into a finish like chalk or milk paint to protect?
Yes you’re right. It just adds another coat of protection and a slight sheen too.
This looks great! The black paint and decoupage paper combination works well together.
Thanks, Tamara.