xTool M1 Beginner’s Guide to the Laser Cutting Machine
This xTool M1 beginner’s guide will help you decide if this 2-in-1 laser engraver and blade cutter is the right tool for you.
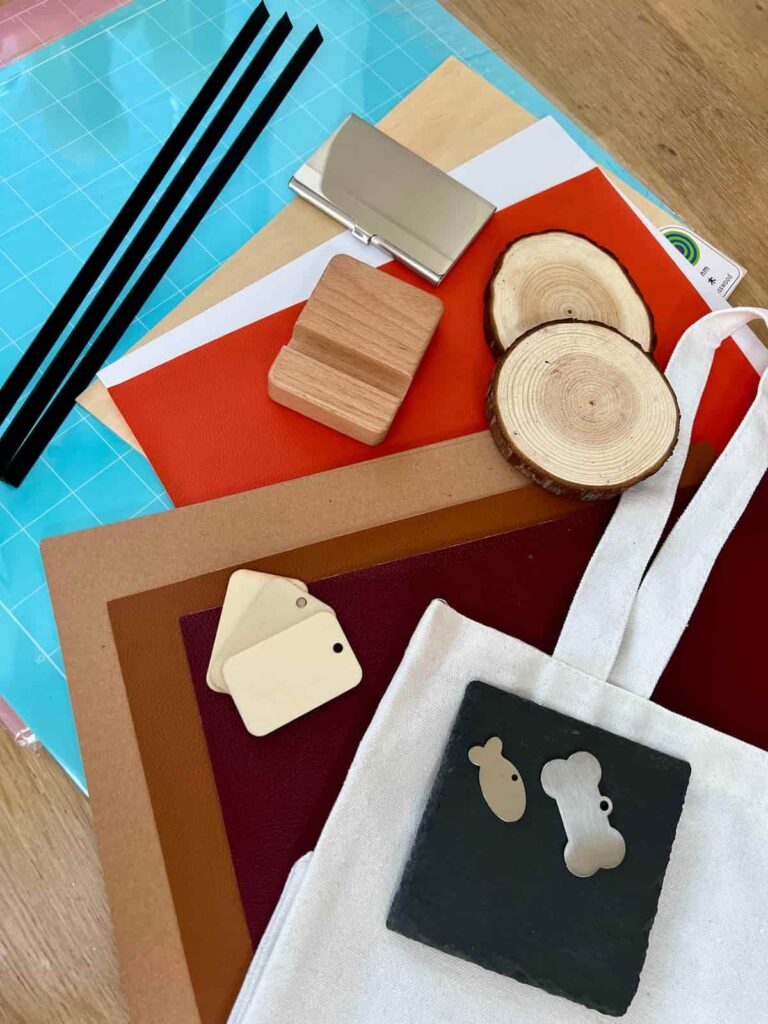
With the xTool M1 you can cut and engrave 100+ materials. Such as wood, coloured acrylic, slate, leather and canvas.
This is a versatile tool for your craft room. Whether you have a small business or enjoy making personalised gifts or home decor, this xTool machine has a lot of potential.

Thank you to xTool who sent me this M1 machine to review. The opinions I share in this review are based on my own research and experience learning the tool.
To give you the best understanding of this cutting tool, I’ve created a beginner’s guide for you. If like me, you haven’t owned a laser cutter before, this information will be useful.
If you’re thinking about upgrading your machine or buying your first cutting machine, this post might help you decide what you need.
This post includes gifted products and affiliate links so you can easily find the products I use myself and recommend to friends. If you purchase these products, I may earn a small commission at no extra cost to you.
Rather a video tutorial instead of step-by-step instructions? Here’s a video tutorial that guides you through setting up your xTool M1 machine.
Beginners Guide to the xTool M1 Machine
What is the xTool M1 Hybrid Laser Cutter?
This machine is the xTool M1 – 10W Deluxe. The M1 is the model type, which is the hybrid laser, engraver and cutter. 10W refers to the level of laser power.
For more powerful machines, xTool have other models that have 20W, 40W and 55W lasers.
What type of laser does the xTool M1 use?
This M1 laser machine has a 10W diode laser. Which is best suited to home crafters and small businesses. For first-time laser crafters, a 10W or 20W machine is a good entry-level.
You may also see Co2 lasers available. These are more powerful lasers that can cut more materials. xTool’s P2, a 55W Co2 laser cutter, can help people who want to upgrade their hobby into a small business by increasing productivity and supporting more and bigger material.
Getting Started with the xTool M1
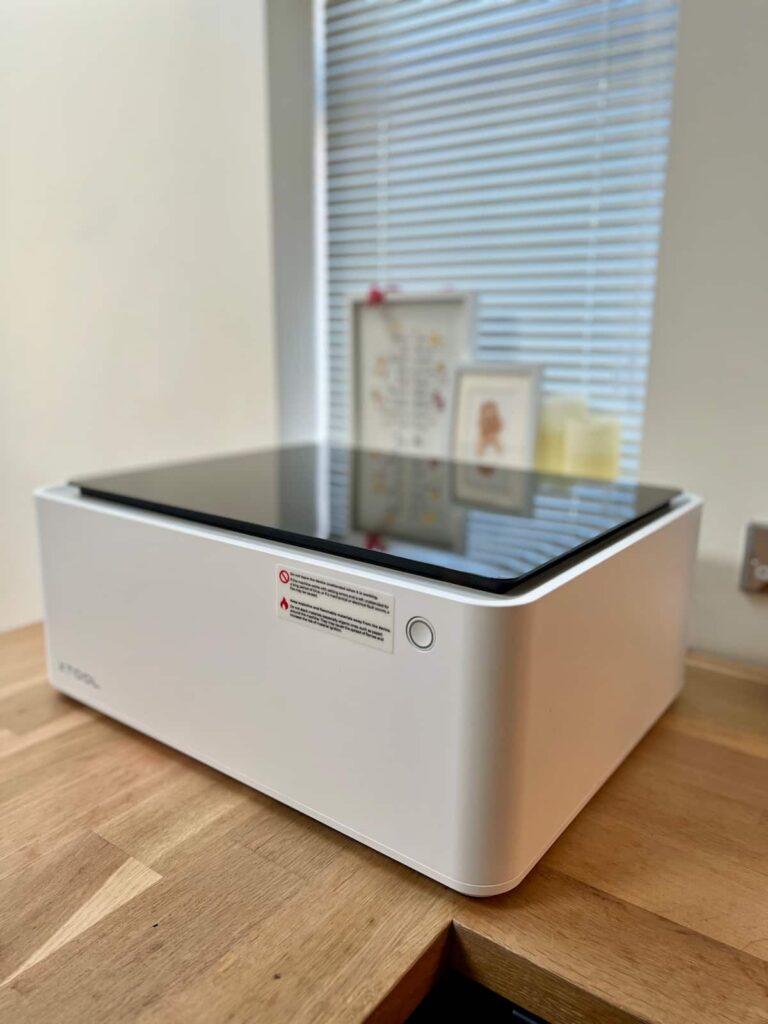
The size of the M1 is 56cm x 45cm by 23cm (22 x 18 x 9 inches). Which is similar to the size of a printer. Suitable for a workbench or craft table.
How big can the xTool M1 cut?
The work area within the machine is 38.5cm x 30cm (15 x 12 inches). Which will fit most small-scale pieces such as tumblers, small signs and sets of pencils.
For taller objects such as tumblers, you have to remove the base plate and use risers to raise the bottom of the machine. As the laser stays in the same place, you need to do this so that the item being worked on is at the right height.
For an additional cost, you can get the riser base to set up the base permanently with the increased depth. This is helpful if you’ll be regularly using the rotary tool for cylindrical objects like tumblers, which need the extra height.
So if what the machine can do seems like it’s something you’re interested in, let’s get into how it works.
Set up of the M1 machine
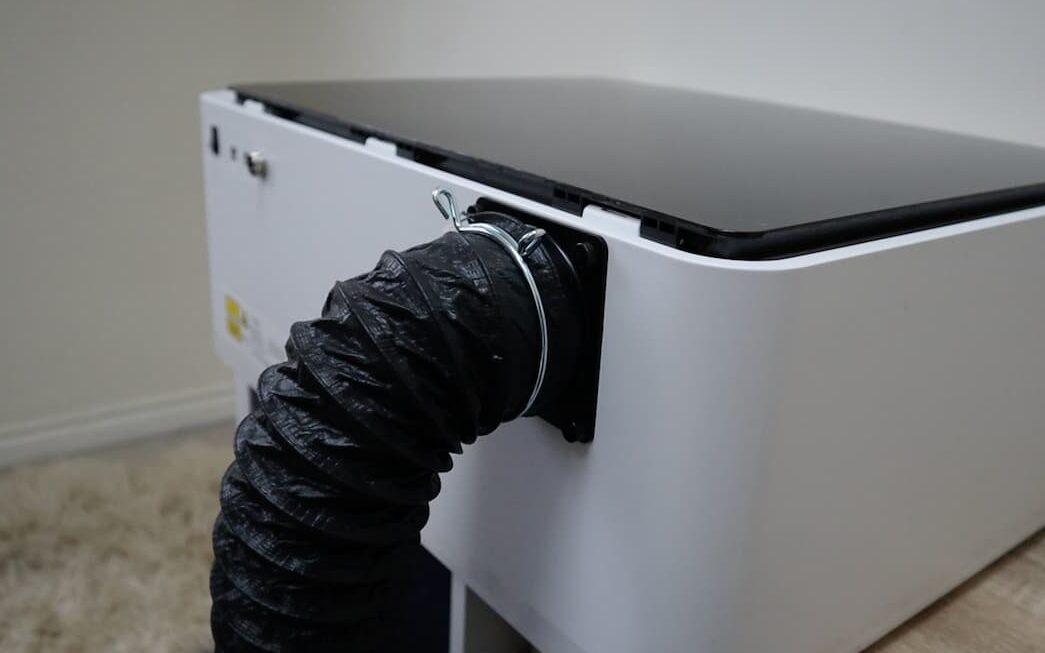
The M1 comes with an exhaust pipe to remove smoke and dust, 5 blades, two cutting mats and test materials.
To install the exhaust pipe, attach it to the back of the machine and secure it with the grip. The end of the pipe needs to go out of a window to safely remove the toxic fumes.
Then remove the blade housing and insert one of the blades.
That’s as simple as the machine setup is. From unboxing to beginning a cutting project, took less than an hour.
How to Install the Software
You create your designs in the xTool creative space software. Which you download for free from the xTool website.
The initial set-up is with a USB cable. After that, you can connect with WiFI which is very convenient.
If you’re familiar with Cricut Design Space, then you’ll know the general way it works. You can insert your images, shapes or text. Then decide which elements to cut, engrave or score.
It’s easy to use but there are lots of tutorials out there for learning the terms for what you want to do.
As a nice feature, you can also get the app on your phone or iPad and can control it from there over WiFi.
What can you do with the xTool M1?
The M1 can engrave and cut many types of materials. Some examples include:
Laser engraving on wood, dark acrylics, glass, paper, card, felt, and leather.
Laser cutting on wood, dark acrylics (not clear), stainless steel, painted metal, bamboo, cement, and leather.
Blade cutting on paper, card, fabric, felt, Heat Transfer Vinyl, and self-adhesive PVC.
The M1 does not work with a few materials, such as clear acrylic or gold. If you know something that you will want to use, it’s best to check that it is supported first.
Want to engrave slate coasters, tumblers, and leather keyrings? It can do all of that.
The M1 basic or Deluxe come with different material bundles. The Deluxe that I received included materials such as wooden tags, slate coasters, plywood, leather, vinyl, and stainless steel tags.
Enough for you to try out all sorts of different materials and projects to decide what works for you.
Beginner Guide To xTool M1 Machine Instruction Video
You can find more video tutorials on the Youtube Channel
How To Use The xTool M1 Machine Step by Step
Materials Needed
Test Cutting Materials
Which xTool M1 Settings work best?
There are no one-size-fits-all settings. Each material will work slightly differently. xTool does provide a settings sheet for the materials that come in the M1 box. These materials are also available to buy directly from them.
It’s a good idea to create a test cut for each new material you use. Then record the results so you know the best settings for next time. You can create these easily within xTool’s graphic design software.

As you’re testing both the power and speed settings of each material, some will work and others won’t. Then you’ll find the right results somewhere within that sheet.
But as you’re testing combinations that may not work well, you need to pay extra attention when the cutting process is taking place. You may need to cancel the process if you see scorch marks.
The shapes below were cut using the recommended settings. But to help avoid scorch marks, they were tested with masking tape and with damp wood.
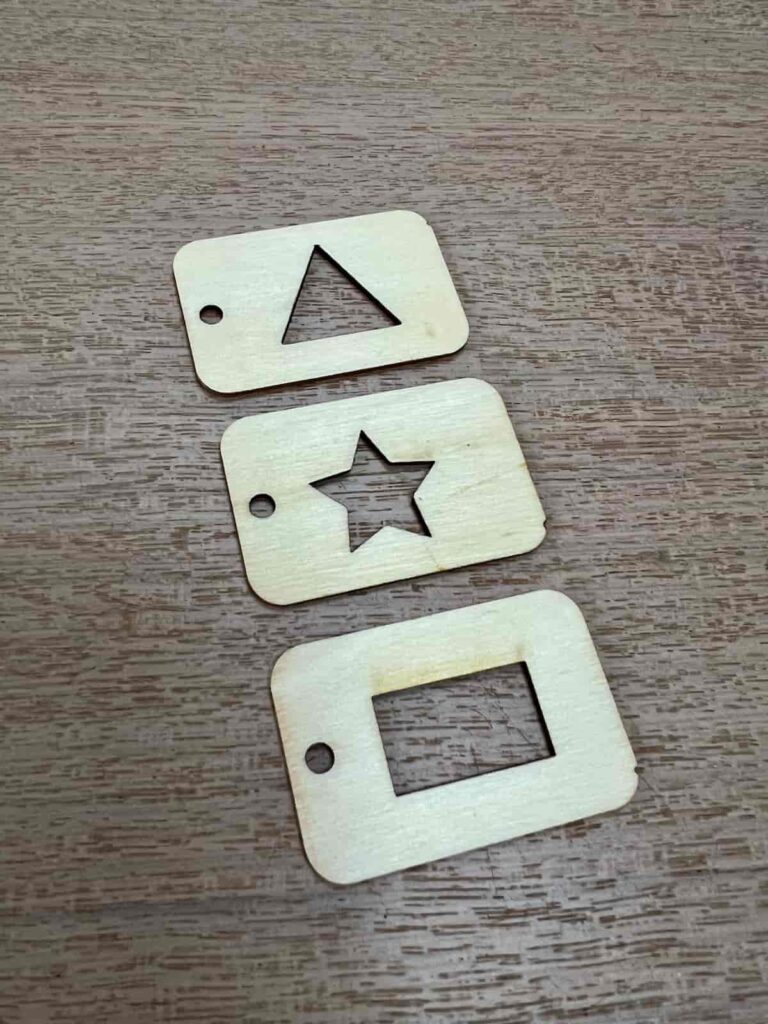
- Triangle = with masking tape
- Star = lightly damp wood
- Rectangle = normal
It’s a good idea to start a spreadsheet with the successful settings. That way you can easily recreate them next time you use the same material.
xTool M1 Beginner Projects
For these beginner-friendly tests, I’ve focused on cutting, engraving and scoring different types of wood.
Project 1 – Walnut Plywood ‘Love’ Rose
Step 1: Choose Your Image and Insert Into XCS
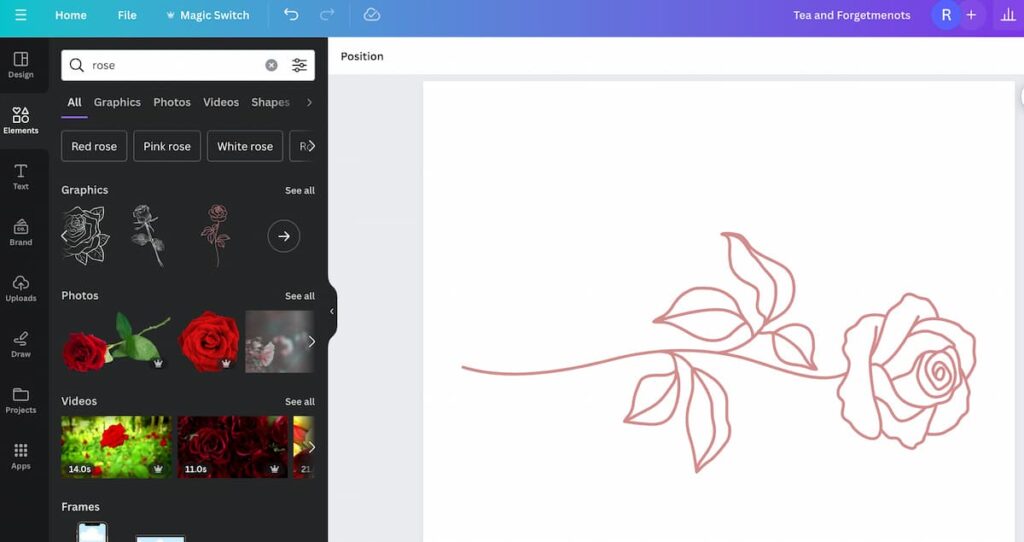
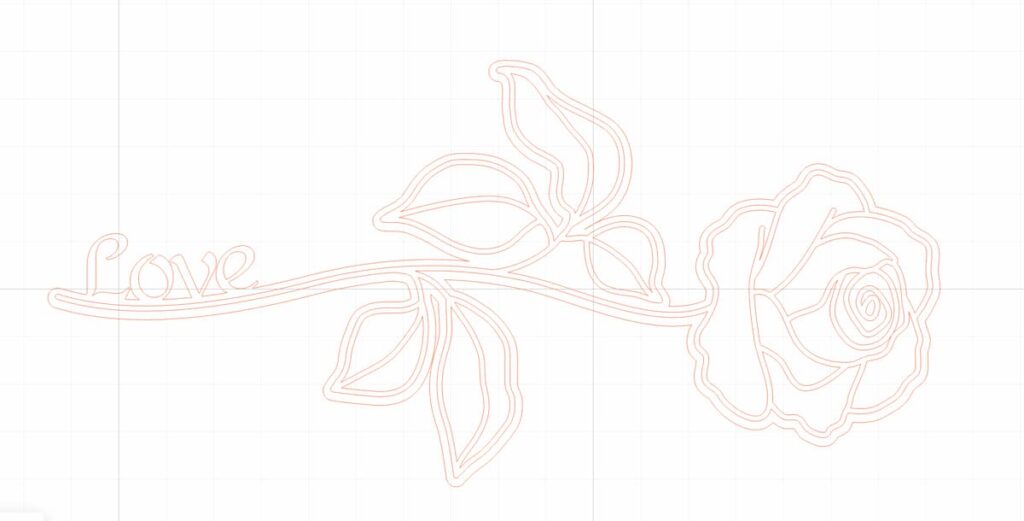
The first project is making a rose. As we’re close to Valentine’s Day, wouldn’t a pretty wooden rose be a nice keepsake?
There are some simple shapes, flowers, vehicles, borders etc in the free software for xTool. But the rose shape in there wasn’t quite right for this design.
Canva is a helpful tool to use for line drawings. You can search for a rose and choose a simple shape that you like. I didn’t change anything about the design. Simply downloaded it as a PNG file.
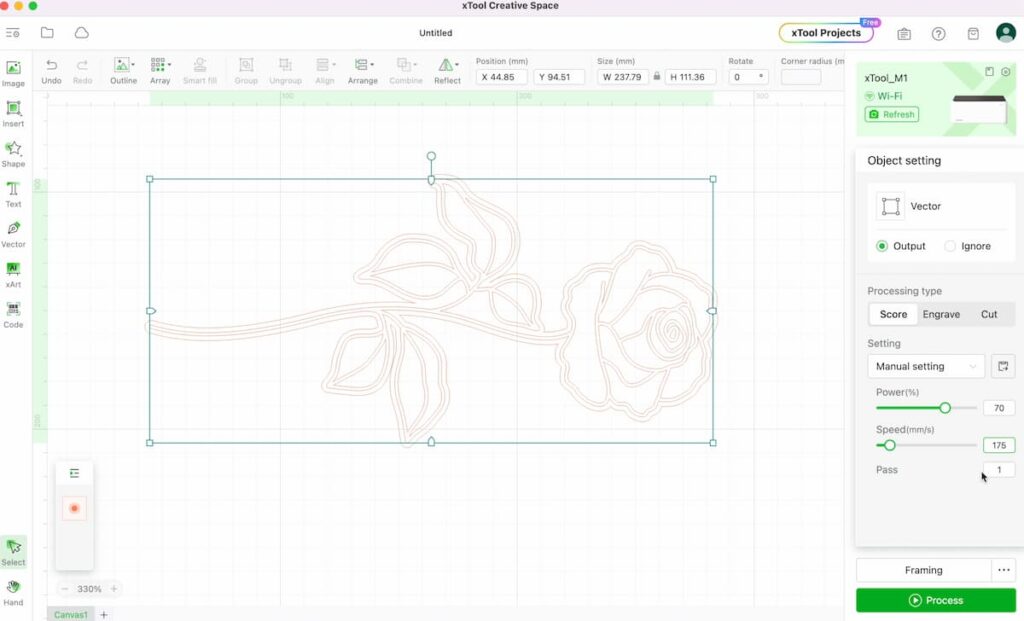
Then go to XCS (xTool Creative Space) and insert the image.
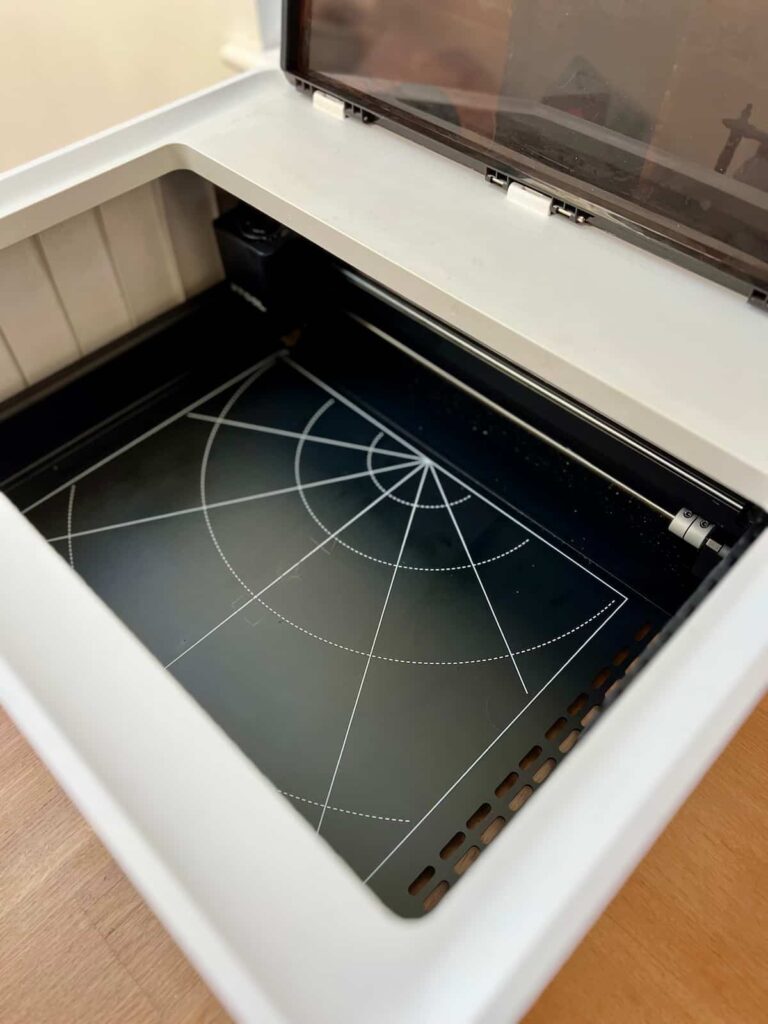
The M1 has a camera inside of it. So, if you refresh the machine, it will show you a live view of the material with the design on top.
You can add tape to the plywood to help with scorch marks around the cut areas. I placed the rose shape so that it stayed in the area with the tape.
Step 2: Choose Score, Engrave or Cut
The line drawing of the rose will be scored, which means that it will create a simple dark line of the rose. But to cut it out, you need an additional line on the outside. For this, select the outline option.
You can also add extra details to line drawings by combining them with the original image. I added ‘Love’ with the text feature in the XCS software. Then used the unite feature to combine them.
By clicking on each element, you can choose the settings for each part. For the inside, choose a score. For the outside, choose cut.
You have to select three settings for each process. The power level, the speed, and how many passes it will make. Which is how many times it will go over the object. If it’s thicker materials like 6mm wood, you will likely need two or three passes to cut the object out.
This is where the test cuts come in helpful. Input the settings based on this to get cleaner cuts and the best results on your score lines.
Step 3: Input the Material and Laser Settings
The material (basswood plywood) pre-populates default settings. These are a good starting point but it’s best to do your tests on each material to be confident in the results.
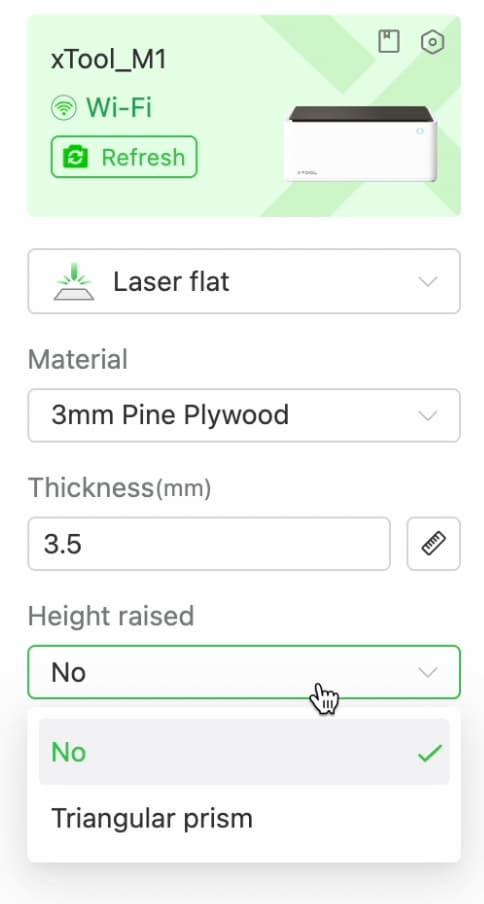
The M1 comes with triangular prisms which raise the wood off of the base plate when cutting. If using these, you also need to say this in the settings area.
The laser beam works by knowing the distance to the material that it’s going to cut. If you don’t say that the wood is on prisms or don’t use the auto measure to get the right thickness of the material, then the laser might not work properly.
When the image is how you want it, and the material and cut settings are in place, it’s time to go into process mode.
You can do an additional step to frame the image. This is a dummy run showing which working area the laser will cut. This is helpful as sometimes you move the material and need to check that the laser is going over the area you want it to.
Step 4: Start the Laser
Then you can start the laser cutting!
You have to hit start on the machine rather than your laptop. This is a good safety feature so that you have to be near the machine while it works.
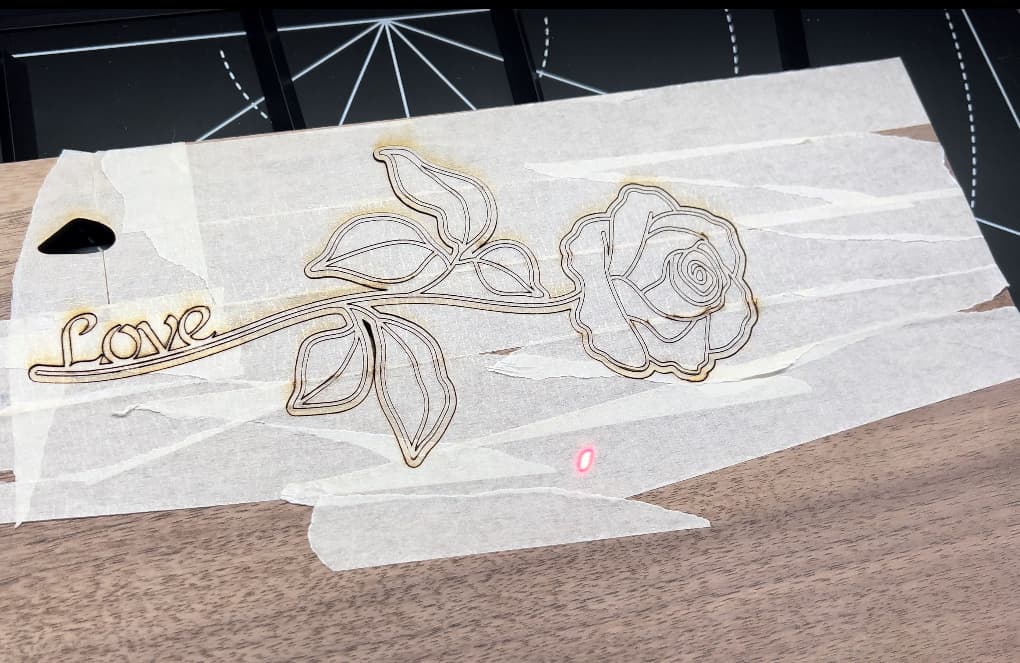
You should keep an eye on the project while it’s working. If the settings are off then you could get a small flame. Simply cancel the project in this case.
There are a few inconsistencies in the wood where the masking tape was doubled up where it overlapped. An easy fix for next time.
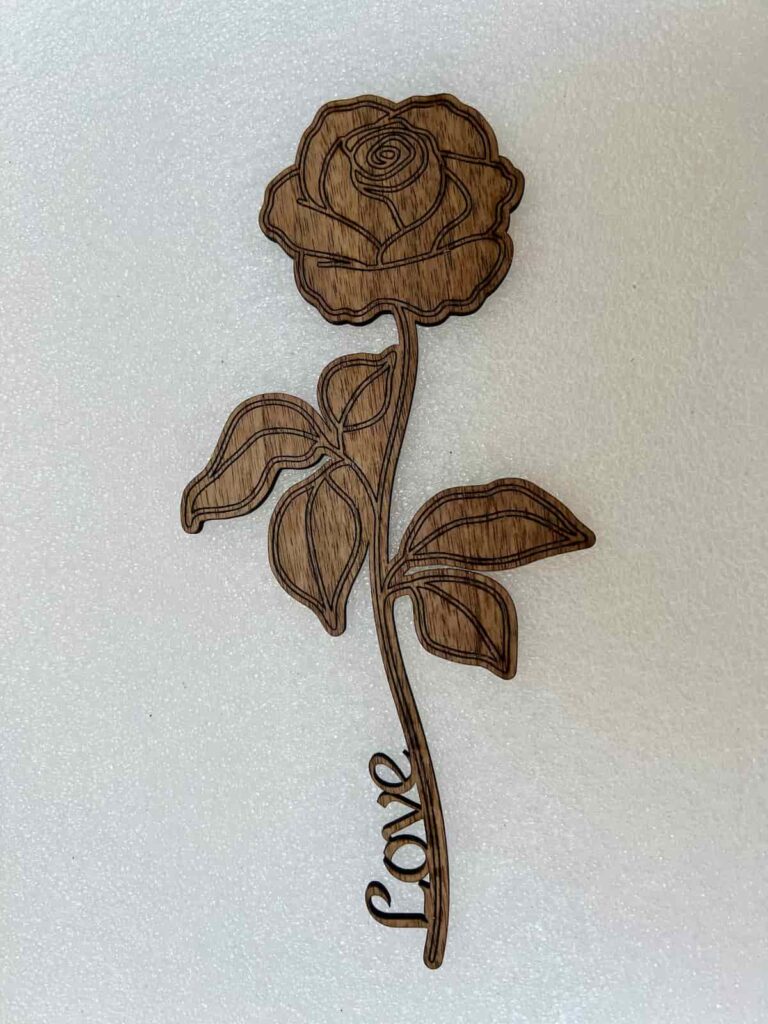
This rose has turned out beautifully. It would make for a lovely personalised gift to put on a shelf or decorate a room.
Project 2 – Engraved House on Basswood Plywood
Step 1: Choose and Edit Image
The second project was to test the laser engraving function on 3 mm basswood plywood.
It’s best to use a photo without a background. For this, I removed the background from this cottage in Canva. Then I set the image to greyscale by setting the saturation to the lowest it would go.

Step 2: Choose Engraving Style
Once imported into XCS you have several options for how you want the image to look. Whether you want it more realistic looking, embossed or like a sketch.
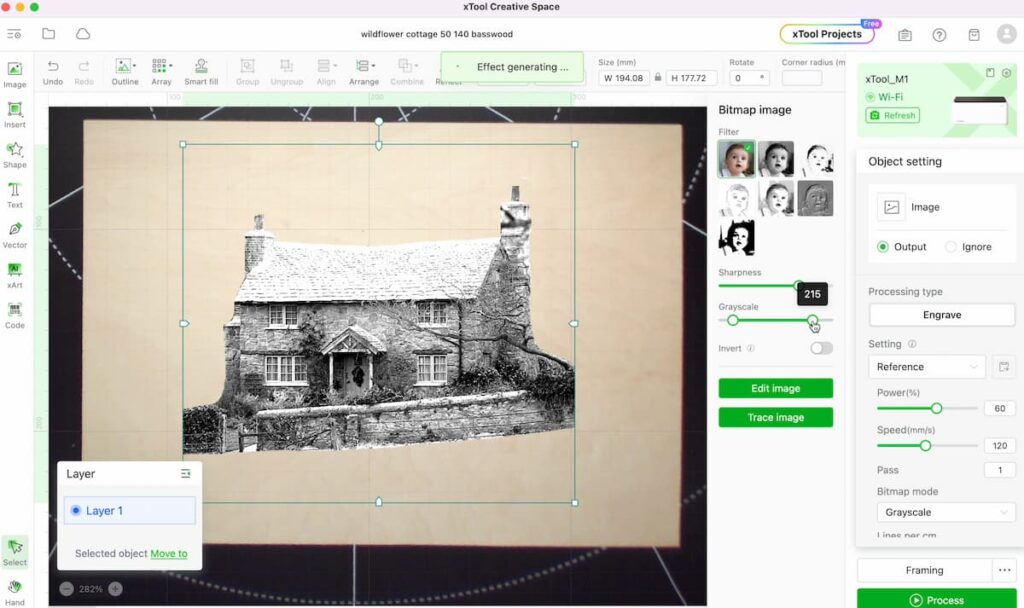
The camera helps decide what size you want the image to be on the material. For something like this project, you could make a lovely ‘Welcome to Our Home’ sign. In which case you’d want the house to be small enough to leave space for the words around the edges.
It took several attempts to get the right settings for the house. Initially, it was too slow. This meant that the darker areas were starting to scorch because the laser stayed in the same place for too long.
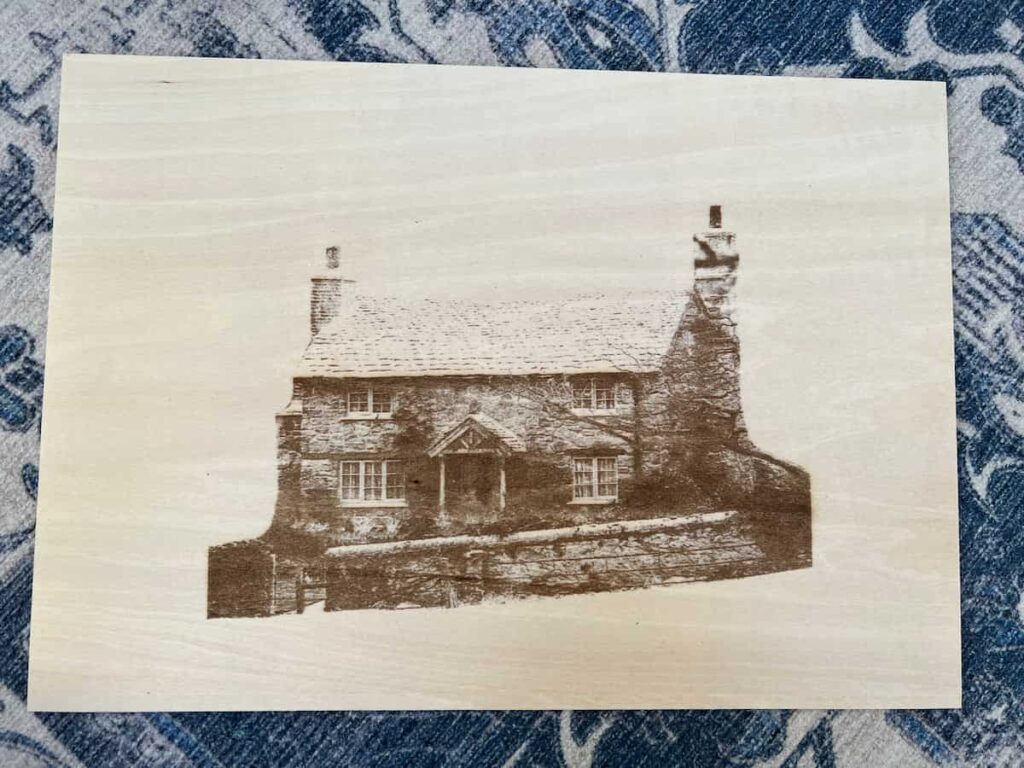
But once the settings were right, the engraved image looked great.
I can imagine a huge market for personalised gifts like this, where people want a lovely reminder of their beautiful home.
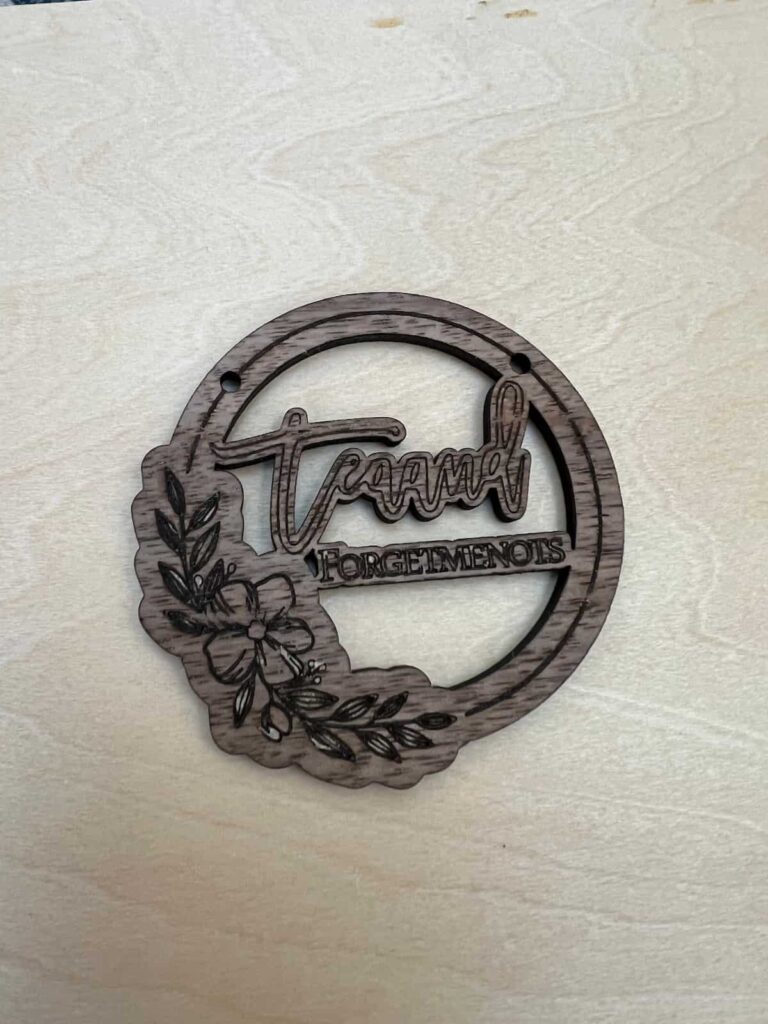
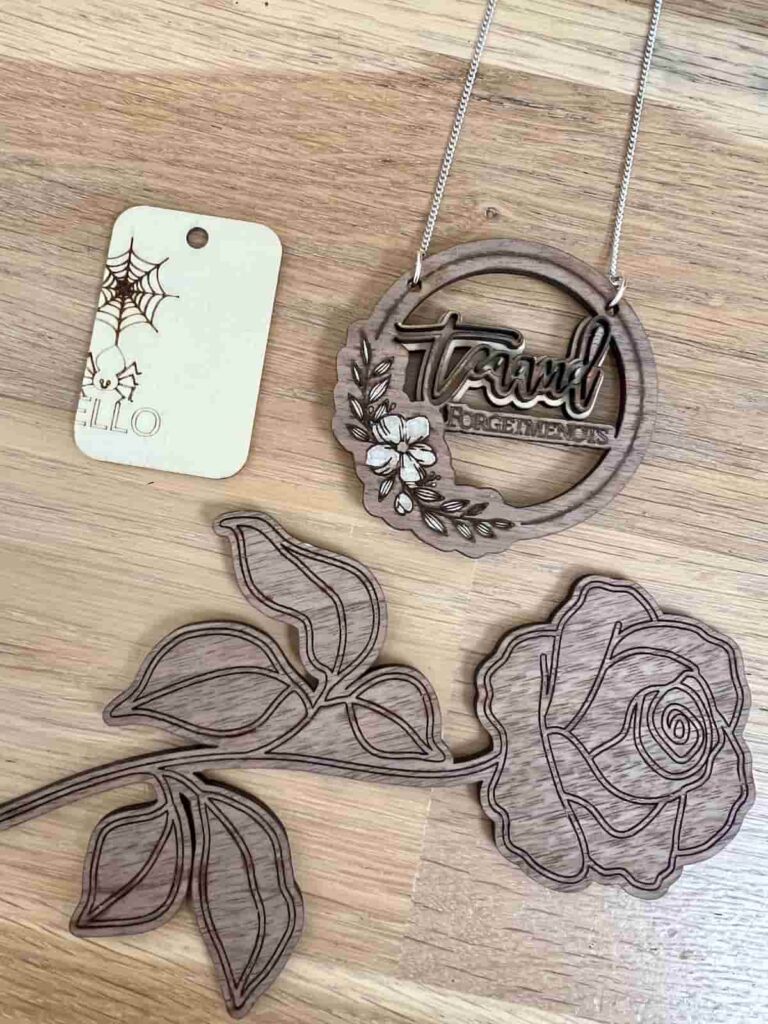
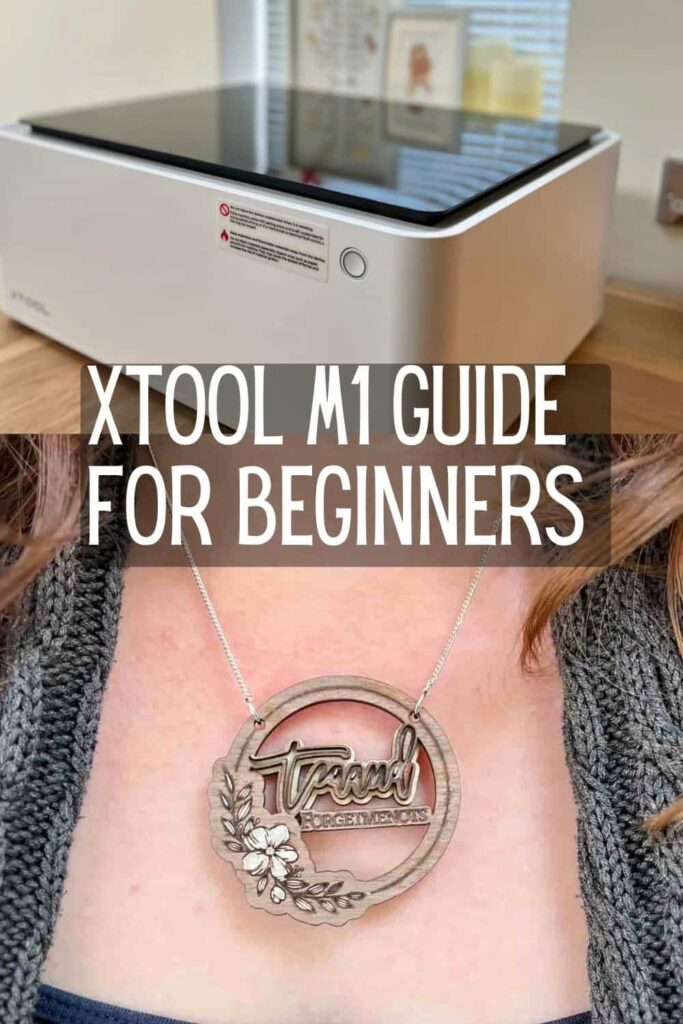
Project 3 – Walnut and Basswood Plywood Necklace
Finally, I wanted to make something with layers. Layers often look the most impressive on laser-cut projects. I chose to use my brand name, Tea and Forget-me-nots and make a layered necklace.
This was the hardest project of the three and took the most time to get the initial layers right. But it’s so satisfying when you start getting faster the more you do it.
Step 1: Bring Design Elements into Work Space
For the shape of the necklace, I chose a simple wreath design in Canva. Then outlined this to make the cut edges larger than the scored design.
I also changed some of the elements from cuts to scores based on how small the details were. You don’t want to cut anything too fine as it won’t be structurally sound.
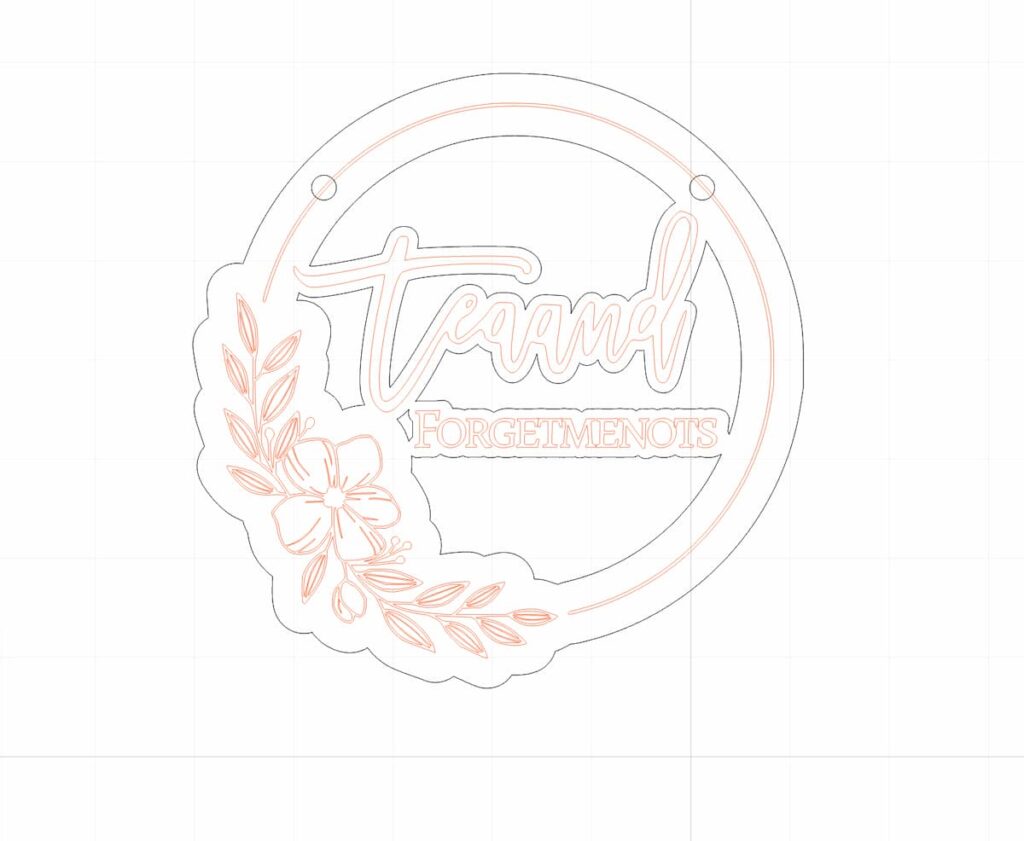
Next, I outlined the ‘Tea and’ words so that they were a shape within the software. This changes it so that it can be cut rather than just as an image which would need engraving.
Step 2: Separate Different Elements into Layers
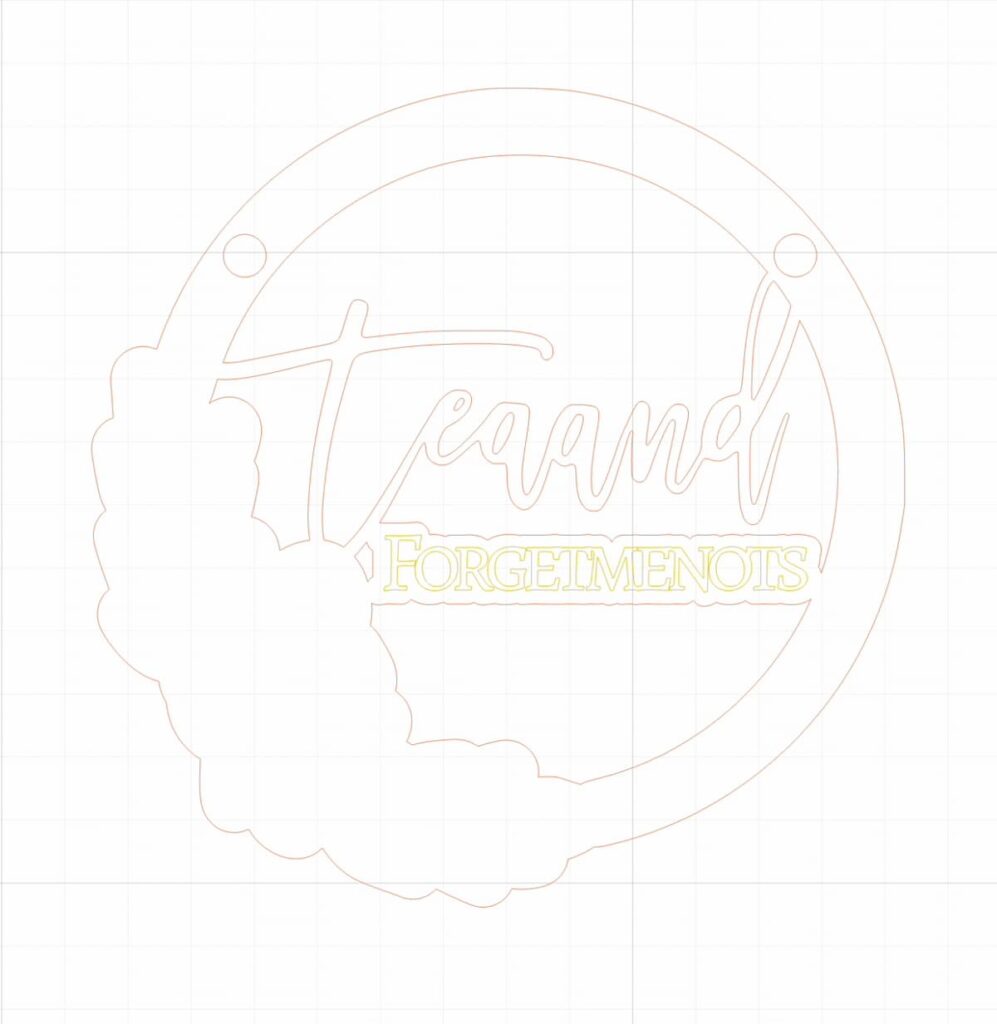
When you have different elements within a design being scored, engraved or cut, it can look complicated. To help, you can move parts to different layers and hide them.
Then when you’re working on one area, you’re not distracted by elements you don’t need to look at.
Step 3: Test Cut and Rework Design
This design went through a few changes until it worked how I wanted it to.
The hardest part of this necklace was working out the right thickness of the ‘Tea and’. It needed to attach to the outer ring, while being easy to read, and have large enough holes for the middle parts of the A’s and D.
Initially, I had another ring of basswood as the background to the piece. But 6mm of wood was too thick for the jump rings to fit through to attach the necklace chain.
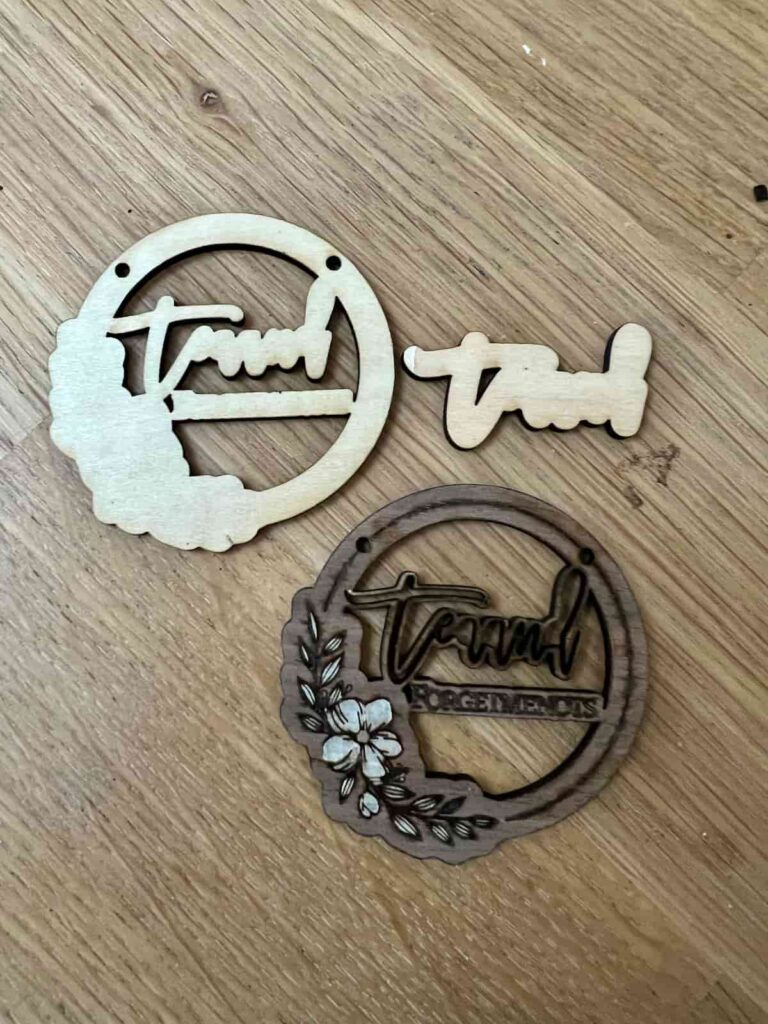
So, I kept the outer ring as a single layer and used the basswood as a background for just the ‘Tea and’.
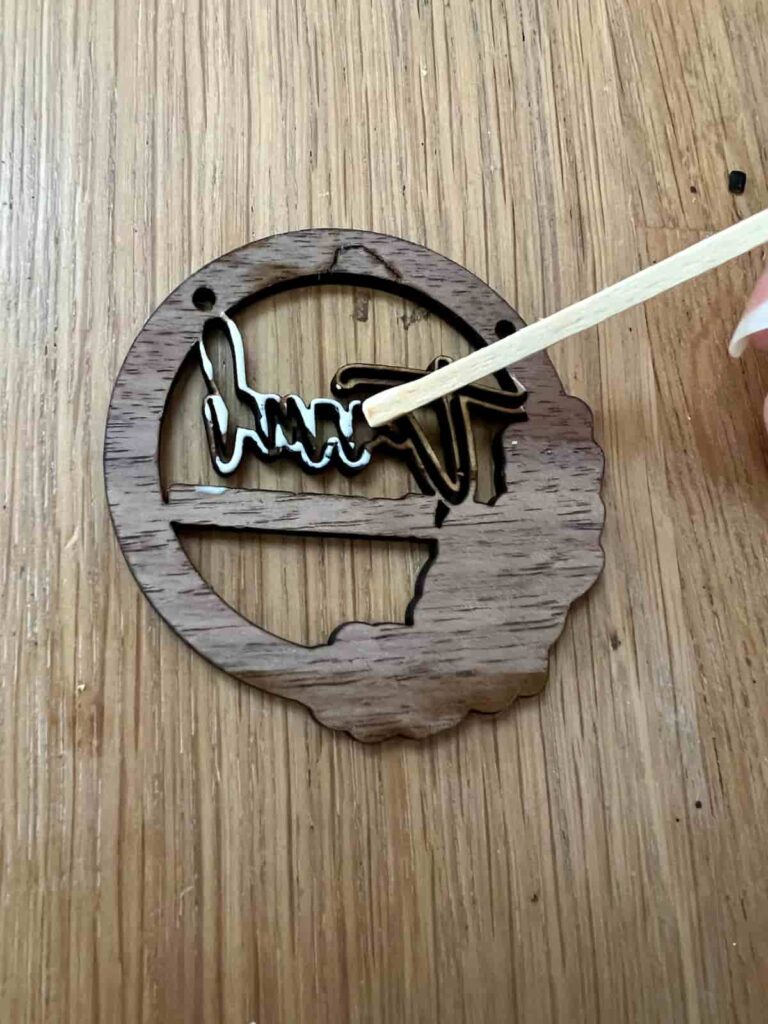
To attach them, you can use Gorilla wood glue.
The Finished Laser Cut Necklace
Wooden necklaces are one of my favourite accessories.
Now that I have a personalised one, it is even more meaningful knowing how I made it.
I can imagine a lot of people who would love a personalised piece of jewellery of their brand name.
And to remind yourself how far you can come in a short amount of time…
My first cut on the M1 machine was within an hour of getting it out of the box. It was a gift tag and I got the placement wrong. Framing is a good idea!
But within a week of dabbling, I was able to create this necklace. Just imagine the possibilities with even more time!
Pros and Cons of the M1
Pros
- Fast to set up so you can get started straight away.
- Easy to use software.
- Built-in safety glass and auto shut-off when the lid opens.
- A wide variety of different materials to cut and engrave.
- Stylish design.
Cons
- Does take time to work out the exact settings for each material, even with presets.
- Doesn’t come with Air Assist as standard. Those who have it often say that it’s a necessary piece of equipment.
- The exhaust hose needs to be directed outside, meaning that a window needs to be open while it’s working. Which is not ideal in colder months. The alternative is buying the additional Smoke Purifier.
- The work area only allows for smaller projects. While you can piece cut materials together, you would need to look at a different laser cutter to create larger projects.
Most of my cons are about the ways to upgrade the M1, and wishing they came as standard.
But the tool still works great as it is and they’re extras for a reason. If not everyone would want or need them, then it doesn’t push the price up by having them as part of the standard package.
The Price of the M1
The price point for the M1, as of January 2024 is £919, reduced from £1,149 ($1,099 reduced from $1,499).
The exact set that I received, with the additional tool for rotary cutting and extra materials is £1,029 reduced from £1,399 ($1,399 reduced from $2,010).
Keep an eye on the exact prices as the discounts and bundles change. Currently, there is an option for a free Air Assist. So it’s worth checking out.
I can’t say that the price is a pro or a con because that is individual to everyone and their budget. And as I was gifted this machine for review, I don’t feel the same need to ‘make my money back’ on it as others might.
For me, it’s a big budget item. But, if you’re in the market for a laser cutter, it’s one of the most affordable out there. If you’re comparing it to professional machines such as the xTool P2 or Glowforge, then it’s much more accessible.
If you are interested, you can get more information and buy the xTool M1 machine here.
Extra Tools
Other tools that are an extra cost and aren’t included as standard include a Smoke Purifier, Air Assist, Riser Base with Honeycomb Panel and RA2 Pro.
The Smoke Purifier allows you to filter the smoke into this machine rather than using the exhaust pipe out of your window. A great thing if you’re working in colder months and need your windows closed.
The Air Assist helps with airflow in the machine while making projects. This reduces scorch marks on the edges of your cuts for cleaner lines.
The Riser Base was mentioned above. It also comes with a Honeycomb Panel. This is an alternative to the triangular prisms that come with the machine. You set your materials to cut on top of these prisms to help with airflow to the material. The honeycomb panel helps with airflow but also catches cut material from dropping to the base plate.
The RA2 Pro is a rotary tool that came with the Deluxe set. It is an optional accessory used for precise engraving on round objects like tumblers. Check back for a review on this!
Overall Thoughts on The xTool M1 Laser Cutter
Is xTool M1 any good?
It depends on your needs. For me, the M1 works as a great introduction to laser cutting. It’s a big step up from my Cricut Explore 2. But this laser cutter is not comparable to that machine as it does a lot more. It’s more similar to the Cricut Maker or the Silhouette machines.
If you’re making different projects like crafts and decor for yourself and as gifts, the M1 is probably all you need.
You may see the questions, is the xTool D1 Pro or M1 better?
If you have larger-scale business needs you might prefer a stronger laser such as 20W xTool D1 or the 40W xTool S1. The higher the wattage, the more high-power and efficient the cuts.
Or if you need the more powerful Co2 laser, you can find that on a machine such as the xTool P2.
In fact, the xTool website has a quiz where you can see which machine is right for you.
This has been a great introduction to laser-cutting machines. The projects have been relatively easy to make. Although I have learned a lot already and am sure there is much more to learn. But it’s the enjoyable kind of learning where you get something fun or meaningful at the end of it.
Next is to dabble with the blade cutting machine on fabrics, as it can cut materials as soft as felt. Then also the slate coasters and vinyl stickers.
I’m excited to share more projects and progress over the coming weeks.
Helpful Resources for xTool M1
Fortunately, there are lots of resources out there to get the best out of your M1 machine.
My Favourite Supplies
Here are some of the supplies that I used when making this project!

xTool m1 machine
A great machine for crafters and small businesses for all sorts of projects.

deluxe materials set
A selection of many kinds of materials to test out projects and get started.
Answers To Your Questions About Making Laser Cut Crafts
xtool m1 how to avoid burn marks?
Two ways to reduce burn marks (when not using Air Assist) are to use masking tape or to dampen the wood before laser cutting.
Where can you get free laser cut files for xTool M1?
There are many sites to get free laser cut files, including the xTools Projects which is accessed from XCS. Other places include 3axis.co and Vecteezy.
If you loved this project, you’ll love these projects too:
do you make laser cut crafts?
I love seeing what you do. Please mention @teaandforgetmenots and share your creations with me!
Pin it for later – xTool M1 Beginner’s Guide

Hi there! I'm Rachel Bowyer, a passionate DIY enthusiast with a knack for transforming the old into something beautifully new. With a deep love for furniture painting, refinishing, and the art of crafting. I've been documenting my DIY projects and restoration journey since 2018. I specialise in techniques like decoupage, stencilling, and decor transfers. Join me as we explore the world of creativity and home improvement, one project at a time.
Wow! How cool is this machine?! It makes such delicate cuts and can be used to create so many varied projects. Love your necklace Rachel, so pretty.
Thanks so much, Maria. I can’t wait to explore it even more.
Amazing! I’ve been wanting one of these (can you tell me how you got yours?….) It’s a wonderful machine for a creative person.
Thanks, Liberty. It is a great machine and so much fun to play with. xTool contacted me.
This looks like such a fun tool to have. I’m not very techy but my son would love it. Our local library has a few machines kind of like this I should check out. Love the necklace.
I love tool libraries, all the fun without needing the space. Thanks for your comment.
Rachel, it’s fascinating to learn about different machines that are now available for home and small buisness use! Thanks for sharing how you use yours and other helpful information.
I’m glad you enjoyed it. It’s exciting the level of professionalism small businesses can adopt now.