How to make an on-trend painted and wood dresser
Have an old dresser you want to update? Here’s how to create the current trend of the painted and wood dresser look.
If you like the modern style. Or your furniture demands a specific makeover to mask its imperfections. Here’s how…
This post includes gifted products and affiliate links so you can easily find the products I use myself and recommend to friends. If you purchase these products, I may earn a small commission at no extra cost to you.
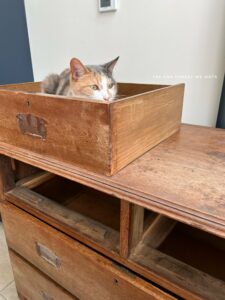
I got this dresser from a charity shop for £50.

It had been in the charity shop for many weeks at £100. Which was over my budget. But I liked it, so kept an eye on it.
One day I decided to say that I would buy it for £50 if they ever reduced it. And on that day, it had already been reduced to £50.
Paint a Trendy Dresser Video
It was meant to be.
How to make an on-trend painted and wood dresser
They did say that the mirror frame was slightly loose and would need a small repair. They weren’t joking!
I was delighted with my new purchase and went to take some before photos of it.
And… crash.
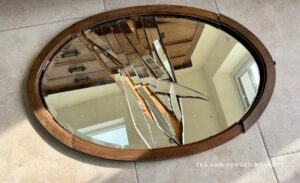
I heard the crash before I saw it. The mirror was on the floor. Smashed.
It was my fault. I didn’t check just how loose the mirror was in the frame. Because I had got it home safely, I assumed it wasn’t urgent to fix.
So this led to the chain of events that determined how this dresser turned out.
You may ask why I didn’t just get the mirror replaced. However, it wasn’t just a broken mirror. Of course, the frame needed repairing. And I also discovered that a leg on a drawer was broken too.
It’s important to know when to cut your losses. Instead of trying to fix everything, I adapted.
This was the last time I made a silly mistake!
I have kept the mirror frame and drawers in case I’m able to use them for something else in the future.
So, by not having the mirror frame anymore, I had to paint the top of the dresser. Because it left big holes on the surface which would have been visible if I’d left the wood stained or natural.
Then as I was sanding back to the raw wood, I also discovered a crack on the side. Which meant that I needed to paint the sides too.
So my hope to keep as much of the wood as natural as possible wasn’t working well.
How do you make an old dresser look modern?
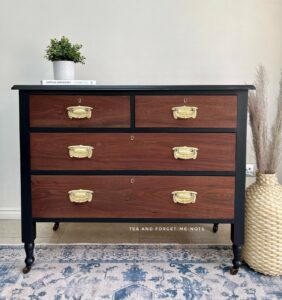
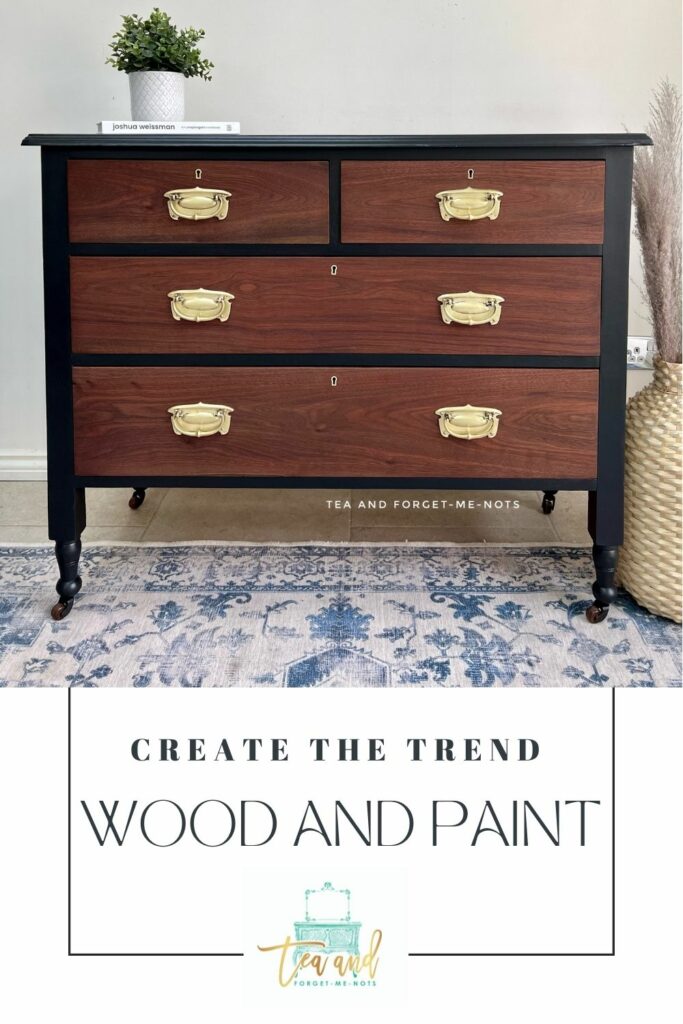
Fortunately, I was able to keep the drawers unpainted. A painted and wood dresser is a very trendy look at the moment.
But the decision not to paint the drawers lost me another choice.
The choice to change the handles. I hadn’t decided that I would change them but now I wasn’t able to anyway.
Each handle had 4 screw holes but as they had also been relocated, there were actually 8 holes in the drawer for each handle.
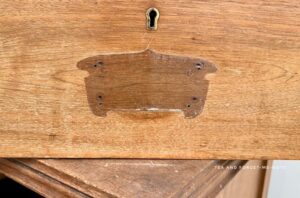
I wouldn’t have been able to fill those holes and not paint the wood as they would have been visible.
So, the frame was getting painted. The drawers were going to be oiled and the handles were staying, but getting refreshed.
I don’t normally explain so much of my reasoning but there was logic to it all. Let’s get into the fun stuff.
Firstly, I did a step that I don’t normally need to do. Vacuuming!
Want to know 23 great DIY tools? Get the list!
Then I cleaned the entire piece with White Lightning. And rinsed it again with clean water.
It definitely needed a good clean.
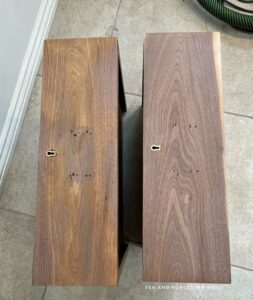
The next step was a long one. I sanded everything back with 80 grit sandpaper to take the varnish off. And continued until it was all sanded up to 180 grit.
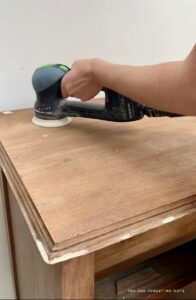
I removed the varnish completely rather than just roughing up the surface because I planned to keep as much of it as natural as possible. However, this was where I discovered the crack in the side panel.
The drawers took a lot of work to get back to a nice even finish. You can see just how blotchy the finish was even after a good amount of sanding.
Here’s how to prepare wood before using a stain.
Sometimes when cleaning a piece, you can tell if it looks like it will cause bleed through. Which is when tannins in the wood show through the paint, like stains. Often if the wood is reddish, it’s a good indicator.
To protect from this, I did a coat of grey primer. I applied it in combination with a brush and a roller. The brush helped push the primer into the grain and the roller smoothed out the application.
How to create two-tone painted furniture
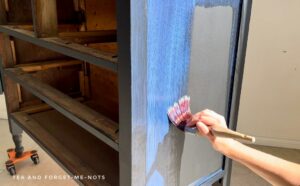
I chose the black paint, Anchor, from the Silk paint range. Silk is all-in-one paint, which includes a primer and top coat. So it’s particularly durable.
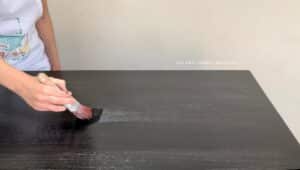
Silk paint is self-levelling and therefore good for hiding brushstrokes. After applying the paint, I smoothed it out with the brush at a 45° angle to the surface. This is another good way of reducing brushstrokes for a clean finish.
I needed three coats of Anchor for perfect coverage.
I placed the dresser on its back so I had easy access to the bottom. Here I added oil to the wheels to help them roll more smoothly.
Which was a great opportunity to get a better view of the underside. I was able to touch up paint that I’d missed.
As the drawers were sanded back to raw wood, they needed protecting. Because raw wood will absorb any dirt or oil.
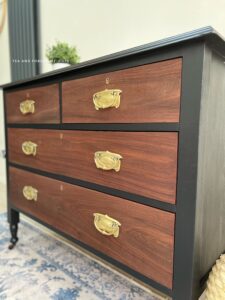
So, to protect the drawers I used Hemp Oil. Which brought out a lovely deep red colour and made the grain look stunning.
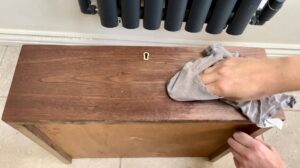
Hemp Oil might be the easiest top coat in existence. I used an old T-shirt to rub it into the wood. If any had been left sitting on the surface after 24 hours, I would have wiped it off. But I didn’t need to.
It gives fairly light protection but is perfectly durable enough for drawer fronts.
I’m so glad I was able to leave the drawers as a wood finish. The original piece was a little worse for wear. Clearly faded from age so did need refreshing.
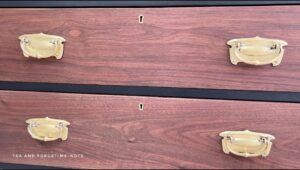
I think that the Hemp Oil on the drawers actually enhances the grain. It makes it stand out even more than the original finish.
I also used Hemp Oil over black paint on this beautiful cabinet.
How to restore original dresser handles
The gold handles were a labour of love. I didn’t think it would take quite as long as it did to clean them.
To start, I used Barkeepers Friend, a cleaning paste good for tarnished metal. I then used a toothbrush and steel wool to get it to work a bit harder.
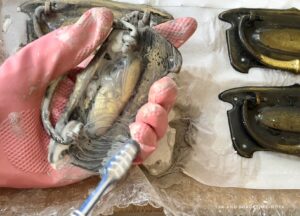
I did attempt the trick of submerging them in Coca-Cola, however, I couldn’t see any difference.
Finally I finished it with another product called, The Pink Stuff. Between the products and my elbow grease, we got there.
It was worth the effort though. The gold is so bright, it really enhances the keyholes.
Another option would have been to add gold gilding wax, like in this transformation.
Reattaching the handles was more complicated than I expected. Each screw hole on the handle was probably hand drilled. Which meant that they were all in slightly different places.
And as there were actually eight holes for each handle, it required some trial and error to find out which handle was in the right place.
But I got there in the end!
Black paint is famously difficult for getting a smooth finish on the topcoat without it looking streaky. To help this, I mixed some of the Anchor with the sealer. Which was Satin Clear Coat.
Being grey, it looks a bit scary applying the top coat as it’s so different to the paint colour. However, as long as you aren’t too heavy with the application, it will dry clear.
I did two coats of sealer in total. And as Silk paint has a built-in sealer, this piece is well protected.
I loved the original piece for its natural wood. But a series of events led to this style of transformation.
Accidents happen. It’s about how you adapt to those problems when they arise, rather than not having any challenges. It’s only furniture after all.
I think both the original and this version are beautiful, just in very different ways.
It’s important to share mistakes, as it helps us all learn.
I hope you enjoyed this painted and wood dresser makeover. If you’d like to see the transformation in action, have a look at my short YouTube video.
If you liked this post, you might also enjoy this wood and black makeover…
Pin it for later – create a trendy painted and wood dresser

Hi there! I'm Rachel Bowyer, a passionate DIY enthusiast with a knack for transforming the old into something beautifully new. With a deep love for furniture painting, refinishing, and the art of crafting. I've been documenting my DIY projects and restoration journey since 2018. I specialise in techniques like decoupage, stencilling, and decor transfers. Join me as we explore the world of creativity and home improvement, one project at a time.
Furniture makeovers are the best! Very helpful tips!
Aw, thank you, Kim!
Love the way this turned out!! You did wonderful girl!!!
Thanks so much, Aliya!
Looks great – I love two tone furniture with wood. It was a project meant to be.
Thanks Rosemary, I like to think so too.
I know this is not what you envisioned at first, but I love how it turned out! I’m liking the wood/painted trend! You did a fabulous job!
Thank you, Donna. Adjusting when things change is half the fun of figuring it all out.