The secret to simple and mess-free distressed furniture
Distressing furniture is messy. This makeover is how to create mess-free distressed furniture with a simple household item.
It’s so easy you’ll be able to do it before you can say ‘shabby chic’.
I found this wine cabinet while I was doing a furniture painting course. The one where I painted these blue and copper shelves.
It was in a charity shop next door and I somehow waddled it back to my car. It was probably entertaining for anyone watching. Me, holding a sandwich, drink and wine cabinet… a pretty standard day.
This post may include affiliate links so you can easily find the products I love and use myself. If you purchase these products, I may earn a small commission at no extra cost to you.
The secret to simple and mess-free distressed furniture
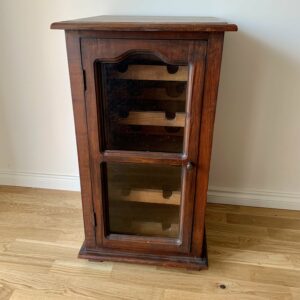
I actually bought it to keep but it didn’t ever fit in my home. But for £10 and the lovely quality that it is, it was still a great find.
Need a gift for the DIYer or upcycler in your life (even if that’s you!)? Here’s my holiday gift guide with some more unusual recommendations.
Repairs
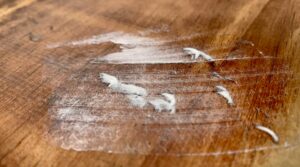
The top had some strange circular dings in it. They were so regular that I think that they must be from use rather than by accident. Possibly a corkscrew or something being used against the wood.

To smooth them out, I applied Polyfilla so that the bulk of the dents wouldn’t be obvious after it was painted.
As I was going for a distressed, aged-look, I didn’t mind some dents but not so many that it looked in poor condition.
After it was dry, I sanded off the excess with 180 grit sandpaper to get a smooth surface.
Base colour
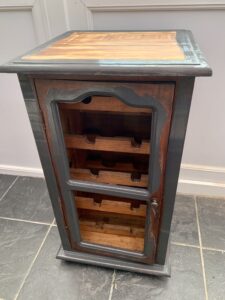
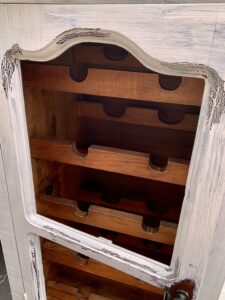
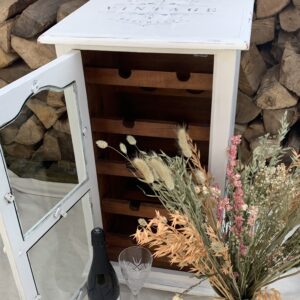
I planned to paint the piece white to make the wood on the inside stand out well.
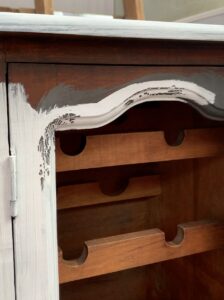
To contrast that light colour, I painted a coat of grey paint around the trim. I put this on the edges where a piece would naturally show wear and tear over time.
After distressing, this grey would peek through the light paint, and give it more impact.
Mess-free distressing
Now, what’s the secret to mess-free distressed furniture?
Vaseline!
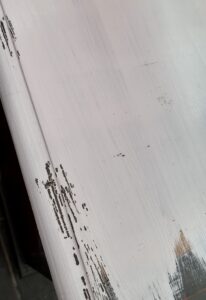
I added a thin layer of Vaseline to the places where I wanted the cabinet to look distressed. Paint doesn’t stick to Vaseline as it creates a barrier so you can easily paint straight over it.
I then applied a coat of BIN Zinsser primer to even out the wood tone before the white paint.
You can see where I’ve applied Vaseline as the primer didn’t stick to it.
You can either wipe back the fresh paint with a cloth to reveal a soft distressed look or wait until it’s dry and be more aggressive with a cloth on it.
Of course, you can get a distressed look with sandpaper also. But if you have several layers of paint on a piece, this creates a barrier just over the colour you don’t want to cover up.
I painted a couple of coats of a bright white paint. It didn’t need too many coats because the primer gave it the base to help reduce the darkness of the wood beneath.
I played around with it until I got the look and contrast I was aiming for.
Making a stencil
I edited a stencil design to make it relevant to my theme and cut it out using my Cricut Explore Air 2.
Some areas had disconnected sections like the loops and the &. As a picture, it works fine. But as a stencil, it creates gaps in the image.
Check out the solution to these holes in my lessons learned mirror stencil post.
In this case, I simply glued the loose holes into place before painting, to complete the image.

Want to know 23 great DIY tools? Get the list!
Measure twice…
I measured the middle of the cabinet top so I would know where to place the stencil. Frog tape is great as corner markers as it doesn’t pull the paint up after removing it.
I have made the mistake before of thinking my stencil was perfectly centred and it wasn’t because the stencil wasn’t centred on the plastic initially. If you make your own stencil, check this so you know where the true centre is before painting.
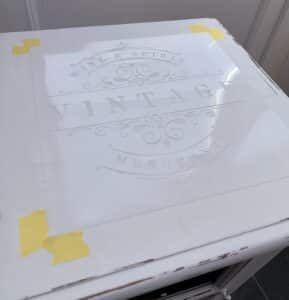
I used stencil spray to lightly glue the stencil to the piece before painting. This keeps it in place more securely than holding it by hand, where it risks slipping. The glue is weak enough that it doesn’t take any paint off after it’s removed.
Did you know that my first ever upcycling project involved a stencil? This is the unbelievable place that it ended up!
The key to stencilling well is having a very little amount of paint on the sponge. Too much paint and it bleeds under the stencil and can’t create a clean line.
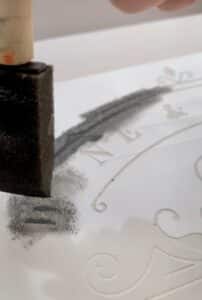
I dab off excess paint onto a tissue or paper plate until there’s barely any left.
It’s better going slowly, rather than having to fix it later.
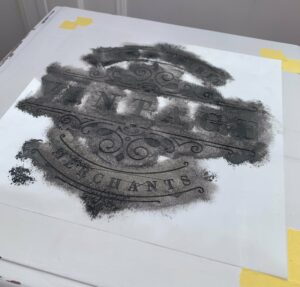
I wasn’t worried about it being perfect because I was going to sand it to add to the distressed appearance. If there are gaps though, you can touch it up with a small detail brush.
Speaking of details, what do you think of my cherry blossom stencil project?
I sealed the whole piece with Polyvine’s Wax Finish Varnish, to give it more durability.
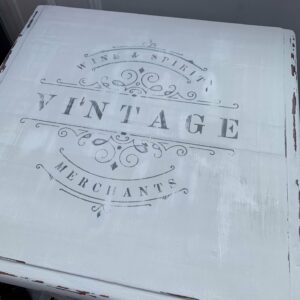
Aged, like a fine wine.
I like the contrast of the white against the dark wood of the inside. It’s certainly an easy way to distress the paint without the mess of sanding.
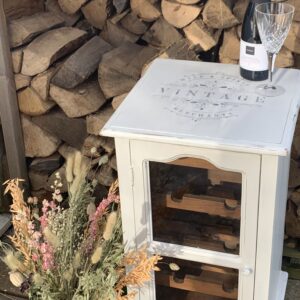
I think it would be charming in a little cottage kitchen.
What do you think of mess-free distressed furniture using Vaseline? I’d love to know your thoughts and experiences.
If you liked this post, you might also enjoy my other stencils projects…
Pin it for later – the secret to mess-free distressed furniture


Hi there! I'm Rachel Bowyer, a passionate DIY enthusiast with a knack for transforming the old into something beautifully new. With a deep love for furniture painting, refinishing, and the art of crafting. I've been documenting my DIY projects and restoration journey since 2018. I specialise in techniques like decoupage, stencilling, and decor transfers. Join me as we explore the world of creativity and home improvement, one project at a time.
Pretty cabinet, love the stencil. I had a feeling it was Vaseline. I have done this on furniture before too.
Ah good knowledge! Did you like how it worked for you?
That is such a cute little cabinet. Who knew Vaseline would do the trick!
Thank you, I was amazed when I discovered it!
A great transformation!
Great tips!! I needed this!!
The end result of this makeover looks so good! I’ve heard of using Vaseline to distress furniture but have never tried it.
Thanks! Vaseline is definitely an easy option and if you don’t like it, easily removed and fixed.
Beautiful! Love the stenciling on top. Works perfect for the piece!
Thank you, it was fun to try out.
Love learning new things! Thanks for the idea 🙂
Me too and there’s always something new!
Absolutely perfect! I have a cottage kitchen and I would love that piece tucked into a corner. And love the technique…I’m all about easy and mess free!
Aww thank you. Easy and mess-free are my dream goals!
What a great make over! Turned out great! I love the stencil! Thanks for sharing!
Thanks Kimberly 😄
So many great tips! What a genius method. Thank you for sharin!
Thanks!
I like this wine cabinet distressed look. i learned abut vasiline from a fellow shopper at Luckett’s spring market a few years ago. Works so well!
Brilliant, isn’t it? Thanks.