Make An Easy Easter Egg Wreath DIY With Real Eggs
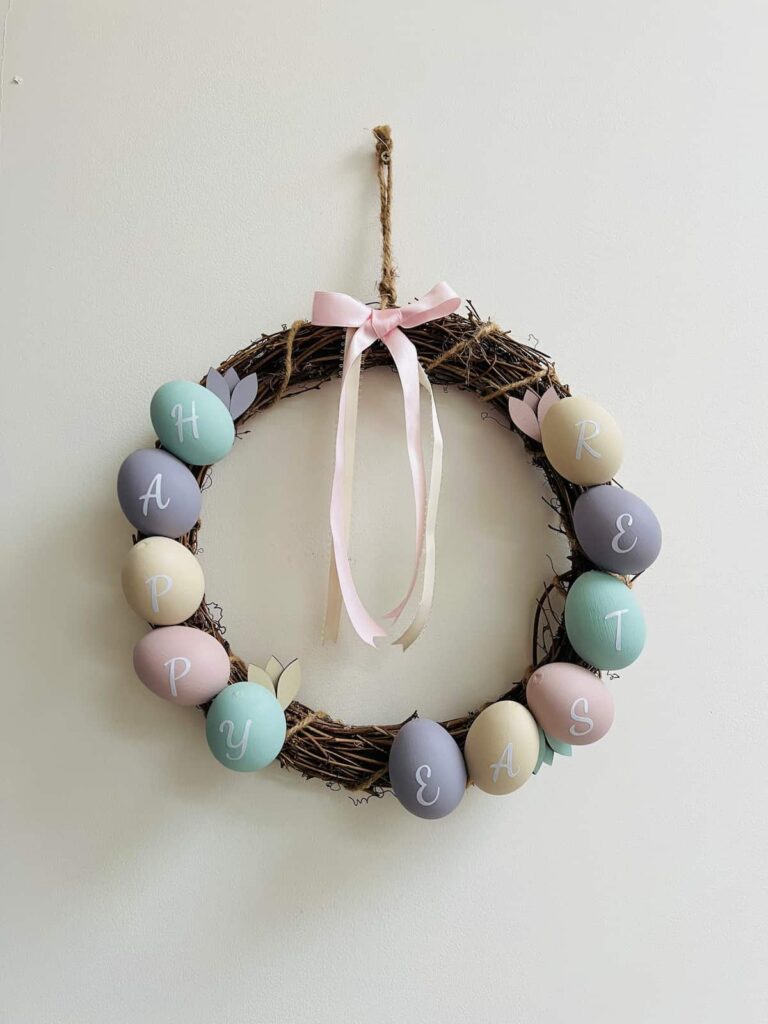
Learn how to make an Easter Egg Wreath
You can do a similar project with wooden eggs or plastic eggs. The advantage of plastic eggs is that you don’t have to be as delicate when assembling or storing the Easter wreath. And it’s something that younger children can get involved with making.
The downside is that plastic eggs are harder to paint as the surface is slick. Then there’s also often a plastic ridge to hide.
See the Full Step-by-Step Easter Wreath Video Tutorial
Creative Craft Hop

Welcome to our Creative Craft Hop hosted by Sara from Birdz of a Feather and Donna from Modern on Monticello. I’m are so glad you’re here! If you’re coming over from Southern Sunflowers, welcome! Wasn’t their Spring wreath beautiful?
How to make an Egg Wreath Easter Craft Step by Step
Materials you’ll need
Step by Step Instructions
Step 1: Easter Egg Wreath Supplies
This easy DIY Easter wreath is very budget-friendly. Especially if like me, you have a wreath base from last year that you can reuse.
I’ve used this wreath base for so many wreaths now. And even then, it only cost £1.60/$2 as it was on sale.
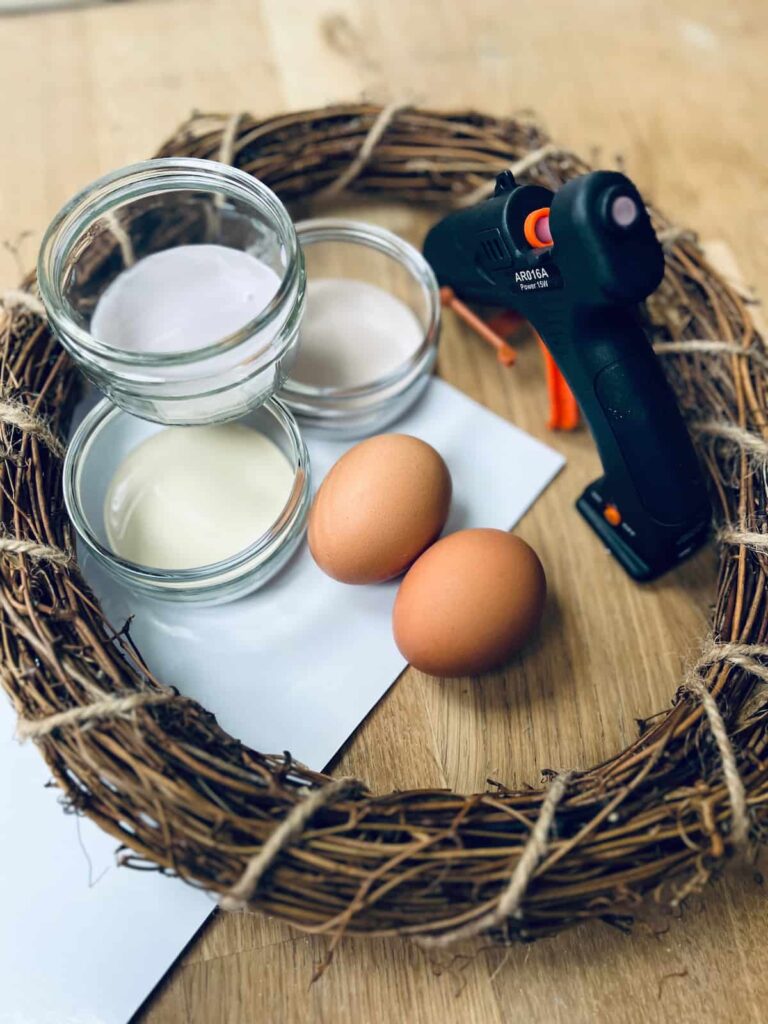
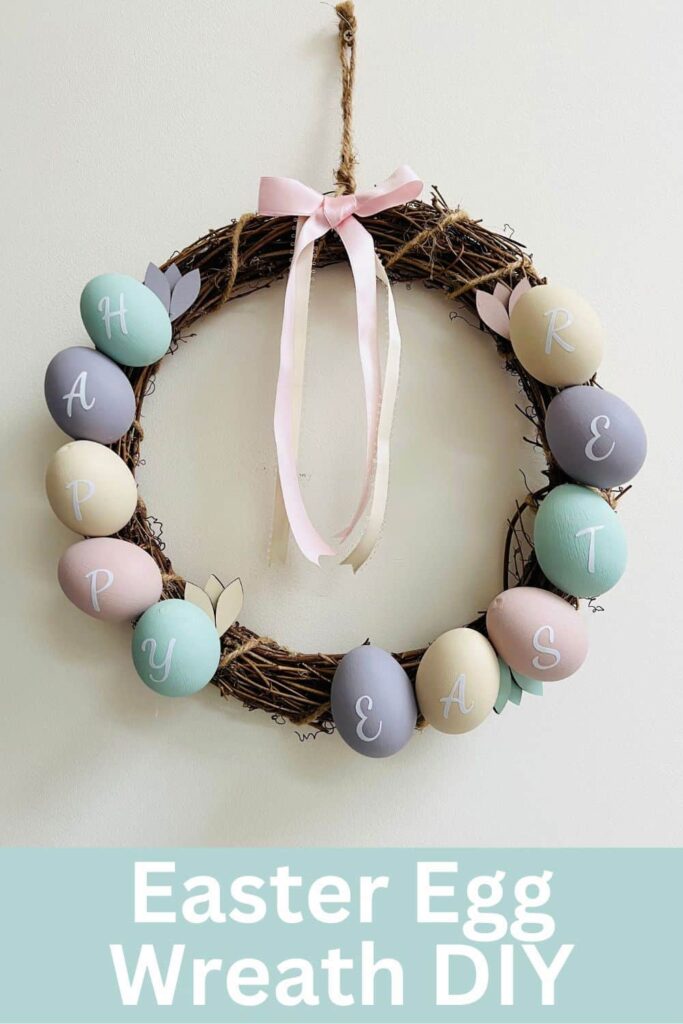
As well as that, you’ll need 11 eggs and a glue gun. The rest are little additions that you can probably find in your craft stash, such as ribbons or trim.
The finished simple Easter wreath will be delicate because it is made with real eggs. But that’s also what makes it extra special.
Step 2: How to Prep Eggs for Use in Decorating a Wreath
If you’re using real eggs in your Easter wreath, the starting point is to prep them first. Raw eggs or hard-boiled eggs will spoil after a week or so.
Personally, if I’m putting time and energy into making a craft project, I want it to last so that I can reuse it. If that’s you too, then you’ll need to clean the eggs out first.
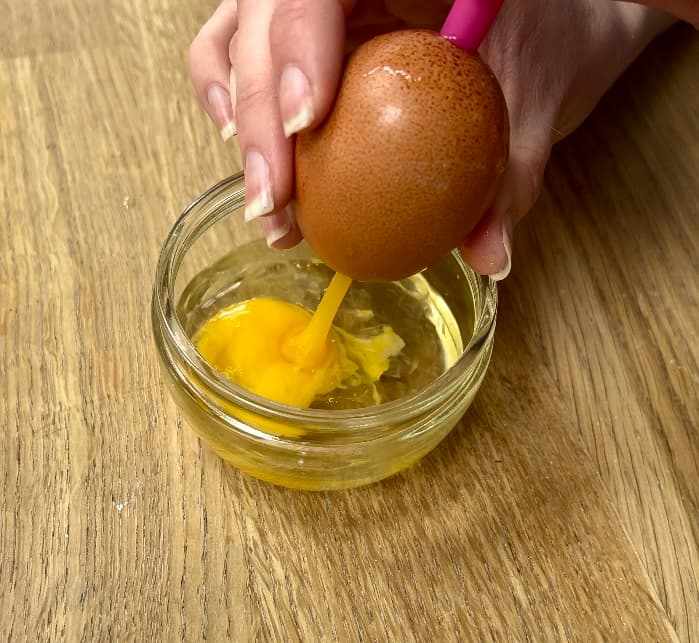
Here’s a tutorial on how to clean your eggs properly before decorating. In brief, you need to:
- Make a small hole in the top and the bottom of the egg
- Use a toothpick to break up the yolk inside
- Use a straw to blow air into the top hole, so that the yolk comes out of the bottom
- Rinse through with water until it runs clear
And remember to save those eggs. The ones from this DIY Easter wreath made some delicious omelettes!
Step 3: Painting the Eggs for Your Easter Egg Wreath
Because of their shape, painting eggs can be tricky. They like to roll around and it’s hard to dry them without a painted surface touching something. But, I have a good solution!
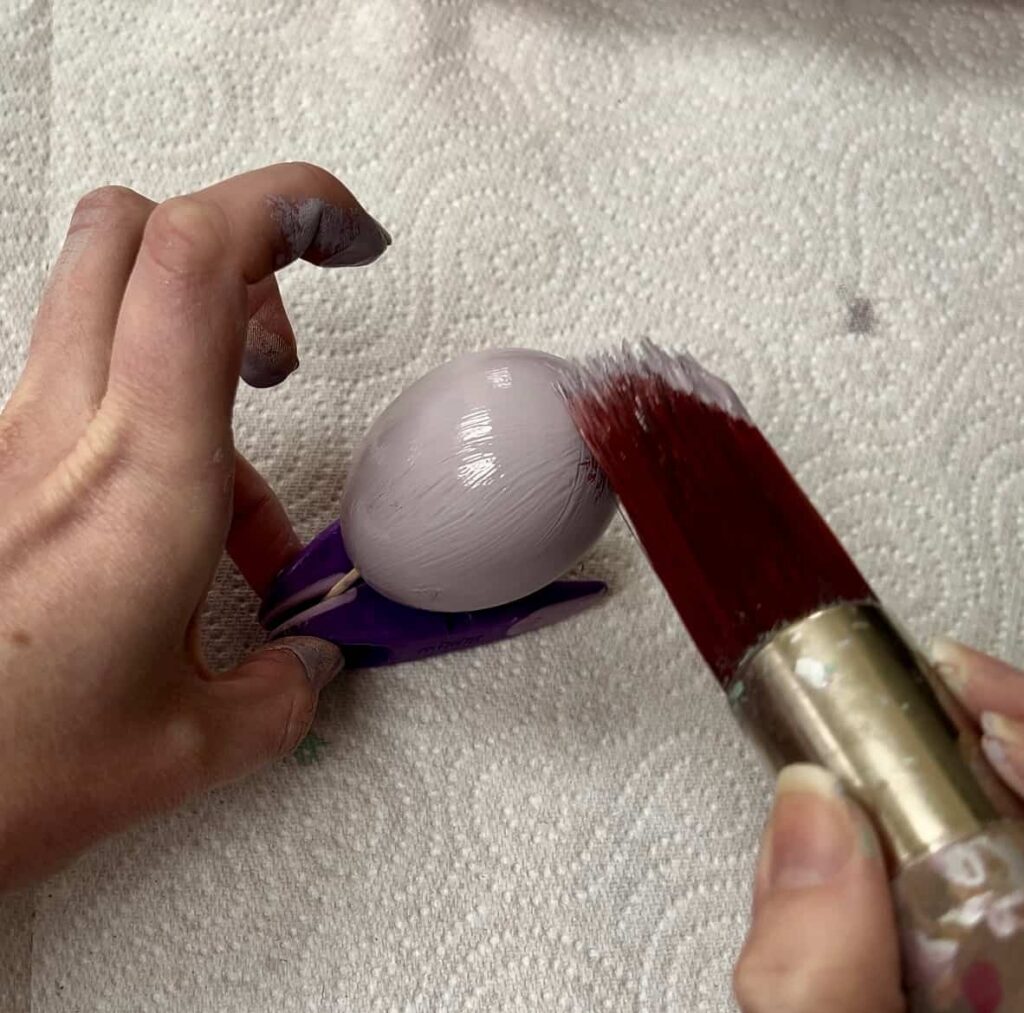
The best way to keep them in place is to use a toothpick and peg.
Start by holding the egg between your finger and thumb and paint the bottom. Paint as much of the egg as possible while holding it, without touching painted areas. Then put the egg bottom side down (the painted side) onto a toothpick so that it is supported by that and the peg.
Then go over the missed areas until the entire egg is painted.
Leave them to dry on the toothpick and follow the same steps for coat two.
Depending on the paint you use, is how many coats you’ll need. I used these beautiful pastel paints in purple (Morning Sunrise), yellow (Sand Castle), green (Sea Glass) and pink (Conch).
Only the yellow paint needed three coats. The other colours had perfect coverage after two coats.
Step 4: How To Attach Eggs to the Wreath
As there are holes in the eggs, you can secure eggs to the wreath with floral wire. But if you use a hot glue gun then you have more flexibility with the placement of the eggs.
You just need to hold them in place on the wooden wreath frame until the glue sets.
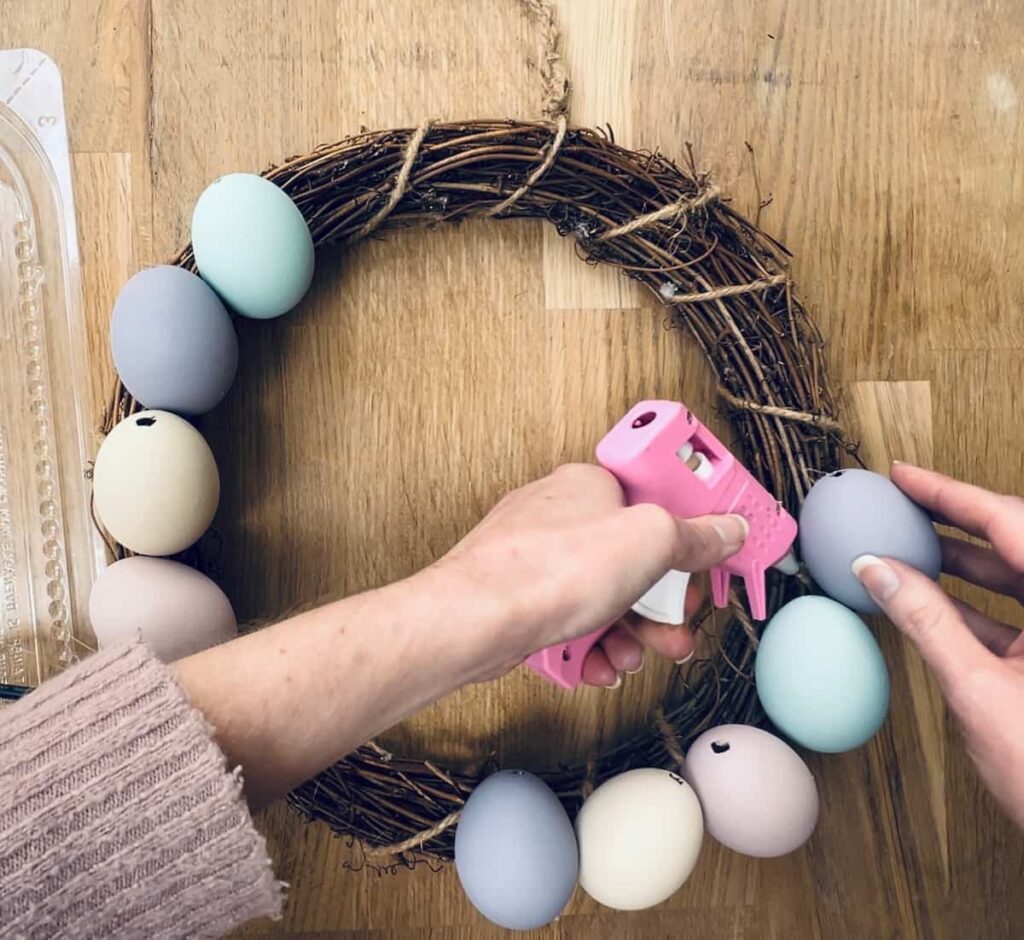
Glue works well to secure the eggs because they don’t lie completely flat. I placed these in different directions and slightly raised them to give them more dimension.
If you have a combination of both larger eggs and small eggs, plan your layout before painting them. It will look best to mix and match the different sizes and colours into groups.
Step 5: Add Letters to Decorate Eggs
If you’ve got a steady hand for lettering, you can paint or draw on the letters of ‘Happy Easter’. Personally, I don’t trust myself not to make them uneven or wonky. So, I cut out the letters on sticky PVC using a blade-cutting machine.
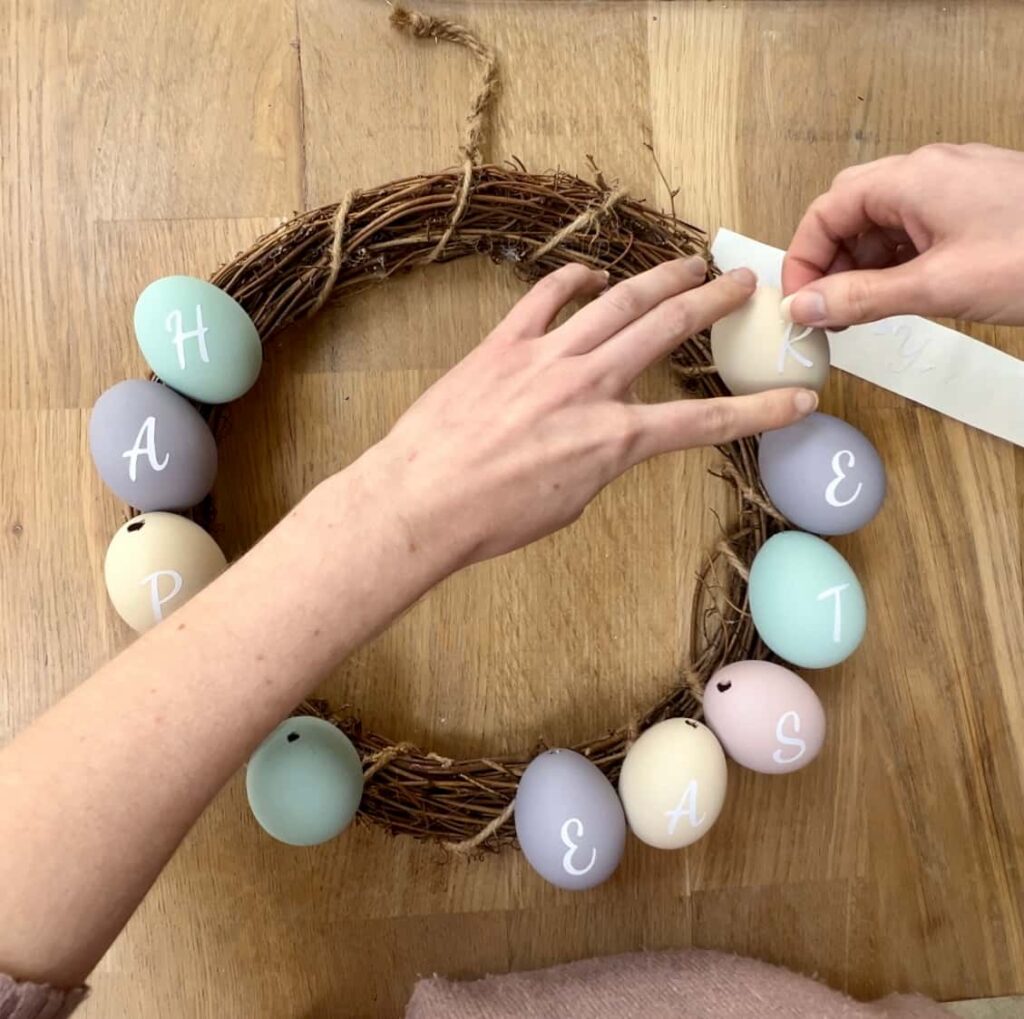
It’s a good idea to not adhere the letters until the eggs are attached to the wreath. This is because if the eggs don’t attach in exactly the place you expect them to, the letters will be wonky.
So, best to attach the eggs first and the letters after, to ensure they’re straight.
Step 6: Hide the Egg Holes
You can see from the above photos that some of the holes in the eggs were quite large. There are a few simple ways that you could hide these holes. You could add bows, sticky gems or flowers over the top.
As I didn’t want to detract from the simplicity of the pastel eggs, I filled the holes with wood filler. You can do this before or after painting the eggs. I did this after the eggs were attached in case I needed to secure the eggs more firmly with wire.
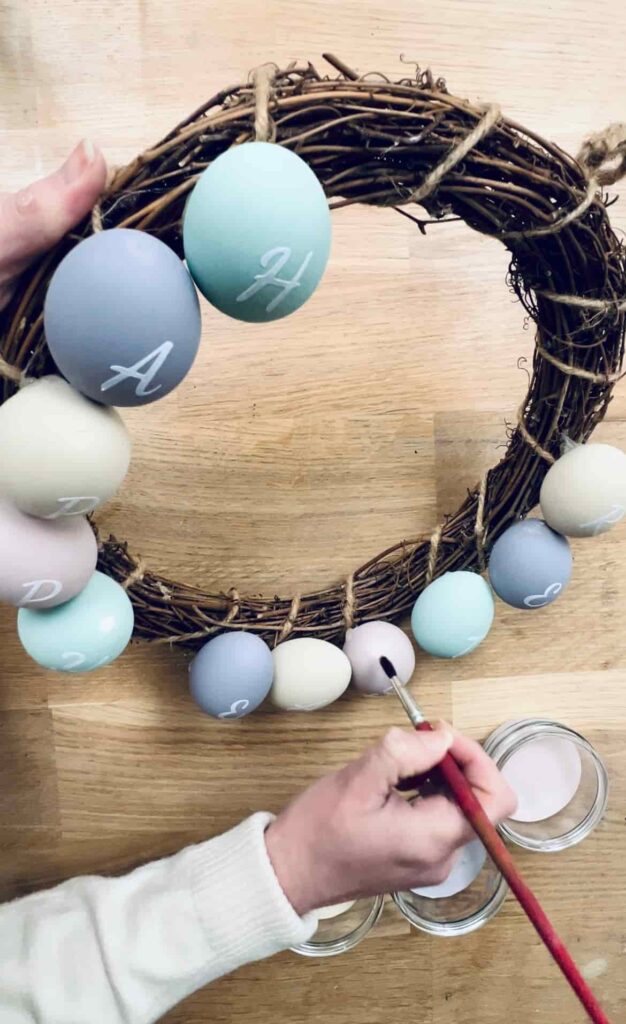
Add the wood filler to the hole with a lollipop stick. Then clean up any excess from around the edge with damp paper towels. Leave the wood filler to dry then paint over those filled areas.
Step 7: Add Extra Decorations to the Easter wreath
Now the main decoration of the wreath is in place, you can add a few embellishments as finishing touches. There are all kinds of things you could add here. A little bit of ribbon, faux flowers or bunny shapes.
I like to repurpose things wherever possible. These almond-shaped pieces of wood were leftover scrap from a sun catcher project. Some of them had holes in the bottom but nothing that couldn’t be disguised by how they were placed on the wreath.
To make a flower-like decoration, you can glue three pieces together. With two overlapping a bottom piece. They were painted in the same colours as the eggs, so each colour had one flower.
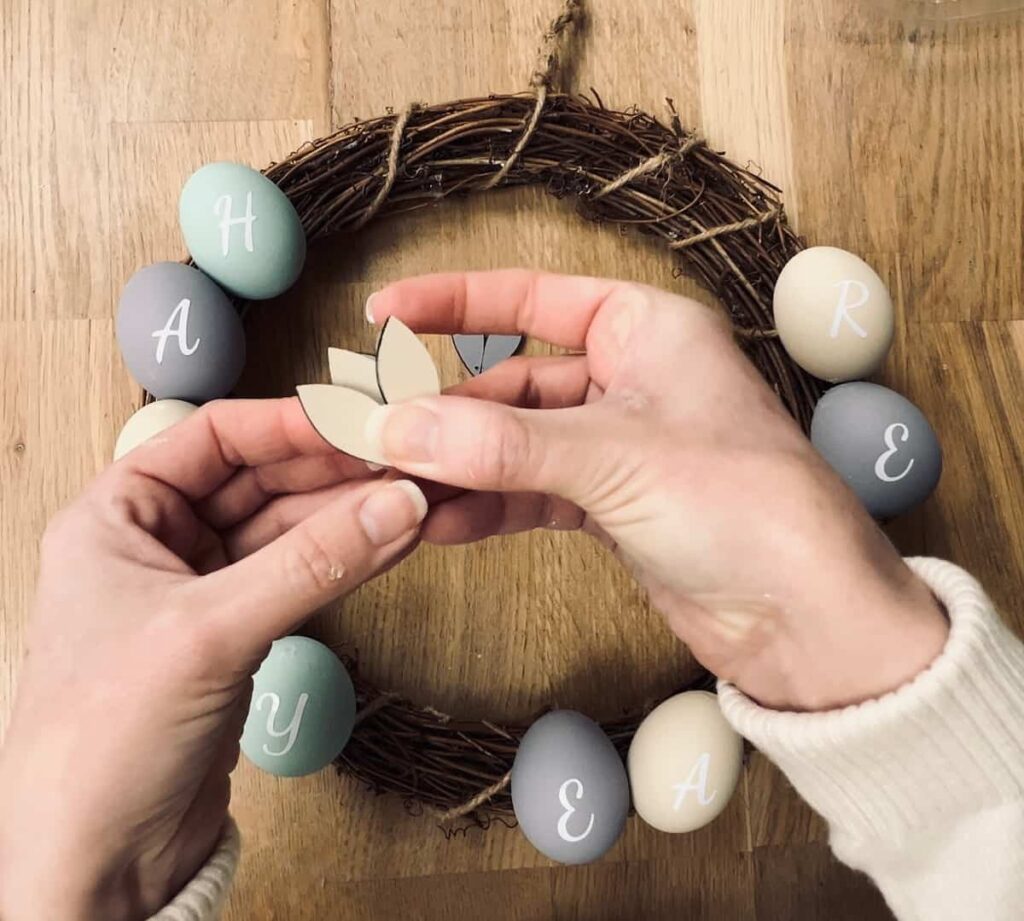
You can place flowers around the wreath so that they poke out of different areas. They have more visual interest if you place them next to an egg of a different colour.
For the finishing touch, you can add ribbons. These look best with similar colours to the pastel eggs. Such as lilac, pastel pink and yellow. To tie a ribbon, make two loops and knot it together.
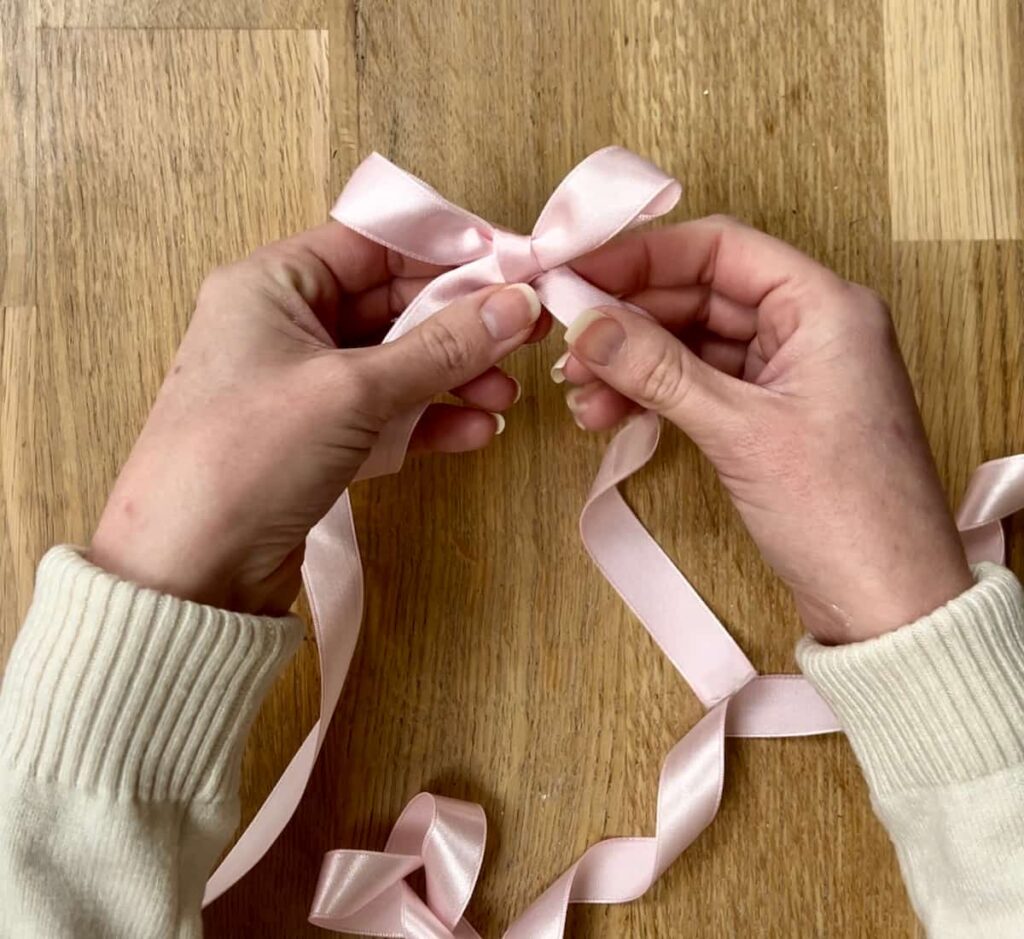
You can add additional thinner strips to bulk out the ribbon. This gives it more depth and ties the colours of the wreath together. The thicker strips you use, the extra plush look you’ll be able to create.
Pastel Egg Easter Wreath DIY
This is such a pretty DIY Easter egg wreath. The colours are delicate and fresh. The little flowers and ribbon accents add a touch of whimsy. It’s all about embracing the gentle, Springtime feel.
While it takes a bit of time to clean the eggs out, as long as you’re using them for a recipe, it’s a good use of both the food and the shells.
This cute wreath is a lovely way to welcome someone to your front door. And will bring a smile to their face in the sunshine and warmer weather.

How can you store a delicate wreath like this? To protect the eggs, it should be stored somewhere like a hat box. Or even somewhere with a microwave lid on top, to protect the eggs.
With different adhesive stickers, you could even turn each egg into an Easter bunny.
Answers to your questions about how to make an Easter wreath
Q: What do you put on an Easter wreath?
A: Typical elements of Easter decor that you can use for your wreath are bunnies, carrots, chocolate eggs, or flowers. Light, pastel colours that reflect Spring and new life are also easy ways to celebrate the time of year.
Q: How do you decorate your front porch for Easter?
A: As well as a door wreath, you can create an Easter sign, easter baskets filled with plastic Easter eggs, or anything with a bunny shape.
If you loved this project, you’ll love these projects too:
Did you make this craft?
I love seeing what you do. Please mention @teaandforgetmenots and share your creations with me!
Pin it for later – Easter Egg Wreath DIY
Creative Craft Hop
Now it’s time to check out this amazing Terracotta Carrot from Decorate with Tip and More. When you’re done, please remember to visit these other amazing talents below:
- How to Upgrade a Spring Wreath for your Door
- Terracotta Carrot DIY
- A Bowl Full of Bunnies
- Easy Update For A Cute Pillow With Pom Poms
- BHG Inspired Beaded Flowers
- 3 D Flower Art Canvas
- Easter Flatware Holders
- How to make a Chinoiserie Planter for a Handmade Topiary
- Design Your Own Fabric
- From Thrift Store Frame to Spring Wreath in 15 Minutes

Hi there! I'm Rachel Bowyer, a passionate DIY enthusiast with a knack for transforming the old into something beautifully new. With a deep love for furniture painting, refinishing, and the art of crafting. I've been documenting my DIY projects and restoration journey since 2018. I specialise in techniques like decoupage, stencilling, and decor transfers. Join me as we explore the world of creativity and home improvement, one project at a time.
This is so pretty Rachel; I just love that you recycled the shells to make it! Thanks for the great tips on how to paint, store and assemble these. You thought of everything to make it easy to replicate
Thanks Sara. It was important to me that the eggs were used so it was a win-win.
Your wreath is so pretty, Rachel. This reminds me of my childhood. We ‘blew-out’ the eggs, painted them and hung them on a tree branch that was brought inside. Good idea to hide the holes with wood filler!
Thanks, Ann. Yes egg blowing definitely has that traditional feel to it. Simple but satisfying.
Rachel, your wreath turned out so pretty. Love how simple it is but gives a door or wall the perfect touch for Easter.
Thanks so much, Terrie.
Your Easter Egg Wreath looks so pretty and tranquil, Rachel! I love the soft spring colors you chose for the eggs! Thanks for including all the special techniques involved with using real egg shells! I’ve never had any luck with removing the eggs yolks for projects! I certainly will try your way! Thanks again!
Thanks Gail. If you try it again, let me know how you get on.
Rachel, this is beautiful! I love the appearance of the real eggs–pinned! Blessings, Cecilia @ My Thrift Store Addiction
Thanks, Cecilia.
Your Easter wreath is adorable Rachel! Using real eggs is tricky, thanks for the tips and tutorial~ so clever of you to use wood filler to disguise the holes. I love the little leaves and soft pink ribbon. Great idea to store it in a box for protecting the delicate eggs. Happy Spring and Easter!
Thanks, Jenna. Wood filler seemed like the natural fit!
Rachel I LOVE how soft these egg colors are. So elegant!!!! Great job and thanks for sharing!
Thanks, Tammy. Pastel colours were an easy choice as they’re so pretty.
You have made a stunning and very special wreath. I learned a lot just by reading through this post, things I am glad to know just in case I give in to the temptation to pull my new carton of eggs out and try these wreath out. Thanks so much for sharing it.
Haha thanks, Donna.
The subdued pastel color scheme is so pretty and looks wonderful against the brown grapevine. Great tip on how to fill the egg holes.
Thanks, Allyson.
Very cute – my husband saw an egg wreath on someone’s door and asked why I didn’t have one. Well, no answer but I do have a pretty floral. Sometimes if I’m painting or decoupaging an item, I use an old wire rack for drying.
That’s a good way of doing it.
LOVELY!!
Don’t forget to join us over at the Creatively Crafty Linky Party every Wednesday through Sunday
Followed and Pinned!
Creatively, Beth
Rachel, I never in a million years would have thought of using real eggs for a project like this. How clever. It turned out so pretty. Love the pastel colors you chose.
Thanks so much, Carol.