How to upcycle a small table for the second time
Here are two ways to upcycle a small table. One makeover is teal and gold and the other is dark and moody. Which do you like best?
Not every project can be a success. And in this case, I had to upcycle a small table twice.
I believe that there is the right buyer for any piece. Any quality, any price or any style, eventually someone will buy it. You just have to have enough patience and let enough people know about it.
How to upcycle a small table for the second time
Patience is a virtue
For this piece, I decided to redo it after it hadn’t sold at The Barn for three months. It wasn’t long, especially as there were various lockdown restrictions due to the pandemic during that time.
It’s important to me that pieces don’t stay for too long at my retail space, as it doesn’t reflect well. Especially with a more unusual piece like this, repeat customers would see it over and over.
Between that and the fact that I didn’t have much invested in it, I was happy to do a quick makeover.
So for this post, you get two transformations in one. I’ve included the initial makeover, as well as the redo. You can see which you prefer.
If you like dark colours, have a look at this stunning black cabinet makeover!
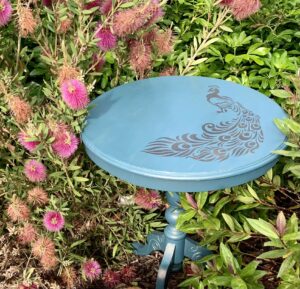
The original
The first time I made over this small table was when I used it for my project at a furniture painting course. I bought it for £3 at a charity shop.
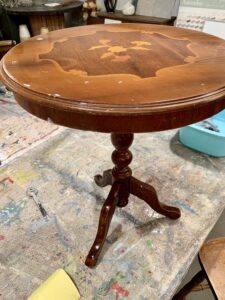
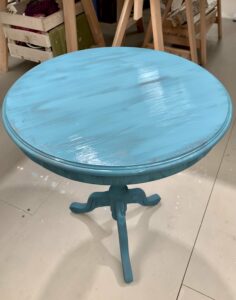
Autentico ran the painting course and this was my first time trying their chalk paint. I chose the teal colour, Byzantine. You can see how completely different the colour is when it’s wet to how it looks when finished.
This post may include affiliate links so you can easily find the products I love and use myself. If you purchase these products, I may earn a small commission at no extra cost to you.
After two coats of paint, there was just time to seal the piece with Autentico’s Sparkling Gold Wax. The gold wax gave it a beautiful shimmer in the light.
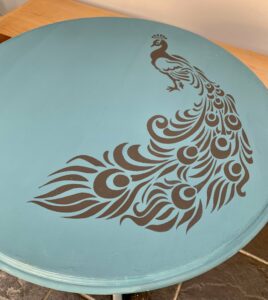
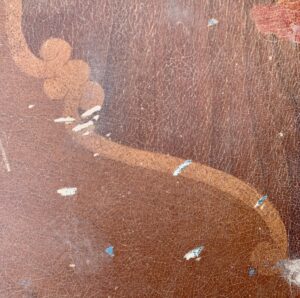
I added a peacock stencil when I got home to make the top more interesting.
Stencilling, decoupage or anything more ornate does limit the potential appeal of a piece, so if you’re painting to sell, keeping it simple is often a quicker way to success.
The final piece – round one
But, it didn’t sell quickly and while I wasn’t feeling impatient, it was time to give it another chance.
A new beginning
So, back to the start…
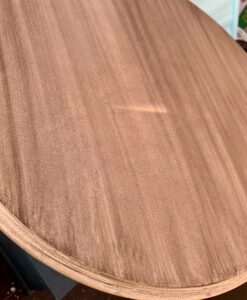
I used a random orbital sander to get back to the wood. There were a few dings that were still visible so I filled them with Dixie Belle’s Mud to get a nice smooth surface.
You can paint over Mud but if you’re staining a piece, it’s best to colour match the Mud to your piece. Mud comes in different colours and I have brown.
Often once a coat of paint or primer goes on, that’s when further dings become visible. So I did another round of filling after the first coat of BIN primer.
Primer is essential when painting from a dark to light colour, as I showed in this beautiful bird cabinet makeover.
Want to know 23 great DIY tools? Get the list!
As I planned to stain the top, which is translucent depending on how many coats there are, it‘s important to start with an even-coloured surface to get a good finish.

To perfect the top I also did an extra step of painting two quick coats of Fusion’s Raw Silk.
I didn’t take a photo of this step but you can see the colour in this chest of drawers transformation.
Staining
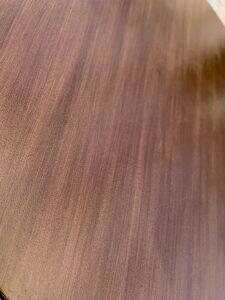
I didn’t know how many coats of Fusion’s Stain and Finishing Oil in Cappuccino I would use. I just continued until I was happy with the result.
I’ve used Cappuccino several times, most recently on this blue bookshelf and it gives such a rich, warm colour to the wood.
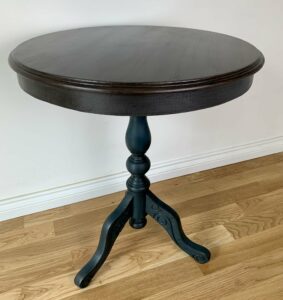
This was after the second coat of stain. It was tricky to get a consistent colour due to the ridge around the edge of the tabletop but I think the variation works well and gives it character.
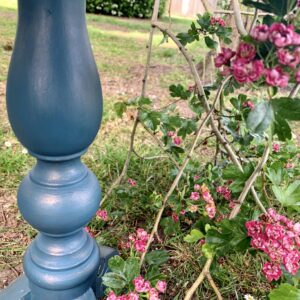
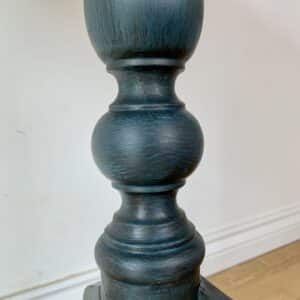
The base
As you can’t put anything other than wax on top of wax, the gold was still slightly there. I covered most of it up with black wax but the odd glimmer adds another dimension, which I like.
The overall look is now more rugged.
The final piece – round two
The piece has gone from quite feminine, with gold, teal and a bird, to more masculine dark browns with black detail.
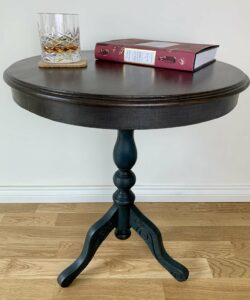
I can picture it in a study. We just need a leather armchair, a roaring fire and a dog and I think we have a perfect combination.
What do you think? Do you prefer the teal peacock table or the chocolate version? Or even the original with marquetry, which was interesting too.
It just goes to show, there’s no one right answer. If it doesn’t fit the bill straight away, it’s another opportunity to be more creative.
If you liked this post, you might also enjoy this one about how to paint a layered stencil…
Pin it for later – upcycling a table twice


Hi there! I'm Rachel Bowyer, a passionate DIY enthusiast with a knack for transforming the old into something beautifully new. With a deep love for furniture painting, refinishing, and the art of crafting. I've been documenting my DIY projects and restoration journey since 2018. I specialise in techniques like decoupage, stencilling, and decor transfers. Join me as we explore the world of creativity and home improvement, one project at a time.
You are so talented! Both tables look amazing! My mother-in-law used to raise peacocks, so I’m a bit partial to the first one! Have a great day! Donna
Wow, that sounds like a noisy endeavour! They are beautiful though.
Wondering if the table sold after the second re-do?
MrsSW
Hi, actually I kept it for my home, funny how things work out!